Thursday, November 29, 2018

Seeing Colour :: Where to begin

imageHow we see colour is definitely a complex subject. There is more than the relatively straight forward physics of light at various frequencies. Much of the so-called Colour Science is focussed on this, and is about matching colour (specifically the Hue). However there is a lot more to understand how Human Vision works, and what we call colour. This itself has two components a Physiology (to do with the vision apparatus, eg retina, rods,cones) and the Cognitive Psychology (to do with how the brain creates our concepts of colour)

imageI was fascinated that Tony Northrup was so surprised by his own user blind poll of the colour quality of various camera and Lenses. He compares their user ratings with a “colour science” study of the cameras using colour calibration charts. This evaluation really covers the transmission of light through the lens and onto the sensor, comparing known colour charts. This is all good science but that’s as far as the study goes, from the subject through the lens and onto the sensor. Yet Tony’s subject where looking at photo of common snapshot style subjects, and their vision was adding a lot to how colour was perceived, including their personal biases (including brand loyalty.

Thus I will begin a series of blog post about seeing colour, armed with the schematic hand drawn diagrams above and some context from Tony’s “Best Colour Science” You Tube Video. I trust that as I developed the discussion of seeing colour you too will understand why peoples’ perception of colour quality often differs from the “Colour Science

Watch for Tony’s great quote “Colour is like Wine”


Saturday, November 24, 2018

Yet another subscription “offer”

It has taken me a little while to get OneDrive setup on my “rebuilt” Window 10 Desktop, and guess what? Yet another advert for a subscription to office 365!

I had previously found the way OneDrive current works, made it suitable for an online archive of my better photos (well until both the computer I had it installed on  effectively died).

image

Of course Not now. Microsoft still allow free OneDrive access and as I have used OneDrive for a long time, rememeber windows Live? so I have 15GB of Storage rather than the 5GB you get if you set up an account now. {thinking to myself I wonder how long free cloud access/storage is going to last}

BTW The photos were always safe in the cloud, it was just complex to access them via the web.


Am I the only one to think the cloud, all these interconnected apps and lots of individual subscriptions are making things more complicated to get even simple task complete.

Friday, November 23, 2018

Dynamic Range and keeping colours real.

The HDR method has become notorious for crunchy texture and oversaturated colour. However it doesn't need to be like that.

When I took the test photos for yesterday’s post, I also took a couple of bracketed sets with both my Pentax and Olympus cameras and the RAW format version were processed in the same default manner in Aurora HDR 2019. This new version of the software analyses each photo in the bracketed set before they are combined into a HDR extended dynamic range and bit depth format. Syklum, the developers of Aurora, call this the Quantum HDR Engine which in part uses AI technology to find the scene style and key objects and then adjust tonal balance and colour to ensure detail in the highlights and also details in the shadows. This seems to produce a very natural tone mapped image. This can also do a nice job off just one RAW image providing it is reasonably exposed. My experience (less than 2 months so far) has been you can save the image at this time and be happy with both the tonal balance and colour rendering looking very natural

Example of Aurora HDR 2019 screen

On the Aurora screen you then see “Filters” (collection of related sliders that can adjust key aspects of the image) om the right hand side and “Looks” (aka presets, which are specific setting of the filters). The Looks tiles along the bottom of the Color Filter Panel controlsscreen will let you experiment with different approaches to the tone mapping and possibly lead you into the those oversaturated, crunchy HDR looks, so I’ll avoid then for now. At this stage I was happy with the tonal balance but felt to colours could be stronger (looking at the colour wheel). This is an important step, rather than use the Saturation slider in the color filter (which increases the saturation of every pixel by the same amount) I used the Vibrance slider slightly (which leaves the fully saturated colours alone and only lift the saturation of lesser colourful pixels). I also increased the Color Contrast, this slider adjust the relative contrast between colours in a similar way to the normal contrast slider works with tone (luminance). It is my experience so far that small adjustment of this slider to expand colour contrast can have a big impact on how natural the resulting colour balance appears, In other words used Vibrance and Colour Contrast lightly but keep you hands off the saturations slider.

Pentax HDR Image Olympus HDR Image

The images above compare the resulting HDR image for my Pentax K20 (one the left) and Olympus OMD EM10iii. Like the straight out of camera jpegs the Pentax HDR image is a little underexposed compared with the Olumpus but the colours are still natural but a little richer than yesterday’s Jpegs.

Thursday, November 22, 2018

Returning to Colour (but not Calibration)

I got distracted from my colour oriented posts by a few issues (ok I was whinging a bit). I was planning to look at colourimeters and some of the commercial colour calibration systems. I actually don’t use them, not because I don’t they work. I think they are expensive and may not work the magic most people perceive that will perform. I believe you are better to  understand how colour can be used or you have an application where absolute colour matching is critical (eg for consistency across a Photobook, or fabric colours in fashion photos). So I going to finish with just leave you with the two important calibration steps of Monitor Contrast & Brightness and Tonal & White Balance. It is my strongly held belief that once you master these two related issues you are likely to the 75% of the way to getting reliable colour from your photos.

You can do a fair bit to improve captured colour in camera (plus 5-10%), most modern digital cameras will have good defaults when rendering the JPEG files and they pass through all the colour settings in their RAW formats. However it is definitely worth getting out your manual and reading up on “Picture Mode” and/or “Screen Mode”. Different Camera Manufacturers use different terminology but Picture Mode, normally convers Contrast, Sharpness and Saturation, and these might be groups under names like VIVID, NATURAL etc. Whilst Screen Mode can either be simple Icons on the mode dial or a number of options that best matches your camera to the type of scene you wish to capture with names like SUNNY, SHADE, MARCO, NIGHT, PORTRAIT. Both these approaches can alter how colour is handled so you will be wise to take a few test shots to find the best setting for your style camera. While the manual is out, have a look at WHITE BALANCE options. For outside in daylight the default setting are likely to be fine but for indoor flash you might try calibrating your white balance with a grey test card before you start taking your photographs.

Taken with a Pentax K20 in VIVID picture modeTaken with an Olympus OMD EM10iii in VIVID picture mode

These photos above are both jpeg straight from the camera (Pentax K20 on left with Olympus OMD EM10iii on the right)and using the same setting, and while the exposure seems a little different both have clean colour rendition. Cameras and even models in the same brand can have subtly different colour renditions and getting the style you want straight out of the camera can save you having to do a lot of post processing work. It is theoretically possible when taking RAW images to recover poor exposures and achieve a wide range of styles and renditions, but that will take time and skill.

So the final big step, which if well applied could easily get you a further 10-20% of the way to controlling colour) are related to how you post process the image.

However be warned that saturation slider could take away most of the colour reality!! (eg-80%) and leave you with a sickly sweat over-cooked disaster.

Post processing of colour is a big topic and will be covered in a number of posts to come.

Wednesday, November 21, 2018

What has happened to Photobucket?

I thought it might be a good idea to research a few alternatives to flick. I’m still convince I’ll keep a free account and scale back to obey the 1000 photo limit. Photobucket was what I used in the early days of this blog as a place to post photos that was easy to embed them in this blog. It was perfect for the job back then but once I started using Flickr I moved my embedding there for a while (no longer a good idea.) before going to google (and the many iterations (Picasa web Albums, Google+, Google Photos). Its an ongoing dance

Well guess what today at least the site is down.

image

A little more disturbing is photobucket’s recent history and attempts to placate its customers. Also if you want to embedded your images elsewhere (like on your own website or blog) it appear to have to upgrade to an annual subscription! I was a little horrified and this is a reason to not consider photobucket as a viable alternative place to share your images

What a Difference

Last week I posted this photo on both Flickr & Instagram. It was related to last week being National Recycle Week (in Australia) and I had been gardening

PB170003_2


The viewing/favourite stats for the post couldn’t be more different! This morning Flickr shows 9,259 views, 59 faves & 6 comments. Whereas Instagram only has a single like.


imageimage

So what is going on? Is it the square crops or number of followers (on flickr I have 208 on Instagram 140). Has flickr been watching my honest assessments of them in this blog recently and taken pity on me? No. Actually its easy to explain, the photo was included in Explore flickr’s special page/gallery selected based on a photo’s interestingness score, flickr’s own measure of what might constitute a popular photos. There are lots of complaint that getting included had become very competitive with many attempts to “game” inclusion. Mainly flickr has done a good job moderating and it is a good place to find decent photo although I have seem many recent complaints that it is just lots of “wee birdies” which might in part be true. The reality is extra exposure becomes self fulfilling, to go viral people must first be looking.

I have had several of my photo and a couple of drawings included in Explore over the years and seen the sudden rise in views and favourites, a nice jolt for my self-confidence. However I don’t go chasing being included.  Mostly I agree with the photos selected but this one has surprised me. It was a pretty rough and ready set up on an out door table my hand pushing the shutter button still covered in dirt, every thing except the tomato seedling went straight in the composite bin. Just a momentary opportunity.

Tuesday, November 20, 2018

A long time in recovery

This has been 5 month in recovery! Since having to do a reset after the last Windows 10 upgrade, I had been limping along not able to reinstall office of this computer and just using office on my little HP spectre, which recently suffered its second cracked screen (after no obvious cause) and is now unusable. I was thus forced to look at reinstalling office on my main computer (a HP desktop).

I spent a couple of frustrating hours trying to navigate the Microsoft on-line Support, which kept sending me to irrelevant FAQ posts. So eventually I tried the on-line chat, which took a while but quickly isolated that the Key I was trying to use was invalid. The same message I kept getting trying to do the install from disk. The culprit was an unfortunate crease in the product label that made a 6 look like a G (a times 10 magnifying glass was helpful here). So my faith in Microsoft has been somewhat installed. Probably only as far as the next unstoppable windows 10 upgrade.

FYI After the install I was asked to finish the install on-line but that just took me to a webpage advertising Office 365 and its yearly subscription. As I am retired I am avoiding anything that requires and annual subscription!

Monday, November 19, 2018

Way too many subscriptions

I feel myself getting slowly painted into a corner. Many of the software tools I would like to use or upgrade are now only available via subscription. For a retired old guy that would have to come out monthly from a very tight budget, so I would have to sacrifice some other expenditure, some more important living expense just to use something I probably have already purchased or use for free. I do understand that software is generally licenced (ie you don’t own it) but most used to come with a licence for perpetuity. You might get bug fixes and minor update but significant upgrade would need to be purchase (upgrade usually being attractively riced compared with new purchases).

On the weekend photowalk I discussed this dilemma with others and one decent suggestion was to try and combine them (eg Going Pro on Flickr list discounts for Adobe Create cloud (and Blurb)) So I set about investigating going pro and my early recollection of an early join up in November seems to have evaporated (along with specific figure of the actual cost, which I remember, because I noted it down) of ~$6/month of USD$49.98 per year (the full price not the discounted one). It does mention 15% Discount Creative Cloud, but checking the Adobe site claims such a discount has expired. OK! Not encouraging.

Then I started looking in the Flickr Help forum for details, firstly see Don MacAskill thread, which is links to other threads. The thread is closed implying that direct feedback is not welcome. I started to read the Grandfather Pro pricing thread and There are many alarmed (aka Angry) folk, part of which was an unfortunately worded email to those on the $25/year deal, which seem to imply the new price was $50/year for the result of this year and then $100 in 2019. It really was saying they will have to pay the $50/year from now on of $100 for two years, but ouch!

None of this has convinced me to pay annual subscriptions, I’m going to stay away for any such deals and I am now certain I will have to stitch with a free account (and will have to reduce my number of photos posted)

Tuesday, November 13, 2018

David Hockney’s thoughts on the Art of Seeing

Those coming to the next Sketch Crawl, Sunday 18th November (there is still time to register at eventbrite) might like to view this BBC documentary which covers much of David Hockneys views on photography and the important Art of Seeing. The documentary does run for almost an hour and mainly covers Hockney’s revised inspirations from landscapes and lead up to Hockney’s Bigger Picture series of landscapes. The PhotoWalk/SketchCrawl is based around many of the same issues. So this You Tube is not only a very interesting in itself, it is also great context for the walk.


The harder to look the more you see.

Monday, November 12, 2018

A small crack but a big disappointment

At Big crack in my faith in HP, as well as a small crack in my screen.I loved my little HP spectre but last week I opened it and found the touch screen didn’t work, and deeper investigation revealed a small crack across the screen towards the base. This is the second cracked screen in under two years and in this case the computer definitely hasn’t been mishandled. It was sitting on my desk and I opened it in the same careful manner I always used. The cost of replacing a screen in Australia about a year ago was around AUD$800. Ouch!!

The spectre can be turned on and off, the touch screen doesn’t work and it works with the mouse but with multiple mouse icons that jump around the place. Its effectively unusable.

However then I started to look on the HP forums to see if there was other repair options and what I saw was an avalanche of similar problems, most after no obvious rough handling or damage.I've blur out my email address but where is the lick or instructions to change my password? With the only conclusion that HP spectre x2 & 360s are prone to unexplained cracking. Suddenly I am thinking twice about spending more on a computer that is at risk of yet another crack without any mishandling.

Then I tried to explain my story on the HP forums, and despite spending a couple of hours to try and log in, get a new password (I got an email without a link to change my password, shown on the right). Then I tried to set up a new account on the forum and you guessed it! Error!

The only HP advice I could find was where to find a dealer or HP repair service to replace the screen, or screen damage is not normally covered under warranty, and I looked around a lot, enough to kill my faith in HP.

Captureh-p error

Ok I’ve lost the ability to warn other HP users but I am still able to tell this story my colleagues and acquittances, those I train and the readers of this blog. Why should I pay a lot to give HP a third chance. Its my money and I’m not. Am I likely to recommend HP gear to others, I really doubt it.

Sunday, November 11, 2018

Creative Commons and another sting in a free flickr tail

imageI have been a fan of the Creative Commons style licencing for a long time and use the creative commons licence on most of my flickr posts. I learnt very early that most people ignore these so I am also careful not to post of Flickr or any social media photos that I want to sell or otherwise don’t want copied. My licence is for Attribution (the figure in a circle graphic) which means its free to use if you attribute me as its creator, it is also NonCommercial (the dollar sign with a strike through in the second circle) and Share Alike (the anticlockwise circular arrow in the third circle) which means it can be shared but must not be altered.

51075027_53736347ca_oFor example the 5 fingered hand was posted on flickr over a decade ago, it is of course a crude photo manipulation and a bit o fun to create.  If you do a reverse image search in google images  or tin eye you with find hundreds of uses of this image. Clearly only one (my flickr post) is attributed to me. It has been used on the cover or an Indian Rap record (commercial) and is recognizable in many modification (ie. not share alike). All these are violations of the creative commons licence.  Looking at the stats it has had 2688 views but only 1 fave and no comments. Which makes me concluded that a large proportion of the Flickr viewers paid little regard to flickr’s licencing and probably no real effort has been applied by flickr or the creative commons group to enforce such licences.

On the up side, there are several example of people who obviously have read the licence on other photos of mine and reached out to me wanting to share this photos on blogs, book covers, and tourist information (I have allowed most and all attributed me as the photographer). So the creative commons licence system can work but requires people to acknowledge the creative commons licence. Unfortunately in my experience they are a very small minority. 

Is the answer legal enforcement (I doubt it), shaming the thieves (“feeding the trolls” doesn’t work on the internet because it just gives them more hits) or Education (yes I believe thats the only way.) Unfortunately way to many creative people who want to truly share and collaboratively work with other are being taken advantage of. This is a big #FAIL for Flickr and pretty well all social media, So guys don’t put your head in the sand, start educating.

So I am very sceptical of the latest post on Flickr’s blog about not deleting creative commons images. I certainly acknowledge that allowing creative commons licencing is a great thing (for example google used to in the picasa web album days but no longer do in google photos) and it is the best way to correctly share images (something I am not against and in fact I encourage), Also having the licence details clearly visible as logos and easily access the find out what the means (vis the Some rights reserved v link , which means there is no excuse for those incorrectly reusing the photos. It all sounds nice but in practise I can’t see evidence of any enforcement of attempt to educate. For me I only see this as a kind of pale grey-mail to get me to pay yearly for a pro account. I have more than the thousand photos allowed under creative commons licences photo and if flickr won’t deleted them I would get looked out of posting any more photos. Specifically I see this as not share any extra photos. Such is Life

Sadly it probably means good bye most of my creative common photos I will have to delete you if I want to stay active on flickr and I apologise to any legitimate uses if that causes distress (just contact me and I am sure you can legal still use of any of my image). However I am now even more resolved not to pay an annual fee to just share my work with others (at least not on flickr). Also don’t expect to see my best work on Flickr any more.

Sorry Don MacAskill if I have misinterpreted your intensions. A lot of others are likely to do the same.

Saturday, November 10, 2018

Colour Calibration :: Before You Panic II :: Tonal & White Balance

Back in the HSL Luminosity Tint & Shade post, I suggested that luminosity has a big impact on how we judge colour. I also showed how getting a tonal balance in black and white tonal range first, then switching the colour back on can enhance the feeling of colour. There is another important tool to help your colour judgement in a photo and that is White Balance.

The Idea behind white balance is an adjustment to match the colour temperature of your light source, and this is achieve by either warming (usually adding magenta) or cooling (usually adding green) the overall colour rendition. Human vision automatically undertake these changes so we seldom notice the effect of different light sources. However cameras will record these colour cast and that often leads to an unnatural looking image. In the early days of colour film, specific film stocks where developed for different light sources (specifically incandescent and tungsten lights). You needed to use different film under different lights. Digital Photography has enable these adjust to be undereaten in the camera when it prepares the jpeg render of the image. Most DSLR & mirrorless cameras can be White Balance calibrated for given scenes and lighting conditions. RAW formats which record more details of the image and only carry out the white balance (so AWB or Auto White Balance is ok) to render the jpeg thumbnail embedded in the RAW format in camera. However the photographer is able to carry out white balance after the photo is de-mosaiced and re-rendered in postprocessing steps. White Balancing can also be used to remove colour cast created by strong reflections of highly coloured surface.

Example of White Balance eye dropper in LightroomIt is my experience all the software I have used, with a white balance feature, can do a reasonable job removing colour casts providing you pick a neutral grey tone (or White or 18% grey card) in your photo.  As discussed on the video above those packages that let you then copy the white balance adjustment across a number of photos, then let you take a reference image perhaps with a “white balance” card infront or held by your subject. make an adjustment and then copy that across the rest of that set of exposures.

There seems to be quiet a school of thought that you can not perform White Balance on a Jpeg files (including the video above) after it is captured, but my experience is if you have a reference shot of a suitable card (with a white or neutral grey patch) you can improve the reliable rendition of colour. The example below is a jpeg file straight from my Olympus OMD EM10iii camera, which I post processed in Picasa 3 (ie an old bit of software).

.Example of using White Balance eye dropper in Picasa

In the example above I have already adjusted the tone to get the the white on my test strip lighter then I used the white balance eyedropper and pointed to one of the two very light grey patches on my test card and clicked. That’s all that’s required. Note I haven’t had to use an expensive bit of specialist gear or customised colour profile.

PB100015PB100015-002

It is my observation that it requires both Tonal and White Balance together to “clean up” colour in a photo.

Friday, November 09, 2018

Colour Calibration :: Before You Panic I

On the internet Blogs, Podcasts and You Tube are full of advice that you have run to buy and expensive bit of gear and calibrate your monitor immediately. Well you don’t but its a bit complex after that.

If you want to go the full colour calibration route you actually need to start at the camera,  cameraphone or scanner, then you can calibrate your monitor, and perhaps phone and data projector, then you must calibrate your printer. Only then can you reliably start using specific colour profiles.  If you want to use outside print services or book publishers you will have to trust their calibration and colour profiles. There is a lot involved in that workflow chain and a lot of it is device specific.Then you will find that your photos look flat, unless you start with really good light. This might sound depressing but…

Ok I’ll start with your computer monitor which is where most folk feel they need colour help. If you’ve got a recent LCD or OLED screen you probably don’t need to worry. Most are carefully colour calibrated during manufacture and/or have some colour calibration features in their setup menu. They generally will be well set when you first unbox the screen. Over time the screen suffers a bit of degradation (normally in luminance of the all pixels) if they are heavily used. The older issues of fading and images burning in (if a single image is continually displayed) were a problem for the old CRT Monitor and TV screens). Some early Plasma TV screens had been reported as noticeably degraded in colour intensity over time. Recent discussion seem to claim plasma screens degrade slower than LCDs. I don’t have a plasma screen  so I just have to accept that as true.image

Really the only thing you need to check is the tonal balance of your monitor which you do with the brightness and contrast adjustments only. There are many calibration web apps but I have found the one on Photo Friday is very simple to use and always gives great results. Rather that use the screen capture here I suggest you go to the Photo Friday site and the Monitor calibration is down the bottom. The basic idea is you need to be able to see a true black and a true white on your screen (not grey approximations of them). Just go to the site and follow the on screen instructions. Believe me it works nicely. Once you’ve done this tonal calibration I’m sure you will notice improved colour rendering.

Yes the first step in good colour calibration is to work in Black & White.

Thursday, November 08, 2018

PhotoProject :: LIVE TIME .vs. LIVE COMP for Lightning

imageI took the opportunity of the storm last night to test out two features LIVE COMP and LIVE TIME of my new camera. The Little Olympus, OMD EM10iii Mirrorless Camera. LIVE TIME lets you see a long exposure building up the image on the LCD screen (in 2 second updates so the lightning just lit up the whole sky (looked like sheet lightning, which it wasn’t)

Wimagehereas LIVE COMP (the image above) takes a back ground image and then only add things that are stronger light,  (again I'd set this to 2 second intervals), its like I am doing highlight blend mode across several images (say 50 to 100). That’s how I got this photo with the forks of lightning and strong frozen backlighting of the tree. Yes I have cropped in a bit.

Wednesday, November 07, 2018

PhotoProject :: Capturing Rain

I have tried many times to find a nice ay to capture rain. Basically it falls to fast to nicely capture drops in detail and its usually dark anyway.

PB060012PB060014PB060015

It was raining heavily yesterday and I saw an opportunity to photographs the drops backlit against dark foliage. Then I took photos at three different shutter speeds

  • 1/500th. second (ie fast enough to freeze a bird in flight)
  • 1/50th. second (a comfortable hand-held speed that should avoid blurring my shaky hands)
  • 1/15th. second (very slow, I have to rely on the in body stabilisation (IBS) of the  camera)

The result is obvious the best photo telling the story of raining is the slow exposure because it has elongated blurs hat captured the motion of the water droplets. Sound obvious in retrospect. Slow shutter speed to blur the motion and hold the camera steady (and/or IBS)

Tuesday, November 06, 2018

Colour Should be Fun

I am aware that up to know I have probably been boring you with terminology, models and variations on colour wheels. I consider that stuff as necessary context but now it is time to play with colour. I’d like to start with colour pickers (specifically the ones that let you investigate the colours in your own images. There are three class of pickers

  1. Stand alone web-app
  2. Stand alone computer app (including Smartphone & IPad)
  3. Eyedroppers, built into software.

I have found the second group which often rely on the built in camera to take a photo. The are the least reliable and frequently very poor at picking even a close match (I suspect the problem is related to getting theimage correct exposure (luminosity of the colour) for the image taken). Also unfortunately all  class of these apps work on either jpeg files or the RAW file only after it is rendered.

There are way to many variation in the first group of web base colour pickers to even start recommending the best (perhaps except for adobe’s colour heel see below). A lot are more focussed on “WEB colours” and harmonious schemes for blogs and websites. The HEX numbers displayed in these sites are the numeric code for various colour in HTML (see also the X11 Colours). In general terms this are unlikely to be great tools for your photography.

image
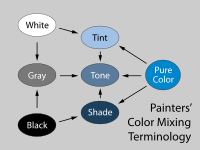
Many photoediting and computer graphics programs include an eyedropper tool (lightroom doesn’t but I believe photoshop does) which lets you choose a given colour from the image.  The colour selection could to be used by your current brush, our choose all the pixels with a similar Hue and Luminosity (eg Nik Software). The example here comes from Corel Painter and the eyedropper will select the appropriate Hue Circle as well as position on a triangle representing Tint, Tone and Saturation. These tools are very useful when it comes to working with colours. If your software has them now is a good time to learn how to use them.

The Adobe Color Wheel app, originally called Kuler and now an app in the CC libraries is also worth investigation. Even if you don’t have a creative cloud subscription you can still access it, however you won’t be able to save the colour schemes (as swatches that could be access by other Creative Clouds software) without a CC account. The main Colour wheel Screen lets you select a number of accepted harmonies to any hue you pick around the perimeter of the circle.

image

Note that on the digital colour wheel the complimentary colour for a light foliage green is magenta or more precisely a blue violet. Constable's famous “splash of red” to tame masses of green, may not help your landscape photo as much as a girl in strong pink or magenta coloured raincoat!

The real beauty of this Adobe colour wheel app is that it can select colours straight off your photo (again only seems to work with jpeg files) and your are then able to select colours chosen under a set of moods (rather than Colour Harmonies). Alternatively you can select your own colour scheme. You then see the select set of 5 colours as member of the digital colour wheel (in a HSL context but you are supplied sRGB (8 bit) and HEX numbers). This should help you get an insight into which colours you might like to enhance, and which can afford to become duller.In this case I could emphasis the split complimentary of greens and deep reds in my photo of some orchids.

imageimage

In any event just playing around with the colour schemes your photography will undoubtedly give you a whole new dimension to compare your images.

Monday, November 05, 2018

HSL Luminously and Tint (Tone) & Shade.

The ability to adjust a specific hue is great and the HSL slider also gives you the ability to adjust Saturation and Luminosity but when they are used together there are some complications.

To understand this better we should first look at the way artist use and name their their colour mixes. When you add White to a colour it is called a TINT and stays in the same hue (family) but it looks paler and lighter. Paler and Lighter means the saturation of the colour is lower and the luminosity (brightness) is higher. When you add Black to a colour the result is called a SHADE and the reverse happens. The colour gets duller and darker, which is again lower saturation and also its luminosity is lower.

Artist also often use the term TONE when they mix in a Neutral Grey. This should not be confused with Tonal Values meaning when talking about relative exposure (particularly in Black & White images). In Photography the alteration of the RGB colours are only lightened (adding luminance or sometimes reducing saturation) or darkened (either reducing Luminance and saturation) so the best way is just to think in terms of Tint or Shade.Many artist never add black when painting (and I’m one of those) because even a tiny amount or black pigment “kills” the colour mix. So they may use a dark neutral (like Payne’s Grey) or better still mix their own dark neutrals with complimentary colours.

To get a feel for how much colour and colour judgment is actually related to luminosity (through tints and shades) a great experiment is to take saturation down fully (-100 in Lightroom so you essentially have a black and white image, but there are many other ways to get black and white but not for this exercise) next adjust the tonal values in the normal manner you undertake. This could be contrast & brightness, or separate shadows and highlight sliders etc. Finally restore the saturation back to its original setting (in Lightroom set it back to zero).

imageimage

imageimage

You probably will be surprised, your colours are likely to be richer and more balanced! Try it yourself,

Sunday, November 04, 2018

Colour Names and the “Martian” Colour Wheel

The naming of colours is not as simple as you may think. There is more or less reasonable agreement on the 6 primary colours of the digital colour wheel  (Red, Yellow, Green, Cyan, Blue, Magenta). Things get a little out of hand after that for example look at some of the outrageous names of interior paints of the latest fashion colours.  You will also be amazed at what are supposed to be common colour names or the so called standard X11 web colour names.

I have found a nice website belonging to Warren Mars who has also adopted the combined GRB and CMY colour spaces and produced a 24 hues wheel (actually based on the HSV (or HSL) cylinder).

martian_colour_wheel_24_hue_f

His colour wheel  is originally and well thought out and a perfect format to adopt, get a copy and place beside your computer monitor or easle.  His opening question is “Do you need another colour wheel?”. Really you should read his arguments and discussion rather than just follow me, but I do strongly believe the answer is yes. His run down of his named set of colours, their tints and shades is wonderful and includes real world examples (mainly photographs) or each colour and its tints and shades, the outer two and inner two rings.

Saturday, November 03, 2018

Chasing the missing colours further

The mystery of the missing adobe colours turns out to be is as simple as understanding the Colour Space being used in the HSL sliders, some unfortunate naming, and confusion on my part. I have exhausted my way around bothLightroom and Photoshop documentation and on-line tutorials etc. I did find a few others asking similar questions and found a few also doing direct tests on Lightroom with colour charts (see my approach below). I still had that empty feeling I was misiing something important.

I decided to investigate the missing colours for myself, I took a series of of different colour wheels into Lightroom (below is a conventional painters colour wheel) and just played around with the Hue Sliders in the HSL panel of Lightrooms Develop Module. This can be a lot of fun and well as giving you a sound understanding of how the sliders work. I strongly recommend trying it out for your self.

Conventional Colour Wheel in lightroom

What I discovered  was first that the sliders did actually cover the full Hue (colour) range. Adobe have provided 8 slidesr so they where spaced 45o apart (ie 360o/8). Also each slider has an adjustment  range form –100 to +100 which seemed to cover 3 or 4 segments on the standard 12 division colour wheel (shown below). There also appeared to be some overlap with the adjacent sliders.

The next bit of the analysis is just my approximation. I assumed that each slider goes half way to the next slider plus a bit (ie 45o/2 = 22.5o plus 10o) Then doubling that for the full movement of the slide from minus to plus yield 64o (32o*2) which is inline with my observations above. Now things where coming together,  I could build the table below and work out the range of HUEs in terms of the angular HSL measure.  the –100 column if the anticlockwise Angular number (eg, –23o) and the –100 column is the clockwise angular number (eg, +23o), give the extent of that slider in terms of Hue.

Adobe Colour -100 Hue +100 Better Colour Name
Red 328o0o 32o Red
Orange 13o 45o 77o Orange-Yellow
Yellow 58o 90o 122o Yellow-Green/Chartreuse
Green 103o 135o 167o Green
Aqua 148o180o 212o Cyan
Blue 193o 225o 257o Blue
Purple 238o270o 302o Blue-Purple/Violet
Magenta 283o 315o 347o Magenta

I also to a HSL Circle (colour wheel) on which our common colour names had been applied to given segments. The obvious feature is our colour names don’t forma linear arrangement around the circle. Some colours (eg Yellow) have narrow range while others (eg green have a very broad range) at least in terms of their name.

image

Suddenly some of my previous observations, like if I used the yellow slider it was more likely to adjust the grass and foliage than the orche coloured yellowed of bleached grass or rocks. That the reds were very sensitive to their sliders whereas blues and greens less so. I also have taken the opportunity to better name the colours of the sliders. Thus now the Orange slider (now Orange-yelloe and the yellow slider (yellow-green) might both be required to enchance of shift the Yellowness of an image. Admittedly things get a little complex when luminance is also considered, that can be a latter topic for a post, but for now a better understanding of which hues are affected is a big step in the right direction to understand how to control colour in your Photograph.

So in conclusion, rather than there being missing colours, I found the names the HSL sliders where given in lightroom had lead me to think back to a conventional colour wheel (3 primaries, 3 secondary and 6 tertiary colours, ie 12 colours). Instead I should have realized Adobe had split the 360o of the HSL Hue Circle into 8 division rather than 12. C’est la Vie

Friday, November 02, 2018

The Sting in the Tail for Free Flickr Accounts

Part of the Banner Meesage on flickr todayDespite the rhetoric from Don MacAskill and others when SmugMug bought Flickr from Oath, today they announce a couple of big changes. Suggesting “This newly-independent community can shape the future of Photography itself”, whatever that means. The cost  of the Pro Account remains the same USD$50, with the same basic features (Ad-free,Unlimited Storage & More Detailed Stats). Its actually it’s still comparable with Smug Mug’s Basic account USD$3.99 (~USD48 annually). There are a couple more things offered like a 50% discount on a smug mug Portfolio, and promise of increased resolution and expanded Colour space, and 10min video rather than 5mins The various and proposed offerings for Pro (paid) membership do offer various advantages compared with the free account but not enough to excite me. At the moment I’m not likely to commit to an ongoing fee for the service, as I’m retired, I have to carefully mange my cashflows and I’m not wishing to use flickr as cloud backup/storage.

imageThe sting in the tail is the proposed changes for the free accounts, and I am a long time free account members. From February next year free accounts (currently unlimited number up to 1TB disk space, but you get ads) will be limited to 1,000 photos. 1000 photos at even one a day is over 3 years worth of posts.  C’est La vie.

I lived with Yahoos limit of 200 photos for free accounts for several years. That was you could only see the last 200 of your photos, However if you posted your photos to groups or had “official” links your photo could still be displayed (in other words the photo still existed on the platform). From what I understand the new limit will be enacted differently. Once you reach the 1000 limit you will be blocked from uploading. Also, and more significantly, if you have more than 1000 images stored Flickr will deleted the excess starting with the oldest! They will be gone forever from flickr. I expect this to be very unpopular, and lead to some ill informed rants. So get ready for the social media backlash! Not sure if deleting old photo once I reach the limit will free up space to  let me add new ones (I can’t currently find any specific reference to this).

I’m hopeful I will be able to remain using Flickr as a place to show my recent photos, but with a bit of extra work on my behalf (ie deleting other photos to give me space). Which in theory gives me the opportunity to curate my collection and improve the quality.

So the ride could get a little bumpy but I’m prepared to hang in there.

UPDATE Don MacAskil has posted on the flickr blog a fairly detail explanation of why free flickr accounts will be limited and the background behind the choice of the 1000 photo limit. Aslo of interest there is a well reasoned article by Thomas Hawk on PetaPixel on Why Flickr limiting free users to 1000 photos is a smart move.

Thursday, November 01, 2018

The Gamut of Different Colour Spaces


In the previous posts I hinted you may be using colour spaces in which exist some unique colours that can not be displayed or printed.  This post will explain why. A nice way to compare these is with the the CIE 1931 xy chromaticity diagram, which is designed to encompass all colours the average human eye can see (the horseshoe shaped background). The full extents of the colours perceived is termed the colour gamut.

This version of the graph shows the extent of common colour spaces applied in camera capture and editing software. For instance  8-bit sRGB if the default space for jpeg files and most new LCD screen. It is probably adequate, but is under half the possible colours we can see.  Compare this to Adobe RGB (12-bit) which gives more definition of unique colours in the greens and some blues. But remember if you are looking at the photo on an older computer screen you are probably only looking at a small colour space equivalent to sRGB. ProPhoto RGB (12 or 16bit) gives an even wider range of green and blue and some extra eds. However now it is possible to generate colours that our eyes can not discern.

The real rub comes when you output shown as the more curved shape , 2200 matt paper) indicates the colours possible when using CMYK colours (eg ink jet printer inks) on a standard matt paper. Gloss papers which appear more contrasty can give a slightly higher gamut.

The software we use in theory takes care of the conversion between t6hese colour spaces, but not always. If you think the colour look strange, before you buy and expensive colour calibration system. Check the colour space, your monitor or printer might not be able to handle your setting of ProPhoto in lightroom. If in doubt using SRGB is the safe setting in lightroom or your favourite software. Also setting exported files you take to the local photolab, should always be OK when you set to SRGB.

It is possible to use the higher gamut colour space if you use appropriate colour profiles but they generally need to be set up for your software, printer model and type of paper. This is so individualised most paper supplied offer a calibration service, where you load up a test image and print it on their paper, then send that to them and you get a customised colour profile returned. The gamut of the result is not wider because the colour gamut depends on the inks and the paper, However the mapping of colours back into that gamut will be significantly improved.