Showing posts with label lightroom. Show all posts

Saturday, October 10, 2020

After 3 months I wasn't overwhelmed

Adobe Creative Cloud I’ve had an trial of the creative cloud suite for an extended 3 month period. It really does have a comprehensive set of programs. In comparison I have a number of different programs, from several different software companies, that I use standalone but use whichever is appropriate and have to swap files between each application. I was expecting that by now adobe would be well integrated. I was disappointed there is only some interchangeability but it is pretty much the same step, saving &/or exporting then opening working on the file, save again and back on the roundtrip merry go round, like plugins have pretty much always worked. Ok it all works but I don’t need to be in the creative cloud environment to do it like this.

  I was once quiet a fan of lightroom up to revision 5 when it got so slow. So I was keen to see how light room classic had progressed and it had. The facial recognition was nice (but not essential for me) the HDR and Panorama were also fine and the synch to lightroom mobile seemed to work nicely. I was initially impressed. However I still had the strong impression that behind it all was the one person one catalogue, one spot to file your originals was underlying this all (the shared images just being smart previews). So I was a little underwhelmed here compared with tools I already had.

  I had decided to spend a fair bit if time learning Photoshop in detail, and it started well, I was particularly interested in layers and blending. I must admit it does do these tasks well, However things kind of fell apart after that there are so many menu, tabs, icons,  sliders and even different terminology for much the same process that I found trying to consume the actually well put together training material to be brain numbing. I did step down to Photoshop Express and that was useable straight away (I do have an old version of Adobe Photoshop express on my main machine, it came with my Wacom tablet, but I actually haven’t used it in 3 years. The new express is certainly update but again a bit disappointing.

  Illustrator wasn’t as hard to pick up and I made a couple of fun things with it, however when I tried doing a couple of cartoons I was a little shocked at how few graphic tools I commonly use I could actually find.

My final foray into the creative cloud world was video. I’m not very experience with video but interested and have been making a few experimental shorts. So I then dove deep into premiere pro,  The training material is good but stopped short of what I wanted. The wealth for a menus, tabs, sliders and icon and number of track types was a bit confusing. I reckon Davinci Resolve is easier to pickup. (that’s not a compliment by the way)  So after some time back down to Premiere Express (its ok easy and much quicker to get things done), then finally Rush.  

 Now Rush does about 90% of what I was after and sort of quickly and had a nice set of options including schedule upload to YouTube. Its very heavily aimed at social media influencer wanna-bees. So I actually used that for a few weeks to recorded a set of quick tips for watercolourist. This might be the one program I would miss when the trial ends. I’ve since discovered a few stutters in the videos on YouTube that are not the same as renderings on my computer (but I’m not totally off-put, it may have been easy to avoid.)

The ongoing rental (aka subscription) and its price, have always been a stumbling block for me. I can’t find any strong reasons for me taking up an subscription (and no discount was offered). I did however registered for Adobe Max, which is free for those with Adobe ID just before my trial version ran out. Maybe the blue sky of features yet to come might keep the adobe flame burning, but its nearly gone out for me.

Saturday, November 03, 2018

Chasing the missing colours further

The mystery of the missing adobe colours turns out to be is as simple as understanding the Colour Space being used in the HSL sliders, some unfortunate naming, and confusion on my part. I have exhausted my way around bothLightroom and Photoshop documentation and on-line tutorials etc. I did find a few others asking similar questions and found a few also doing direct tests on Lightroom with colour charts (see my approach below). I still had that empty feeling I was misiing something important.

I decided to investigate the missing colours for myself, I took a series of of different colour wheels into Lightroom (below is a conventional painters colour wheel) and just played around with the Hue Sliders in the HSL panel of Lightrooms Develop Module. This can be a lot of fun and well as giving you a sound understanding of how the sliders work. I strongly recommend trying it out for your self.

Conventional Colour Wheel in lightroom

What I discovered  was first that the sliders did actually cover the full Hue (colour) range. Adobe have provided 8 slidesr so they where spaced 45o apart (ie 360o/8). Also each slider has an adjustment  range form –100 to +100 which seemed to cover 3 or 4 segments on the standard 12 division colour wheel (shown below). There also appeared to be some overlap with the adjacent sliders.

The next bit of the analysis is just my approximation. I assumed that each slider goes half way to the next slider plus a bit (ie 45o/2 = 22.5o plus 10o) Then doubling that for the full movement of the slide from minus to plus yield 64o (32o*2) which is inline with my observations above. Now things where coming together,  I could build the table below and work out the range of HUEs in terms of the angular HSL measure.  the –100 column if the anticlockwise Angular number (eg, –23o) and the –100 column is the clockwise angular number (eg, +23o), give the extent of that slider in terms of Hue.

Adobe Colour -100 Hue +100 Better Colour Name
Red 328o0o 32o Red
Orange 13o 45o 77o Orange-Yellow
Yellow 58o 90o 122o Yellow-Green/Chartreuse
Green 103o 135o 167o Green
Aqua 148o180o 212o Cyan
Blue 193o 225o 257o Blue
Purple 238o270o 302o Blue-Purple/Violet
Magenta 283o 315o 347o Magenta

I also to a HSL Circle (colour wheel) on which our common colour names had been applied to given segments. The obvious feature is our colour names don’t forma linear arrangement around the circle. Some colours (eg Yellow) have narrow range while others (eg green have a very broad range) at least in terms of their name.

image

Suddenly some of my previous observations, like if I used the yellow slider it was more likely to adjust the grass and foliage than the orche coloured yellowed of bleached grass or rocks. That the reds were very sensitive to their sliders whereas blues and greens less so. I also have taken the opportunity to better name the colours of the sliders. Thus now the Orange slider (now Orange-yelloe and the yellow slider (yellow-green) might both be required to enchance of shift the Yellowness of an image. Admittedly things get a little complex when luminance is also considered, that can be a latter topic for a post, but for now a better understanding of which hues are affected is a big step in the right direction to understand how to control colour in your Photograph.

So in conclusion, rather than there being missing colours, I found the names the HSL sliders where given in lightroom had lead me to think back to a conventional colour wheel (3 primaries, 3 secondary and 6 tertiary colours, ie 12 colours). Instead I should have realized Adobe had split the 360o of the HSL Hue Circle into 8 division rather than 12. C’est la Vie

Saturday, May 12, 2018

Day One ... cont. jpeg .vs. .orf RAW

This was not a surprise. My lightroom (still ver 4.4) could not read the Olympus RAW format .orf. The same thing happens to most owners of new cameras, they have to wait for an update from adobe and they complain a lot on the internet. Please don’t think I’m just complaining, I understand the issue but I not interested in the adobe subscription so this probably marks the beginning of the end for lightroom in my photographic tool set.

testing olympus camera original jpeg fileProcessed with basic Tone Mapping in Aurora HDR 2018

On the left is the jpeg image straight out of the camera, shot in Auto. On the right is the same image but the .orf version read by Aurora HDR 2018, which can read the Olympus .orf RAW format. To keep with the spirit of using Auto I have only used it’s basic Tone Mapping (just stretching the tonal range) as a fairly basic thing you might do with any RAW file. I like both but the one of the right feels more like being there, so I made it my PhotoFriday post this week.

Thursday, November 02, 2017

Surely its Time to Move On (maybe better not to panic)

Despite the hype, it is really clear to me that Adobe have done a google style deprecate with lightroom as we know it. That desktop program that most photographers rely on, but wish it was faster, multi-computer LAN compatible shared catalogue, and better still multi-user to mention a few wishes from the many that have gone unanswered for the past 4 or 5 years. I actually think the rot set in before the creative cloud subscription, which has only delivered a few feature that most other software already had, I think the writing was on the wall when version LR5 was first release. In fact I have not upgraded since version LR4.4 (mainly because I haven’t bought a new or different camera camera system, so I don’t need upgrade). I just had to buy a SSD drive to get lightroom running (more like limp along) at a reasonable pace.

Lightroom has always seemed a High Maintenance Mistress to me. She has to control everything, and often just for no sensible reason. I still can not forgive her for loosing so many of my collections (once my favourite way to organize my chaotic digital photo universe). Which is probably why I have been open to trying different and new software from third party to plug ins to alternative programs. Well there isn’t a magic answer to the best program. I doubt it will every exist. Yet with something to manage your growing collection (like Lightroom,Picasa, VnView, ACDsee, Aftershot pro, On1 Photo RAW or even Photo Mechanic) and a good collections of editing tools (too many to mention in one sentence, yet Luminar is clearly a rising star) everyone will be able to get by. Albeit with the frustration or round tripping between different packages and learning different short cut keys etc,. Such is the keen digital photographer’s lot.

It appears from my remote view outside the Adobe Creative cloud Juggernaut, that adobe is the mobile and portable tablet or lightweigh browser (cloud) applications (aka consumer new shinny toys) rather than powerful computer environments. Surely even the fan boys can see that the new Lightroom cc is pretty much a single image at a time thing that needs a lot of extra bits to make it useful for serious users. Even then it will require a fast internet with plenty of band width. At least those serious will still have Lightroom Classic CC, which is the old Lightroom you can speed up by using the jpeg thumbnails embedded in your RAW files (like Photo Mechanic and On1 RAW Photo 2018). Excise me for suggesting this sounds a lot like “buying the emperor new cloths”

However Don’t Panic, read the Lightoom Queen’s recent blog post. Just keep using what ever you have now and only look for something new when you get that new camera!

Monday, May 22, 2017

Accidental discoveries in lightroom

I’ve been using lightroom as my primary photo editor again on my travels, because my light HP spectre with its SSD drive have made lightroom fast enough again. There are things about lightroom that still hold me up and things about the way it has to organise everything in her own way that still frustrate me. In particular how to handle working copies.image in my case these are files being past onto third arty plug-ins like Nik Software Efex range, OnOne and Perfect Exposure. What happens is the little PCPlugin windows pop up and I can chose to  edit a copy with lightroom setting (the default and most common response), a copy without lightroom settings (seems to only works with jpeg files) or edit the original (except this doesn’t work with most plug-ins). Then there is a small dialogue area at the bottom which contains the file format you will use in the exchange (jpeg, Tiff or PSD).This is all fine and I’ve done it hundreds of times because I just press ok, but the annoying part is lightroom now takes the copy and the original to the very end of your photo series. If you have more than say 50 photos in you directory this can be a few screen’s scrolling away of forever removed on the film strip. It is a tedious interruption to my thoughts and concentration.imageI have found one work around, just change to a different folder in the library module and back to the folder you working in, and Voila the files are back in their normal order, but these is even more tedium and frustration. Ahhh!!! Then I notice after I had done this at least once (but sometimes twice) the photos where not copied to the end of the folder on the lightroom screen but arrive beside the original in the alphabetical/numerical order or the origin photo.

The next discovery, I’m sure must be documented somewhere, but I just haven’t found where, is that photos in subdirectory/folder get displayed in the parent directory. I came across this by accident. To get my autostitch panoramas I need to export my starter images (they are now often HDR and tiff format) into jpeg because autostitch only works with that format. So I normally export it to a specifically named directory over in my photo scrapbook. Unfortunately it doesn’t take long to forget where an image is in that confused space. imageAt some point while I was travelling, and probably late at night, I accidentally reset the the destination of export from lightroom from a specific location to same folder as original plus sending it to a defined subdirectory. Suddenly the export shows up beside the original? Not only that I could then create my panorama and import that back into lightroom in the sub directory/folder and it to shows up in the parent folder also. I don’t have to have duplicated files over in another scrapbook folder! Then I can stack the whole series behind the panorama (gaining a lot more organizational control of this folder)

Whilst I have been using lightroom for a long time, (I stopped upgrading from version 4.4) have read the manuals in detail and many guides I can not find ant documentation relevant to these discoveries/”features”. Coincidentally I did just watch an Ed Gregory You Tube video (below) that exploits this “feature” of photos in the sub directories/folders showing up in the directory above. 

I’m never a fan of fixed workflows, so you don’t have to follow his approach meticulously just be inspired and know you can use sub folders/directories to house various working and exported versions of the photos but still see all the photos grouped together in the parent folder/directory.

Here is what I adopted on my last trip that seems to work seamlessly for me. I still use picasa to load and do the preliminary culling of my photos and I load the photo into daily folders with the name format YYYY-MM-DD this means that they automatically get sorted into chronological order. Using picasa is way faster still compared to lightroom and because I still shot RAW+jpeg I can cull the RAW/Jpeg pair at the same time (you don’t see the jpeg file in lightroom). I can als “”touch up”, crop, email and post the jpeg to the web immediately is I want (eg email photos to the family). When I’m ready to post process I just point lightoom to import from this gallery. Doesn’t take long and lightroom has happily loaded the requited details into her catalogue and ready to be useful. This is when I rate my photos and I’m trying out the star rating idea present in Jeff Harman’s PhotoTaco podcast (Culling like a Pro) below.

The idea is to only use three stars, set lightroom to auto advance, and then just hit the 1 2 or 3 key on you keyboard. This works in both the library and develop modules but works best on library if you also want to swap between thumbnail and full screen view of just a few images. The important thing is to go through your entire days shots. Each time you rate a photo you will moved onto the next. With a little concentration on the image and one hand over the relevant keys you can become very fast at this.
StarOne Star is for the set up and background shots you want to keep but not process further
StarStarTwo Stars is for any average shot, they maybe nice but are not the best in the days shots
StarStarStarThree Stars are for those shots with great potential that warrant a bit more post processing.
You will undoubtedly find that the two stars make up the majority of your folder but that’s life. Any non stared images should be deleted now (but I normally get rid of those in picasa when I load the photos). If like me you do a daily backup now is the time to do it.

Post ProcessingNext I set the filter in lightroom on rating to plus 3 stars and I only have a few images to consider. Often I will also demote a few NQR (not quiet right) photos to further trim down what I need to do. Suddenly 2 hours post processing drudgery become 20 minutes of fun!

My adopted directory/folder structureThe final piece of magic that these discoveries lead to was using the subfolders to hold working and then exported versions, would allow me to see all the photos from one day in one place. I’m not sure if final should be a sub directory of Work (where I do my post processing) or a folder at the same level, Keeping my Final work separate and easily found is the important aspect here. I definitely need to have the option of separating the image size and finish (ie post processing sharpening) in he exported versions. I just have two sizes (small for the WEB or Full resolution for possible printing. My scrapbook mess is now obsolete! (not sure yet if I will try to back that diversity into this new structure, I suspect that will be too much work). There is some duplication of files, but they are at least stored more logically close to the original images. I also returned to using the colour labels to help understand the type of images within the daily (Parent) Directory/Folder. Yellow for HDR , Green for multi image panorama stitching or collage, Purple for family snaps, Red for images posted on the web.

I don’t want you to follow my process exactly but be inspired to simplify the way you organize your photos and/or reduce the time taken or tedium to give more time to be creative.

Friday, April 28, 2017

Stepping into HDR

EV Bracketed Setup on my cameraWhilst I am definitely not in favour of setting fixed methods (workflows) for others to follow I figure it would be worthwhile to outline the steps I take to produced HDR images. I’ll be doing it in four different four ways, starting with my current most favoured approach, using Lightroom and Nik HDR Efex Pro 2

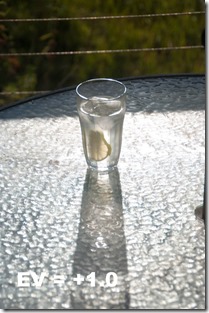
I start most of my HDR work the same way, using the bracketing on my DLSR. I have experimented with the number and magnitude of the EV steps. Just three steps of ± 1.0 EV seem to suit a more restrained HDR approach. This give me three exposures, one underexposed, one close to best exposure and one over exposed.

_IGP6682 _IGP6683 _IGP6684

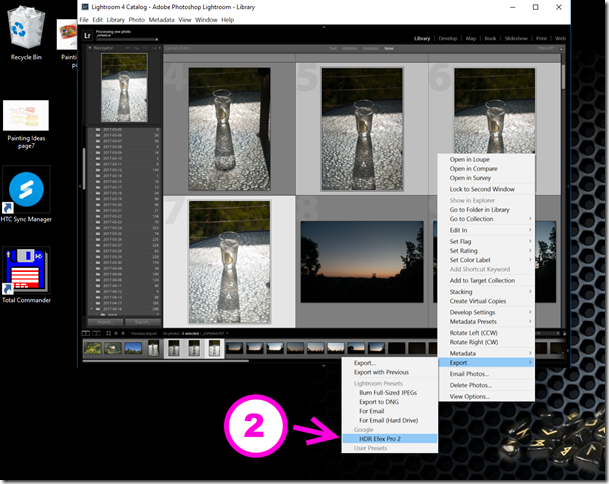
For the first example I’m using Nik software’s (now google’s)HDR Efex Pro 2 plug in via Lightroom. Whilst lightroom has a mechanism to transfer photo out to plug-ins it can only transfer a single image at a time. So instead on the Edit-in tool I need to use the export function and the option google/HDR Efex Pro 2

The Lightroom export required

Lightroom will take a little while to export these three files and then start up Nik HDR merge. This occurs in two parts, the first is the Merge Dialogue, which offer three ways to avoid common artefacts and problems when taking multiple photos. This include aligning photos (step 3) when taking the HDR handheld, this is the default so no action is required unless you had previously turned it off. Ghost removal (step4) which searches for and removes ghost images associated with things (usually people) that move between the three exposures. The grey frame around the upper photo indicated the photo that will be used as the ghost removal reference. The strength of 100% is the default but allows you to soften the degrees to which ghost removal is undertaken. Whilst I’m sure this step takes time, I just leave them always on, as it has no impact that I can find when there is no movement. The final artefact (step5) is chromatic aberration (coloured fringes at the edge if strongly contrasting parts of the photo, eg. tree silhouettes against the sky) because the HDR process can over emphasise this effect. Different lenses and lighting will give different effects, I have found more the upper slider to remove red effects and the bottom slider a little less towards the blue works well for most of the photos taken with my Pentax camera and Tamron lens combination. There is a magnifier at the bottom right of the reference image if you want to check who these setting are being applied. The lightness slider underneath the image helps you see and check detail in the HDR image. It does not effect the the processing of the HDR image in the tone mapping steps to follow.

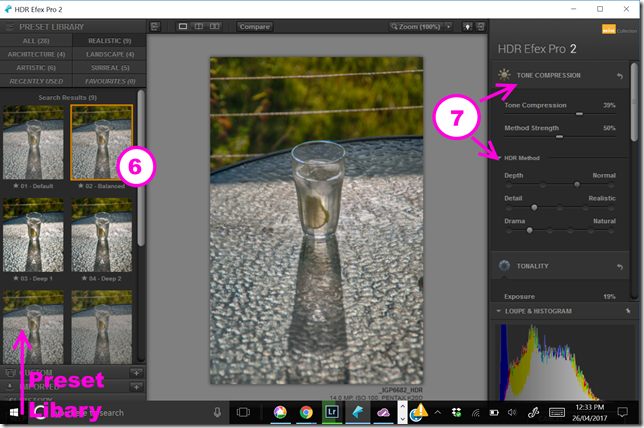
Merge controls in NIK HDR Efex Pro 2Clicking on the Create HDR button at the bottom right, starts the corrections you have set and applies them to the individual exposures and the merges the three images, It can take a few seconds and then takes you onto the interface controls for the tone mapping step. This  is the dialogue window in which you will do all the remaining image adjustments. Nik have provided a library of presets which show on the left hand side, grouped under several effects. When you begin using the software it is probably a good idea to try the look of several presets, a lot of them are over the top. I quickly found I only liked the realistic group and then only a few of those, I personally find the Balanced Preset (step 6) gives me a good starting point.

Tonemapping Interface controls in NIK HDR Efex Pro 2

However It is just a starting point, and I suggest moving over to the right hand side and working down through the options to edit your image. The first is tone compression (step 7), these sliders can have a really significant effect. The tone compression moved all the way to the left will leave the dynamic range much close to a single photo (flatter) whereas move all the way to the right gives you an extreme dynamic range putting detail in the shadows and highlights (it will usually look surreal and  over-powering), but a slight move to the right often makes the image snap. The methods and method strength also control the tone mapping but in specific ways. Depth controls how the shadows and highlights are to be treated and again moving to the right will enhance the dynamic range, normal is fine for me. Detail is a lot like clarity in lightroom or structure elsewhere in Nik software, it controls the local contrast and can bring up a lot of detail, realistic is fine for me. Selecting the histogramDrama is like a contrast control and different images respond different, I’m using natural here but moving to the right usually adds drama particularly to a cloud sky.

For the next step Tonality I like to have the Histrogram displayed (step 8) on the lower right panel (normally it is a loupe/magnified view)

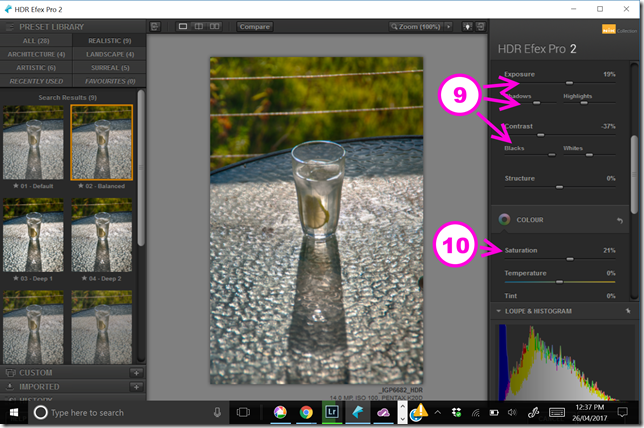
Toneality controls in NIK HDR Efex Pro 2

The tonality controls are  very similar to the Basic tonal controls in Lightroom, but the work across the new combine dynamic range of luminosity in the HDR image. They work on the image as a whole. I wanted this image to better fill the histogram of the available dynamic range to I increased the exposure a little, stretching the whole histogram to the right. I also increase the highlights and lessened the blacks (lifting the left most part of the histogram (step 9). I also increased the saturation just s little (step 10). These last two steps could have just as easily been made in lightroom but it is convenient to do them here.

Normally I would finish here, but I found the wire in the background distraction so I then used OnOne 10 enhance and the magic eraser (a context sensitive fill)  to remove them. Also I cropped the photo a little.

G&T :: Backlit Glass

Friday, April 14, 2017

Extending Dynamic Range

Contrary to want a lot of people believe Digital Cameras, even the best ones, are not capable of capture the full extent of light from the darkest blacks to the purest white. They struggle to get close to the capabilities of traditional film and they are certainly no where near as capable as the human eye. This range of illumination is usually referred to as Dynamic Range. This limited range coupled with an automatic light meter that is trying to get an average exposure (ie matching a mid tone grey overall) is the reason a lot of images turn out boring, washed out and flat looking even though you remember much stronger light (and often colour)._IGP6498 Untouched RAW Image as Rendered by Lightroom

Here are a couple of techniques that can help you get a wider apparent Dynamic Range in your final photo.IMAG0167 - AutoHDR using HTC UPlay CameraThe first is the use a camera app on your phone that will take an “AutoHDR” (this usually means it will take 3 exposure and combine then using software with the app, a few will do pseudo HDR a bit like the next approach.) This is the simplest approach and results can be surprisingly good.

_IGP6497A second approach is to take a RAW image (this is in .PEF format) and use software (I’m using lightroom Develop basic panel only.) I’m following what I once called SDR+ (standard dynamic range plus) and I even wrote a couple of presets to do it. The basic idea is I bring up detail in the shadows (usually moving the shadow slider to the right, sometimes I also change the blacks using the approach often called “finding the black point”, while on the black slide hold down the <alt> and the scree turn black,image the adjust the slider till a few whit areas (these are the areas that will be rendered pure black) show up. You can do a similar operation with the white slider. The objective is to get the illumination histogram to be as evenly spread across the range as possible. This doesn’t take all that long  and I prefer to do it manually to even my own preset, but it requires specialist software, some skills in the oftware and a camera that can take RAW files. Many RAW purist will explain this is why you should always take RAW images.

_IGP6496_HDRThe third approach is classic HDR (High Dynamic Range) and here I am using three bracketed +/-1 EV exposures. Then the Nik HDR Efex Pro 2 software and the balanced preset to create a new 16-bit colour .Tiff file. There are many variation of the HDR technique and software, but it normally involves two steps. First collecting and preserving the full range of illumination values from the three or more exposures. Then a second step of “tone mapping” these into the available dynamic range of your image (and this is also related to how you might reproduce the image, eg print or screen). The downside is these steps and any image prep take extra time and a lot of folk get carried away with the slider options in the “tone mapping” step, thereby producing the sickly vivid and disturbingly surreal images that have given HDR  a bad name. I personally think this method has give me a final photo much closer to the late afternoon light I was photographing in. I have to admit I do take a lot of HDR images, particularly in contrasty light or where I know I need to preserve the Highest Dynamic Range possible.

So if you are disappointed with flat washed out images you might like to investigate at least one of these approaches.

Friday, November 11, 2016

The awkward return of my prodigal PC

After two full weeks away, including a trip to HP Singapore and back, my sick HP Spectre is back home. “Does it work?” was the first question and superficially it does. The Tech speak was “Reimage ok Passed all UEFI tests” which meant the disk was cleaned off (the upgrade USB I was three weeks ago had already done that!) and a new system image installed (the USB key failed to do that!) and the hardware tested ok. Great, but don’t get excited too soon.

The first task was to connect to the internet, sync up the blue tooth mouse and reset my user account and one drive, All good so far. Then I tried to connect to myaftershot error Home group, very tediously nothing, ask to join and waiting while the operating system was considering the password for ages then just ignoring anything new on the network.Well at one stage I got to see the network printers. Then bugger! The computer just restarted itself (maybe an upgrade?) What about the Windows 10 Store to download a few things. Damn that wants authorization again (that’s the third message and code to my phone). Now its trying to download all my windows 10 apps. Time for a coffee. Arrrrh! another unscheduled restart. At least its not the blue screen of death (better only whisper that)

adobe errorNow I had the task of reloading the software I normally use (my many photographic mistressess). That’s where the disappointment really set in. whilst I could install picasa all my other decent photo applications refused to install, with similarly unhelpful error messages during the assembly component.Why all suffered similar problems was a mystery but I decided to down load a fresh install from lightroom (not a good choice because it is huge). About 10 minutes into the 25 minute download you guessed it my system decided to do a restart. so with only about 30% download complete. I was able to restartimage  and continue but now it said it would take 2 hours, I’ve seen Microsoft exaggerate download time before so I pressed on. Three hours later and 6 restarts later no photo software had been installed and the lasts restart suggested 3 hours to go although the download was 700MB into the 800MB+ of the lightroom setup file. Time for bed and let it go and get the computer ready to go back to the store in the morning!!!!

In the morning all I could find was a totally blank screen with a mouse cursor I could move around. Pressing the on/off switch bought up the slide down to shutdown screen. But sliding down just got me back to the blank screen, Several on/off and holding down the key for longer and longer. I finally got the system to restart BUT it was doing an update at 100%. A 15 minute wait and the update started again at 10% and crawled its way back to 100%. Finally it restarted AND has been working fine since. I now have my cluster of photo software installed and tested and ready to use.

Welcome back my most prodigal little friend, but don’t try that again.

Thursday, October 27, 2016

Perfectly Clear why I am saving in .tiff

The problems on my HP Spectre (death by update) have forced me back onto my toshiba laptop as the first place I review my photos, cull the duds and perhaps do some preliminary evaluation of what might be worthwhile to further process. I had got used to using AfterShot pro, and in particularly had found the built in plug-in perfectly clear a wonderful little short cut to see what was possible by refining RAW files. To start I would have to try and reproduce what perfectly clear had done. Then I realized is I exported the perfectly clear changes to a 16 bit .tiff file I would have the perfectly clear image as a starting point and still access to the extra colour depth and dynamic range. Also on the HP Spectre I had got to using lightroom much more, particular as the platform to run other plug-ins like OnOne and Nik Software. Both of which work well with .tiff files. The option of running both Aftershot and then lightroom on the laptop was getting a tediously slow.

imageBack on the slower laptop I still like to look at potential good photos in perfect clear. A couple of weeks ago I received an offer with a Perfectly Clear newsletter to download (for free) the Prefect Exposure plug-ins tools (for lightroom and photoshop) so I jumped at the opportunity. The lightroom style plug in is still an extra step inside Lightroom but it is wonderful time saver for a lot of the manual exposure slider tweaking and it can deliver the .tiff file back into the lightroom library. Just Perfect for further lightroom, Nik or OnOne adjustments, staying with the .tiff format of course. I strenuously avoid fixed workflows (I think they are anti-creative) but I know starting with perfectly clear can avoid a lot of tedium, even if I don’t use all of the changes it recommends. I will have some knowledge of a better place to start

If you haven’t looked at the Perfectly Clear plug-ins yet they are probably going to be the best things you can add to lightroom.

Tuesday, October 04, 2016

DNG and the Month of Living Dangerously

Well i’m glad September is over, I can reset the dial of my beloved Pentax back to RAW/PEF not RAW/DNG. This story began several months ago when I installed the new version of OnOne 10.5, and suddenly I started having problems with OnOne Browse not display RAW files. Initially it wasn’t every RAW file but as I tried reinstalling the update and specifically once I had installed version 10.5.1 I was not able to view any .pef (the Pentax native RAW file) other than for a fleeting moment when the file was first viewed. Also .tif files and .cr2 first would intermittently disappear. This made trying to use OnOne software standalone tedious and frustrating. My continued request for support were just answered with trite rubbish about updating drivers and re-installing the software. I got frustrated and stopped using OnOne for a long time.


I got used to using Aftershot Pro mainly for my initial review and perhaps quick processing in the field. Then loading up lightroom back home and finishing images. For a few photos I wanted to do extra post processing I used the plug-ins linked to either OnOne Enhance, OnOne Effects or Nik’s Software.There is really nothing wrong with Aftershot Pro, in fact despite OnOne’s claims to have the fastest RAW rendering I suspect aftershot might be faster. However I quiet liked being able to flag just the images I wanted to further post process and load only those into lightroom or just finish them in the other OnOne modules, as I had been able to in version 10.0.1.  This was ok and seldom more than two steps. usinf aftershot, then lightroom and then a plg-in was three and meant having to generate an intermediate exchange file. Then I remember that my Pentax is one of the very few cameras that can capture DNG files in camera. I had previously looked at using that format but the files where substantially bigger so I couldn’t see any benefit. However if I avoided the intermediate copies I felt I could still be ahead in terms of spaced consumed so I bravely decided to only take DNG files during September.

Where did all the space go?


In september I created 1420 photo files. Most RAW plus jpeg pairs and most of them RAW DNG with a few .cr2 files. They took up a whopping 85 GB (excluding any .tiff post processing versions)
compared with 3710 files taking up only 40gb for my  month long candian month long trip earlier.

Exploding DNG  Grenades

The first hint of an issue had showed up before September but I assumed it was an isolated accident. Occasionally, and I still can not figure out why or which piece of software is to blame, some of the DNG files will suddenly double in size. Typically it is my better shot that I am interested in. Then sometimes they double in size again. as an example most DNG file from the camera are around 23 MB each, then when they first explode they will reach around 54MB then the second explosion will see them at 120mb plus. It is only when I try to view one of these exploded files that the havoc begins. image_thumb2Aftershot nicely reports it has stopped working, and trying to restart it report that it shut down unexpectedly and is set to read that directory again but it nicely reports it is stopping again, and so on. Lightroom seems to disappear for a while and eventually just doesn’t acknowledge that these bigger DNG files exist. OnOne browser however goes into suspended animation and my computer totally locks up. If I kill the process, restart the computer OnOne will refuse toit refuses to restart.


I eventually worked out if I renamed the last directory I had used before such crashes I could restart the misbehaving software. However if I tried to re-access that directory with OnOne browse, it was back to sleep, and crashes again. Lightroom just kept ignoring the big files after long contemplation and aftershot was ok unless I tried to look more closely at those files. Picasa would still view these files but took a long time to load them, perhaps understandably because they were large. These problems occurred on both my new HP Spectre laptop and my HP desktop, but less so on tests on an old Toshiba laptop.


I soon came to the conclusion that these exploded DNG files were not good, possibly corrupted some how. Which left me with a risk, if I tried to view these files before I had a backup I could loose the RAW version (since I take RAW and jpeg I would at least still have the jpeg version). Unfortunately I realised this AFTER I lost a couple of rather nice photos. I do nothave decent DNG version of these now.


As the month progressed this just became a bigger and more frequent problem and I am no closer to knowing why. I just have a mass of DGN files I am reluctant to even veiw.

Toxic Tiffs

When I am working with plug-ins like OnOne or Nik’s software I had adopted the idea of using .tiff files which give me more colour bit depth and preserve the illumination dynamic range compared with Jpeg and are way smaller than using the .png format (photoshop file format). Again occasionally to start with these .tiff files derived from DNG files began to refuse to load. I could work on the file to begin with, but once i quit the plug-in concerned the file would not open. Worst once this occurred within a session all other tiff files I tried to access would suffer the same fate. Exiting the software and starting a new session sometimes fixed the problem till I hit another toxic .tiff. the file sized does not seem to be altered in the case of the .tif files, so there is no easyway to figure out which fie will or won’t open. So opening any .tif file has a risk!

At this stage I also started to suspect a photo/dng targeting virus or malware, but I can not findany reports of such a beast and my virus and malware scans do not report any problems,

So I have stopped recording in DNG for four days now and guess what? no problems for two days!


Is the problem in the Pentax version of DNG, or is it in the software, or even combination of software I’m trying to use?


The fact that the new apple IPhone 7 will save optionally save in DNG format could see others finding similar problems. I’ll let the do the debugging. I’ve had enough for now no more DNG for me!

Tuesday, July 05, 2016

PhotoProject :: A chance to compare

This is an alright photo for an overcast drizzly day. Actually I was waiting in hope of catching a rainbow, but the sun never shone for me so I didn’t get a rainbow, just the last of the oak leaves falling. Being adventurous and warm back inside I figured this was perfect for a comparison of how I might post process the RAW version of this image in my software on my HP spectre 2 in 1 laptop.

Picasa (no adjustments) After Shot Pro 3 (Perfectly Clear)
_IGP7040 _IGP7040asp
Lightroom (Tonal & Colour Adj) OnOne 10 (Enhance & Effects)
_IGP7040lr _IGP7040-OnOne

I have included the unaltered render of the .pef RAW file, just to show that an unedited RAW file usually looks flat and often a bit dark. My goto tool for the first pass look at photos at the moment is After Shot Pro and the perfectly Clear filter (in this case it has the colour a bit loud and the sky blown out, not that wasn’t pretty much blown out in the unedited version). At this stage I think the image has potential and flag it was a keeper and even give it a couple of stars.

I then fired up Lightroom and set to doing a fairly standard tonal tweak, recovering some shadows by mainly looking to pull highlight down and deepen the blue of the sky (moving the blue channel viberance to the left) I also cropped the image to avoid the leading lines of the edge of the road drawing the veiwer to the bottom left corner. I felt this was better than the Perfectly Clear. Next I used OnOne, I’m having trouble with the browser not display my RAW filesin version 10.5 so I took the unprocessed lightroom rendering into OnOne 10 Enhance and tweaked the total range similarly to lightroom and I also used the magic eraser to remove a couple of post a swing and BBQ and performed a similar crop. Next I went into OnOne 10 effects and started with a soft dynamic contrast, added a little sunshine and finished with the big softy vignette. Happy with this and it becomes my photo of the day, albeit a dull day.

Friday, June 17, 2016

ArtInspired :: The Banksia in the rain

Still thinking of the process used by artist to create an image versus how a photographer might capture that image. It has been a overcast and drizzly day but I managed to get a photograph of a banksia cone in flower. A almost good photo in itself and I had run a bracketed set (handheld) but it was windy so it was hard to merge and properly register. Rather than commit them to the reject bin it was a worthwhile starting point to reconstruct an image in the manner an artist might.

I’m just using my HP Spectre Tablet in tablet mode so I started with the original image and used the Polarr app to add a little contrast, contrast and strength to the red (both luminance and saturation, but not two much). I might have normally preformed this in lightroom and/or OneOne but they are not as touch screen aware as Polarr, which is a pretty neat photo edit app with really intuitive and easy to use basic tools that can easily be used by hand in tablet mode. An artist might start with the background and the overall colour, so I switched to Corel painter essentials and first set up what they call smart blur (which help highlight the strong compositional elements) and also refined the colour palette (I just wanted to enhance the two colours red and green, classic complimentary colours so I pulled back the saturation of any other colours). I use painter essential to do a very quick starter clone painting of the background. Unfortunately this smeared out the red so I use a soft clone brush to bring out sharper edge  of the Banksia flower (this helped later registration of the images). Next I re-ran the HDR merge using Aftershot Pro, with particular focus on getting best registration on the banksia. However the droplets of water where no longer perfect.

_IGP6049 original photo enhanced in Polarr prelim clone painting in Corel Painter HDR created with After Shot pro

I now had three separate and subtly different images and used OnOne 10.5 layers to blend them together.  The background from the clone painting, the foliage and water droplets on the upper stamens from the original photo and the flower itself a combination (a soft blend mode) of the original photo and HDR image (mainly to enhance the colour).  With a Brush Border from OnOne Enhance

Between Painting & Reality

I’m not sure how to refer to this style of image. Is it digital art, a faked photo (aka photoshopped which of course it isn’t) or photomontage or something different (and new)?

“We called it photomontage because it reflected our aversion to claiming to be artists”  …Hannah Höch