Showing posts with label Nik Software. Show all posts

Thursday, June 13, 2019

A Hybrid Approach 1 :: Where to Start?

I’ve decided to try and describe my hybrid approach to using a range of photographic software tools (aka my photographic mistresses). It really began long ago when everyone had lightroom and it was in charge of everything. I was interested in HDR and had to use other software to pull the EV bracketed sets together. One of the first tools to let me use RAW files directly from within lightroom was NIK software. Google had purchased the system and for a short time offered it for free downloads, still as an add in for Lightroom. I actually found all the tools very useful but it was HDR EFex Pro that I used most. As I was slowly moving away from using lightroom I started missing my access to the NIK tools, generally finding alternatives in other software. I even researched trying to use NIK tools as an Add-in for OnOne. Then a few week ago I saw a YouTube video by Robin Whalley of Lenscraft that mentioned using the NIK programs stand alone. Turns out it pretty easy, you just need to create a shortcut  link\icon on your screen to each program within the NIK collection, then just drop the photo (or photos in a HDR set) onto the icon. Suddenly I have the NIK tools back to use when I need them.

So onto the task of straight forward HDR. This begins by selecting the 5 photos of my EV bracketed set and dropping them onto the shortcut link. This bring up a dialogue to work on a copy or the original and after that the main setup dilogue screen, where options such as alignment, ghost removal and fixing chromatic aberration (those purple and green outlines at high contrast edges) can be manipulated. Also the opportunity to choose which is the reference exposure. Next chick Create HDR and this begins the series of processes to combine the exposures according to your setup. It takes a little time but not enough to justify going to make a coffee.

In a familar NIK software style you then get a basic processed photo to view but with a series of tools, icon and sliders on the right to further enhance the image, OR a series of tiles on the right hand side showing various presets to further stylize your photos. In this case I’m happy to just accept the default HDR result and click on save. I have the option to save the result as a Tiff or  jpeg (other formats don’t interest me) and where I would like it stored.  Job done in less time!

Its exactly the same as if I submitted the selected photos in lightroom to the HDR Efex plug-in, via a special export process but quicker and without the hassle of reloading the result back into lightroom. Same result in less time and no need to fire up and wait, and wait… and wait… for lightroom.

Wednesday, May 31, 2017

And now for the BAD news

Bad GoogleUnfortunately google is abandoning yet another photo product popular with users. Effective immediately they have formally notified that they no plans to updated (and support) the Nik software collection.image

If you are a keen photographer, take RAW format photos and already have photoshop or lightroom, but don’t have the Nik software plug-ins yet, don’t delay download them now, they are free. They are popular because they are good.

I, like petapixel, once hoped that google supposedly an open source advocate, might make picasa, snap seed and the Nik tools open source and let keen users and photographers expand them. My cynical side feels google are squandering a lot of good photographic tools and abandoning the desktop/laptop/webapps space altogether to concentrate on capturing the mobile phone look-at-me-too eye’s (or their phone photo substitutes for seeing).

Friday, April 28, 2017

Stepping into HDR

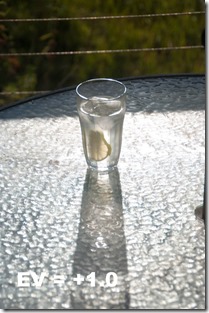
EV Bracketed Setup on my cameraWhilst I am definitely not in favour of setting fixed methods (workflows) for others to follow I figure it would be worthwhile to outline the steps I take to produced HDR images. I’ll be doing it in four different four ways, starting with my current most favoured approach, using Lightroom and Nik HDR Efex Pro 2

I start most of my HDR work the same way, using the bracketing on my DLSR. I have experimented with the number and magnitude of the EV steps. Just three steps of ± 1.0 EV seem to suit a more restrained HDR approach. This give me three exposures, one underexposed, one close to best exposure and one over exposed.

_IGP6682 _IGP6683 _IGP6684

For the first example I’m using Nik software’s (now google’s)HDR Efex Pro 2 plug in via Lightroom. Whilst lightroom has a mechanism to transfer photo out to plug-ins it can only transfer a single image at a time. So instead on the Edit-in tool I need to use the export function and the option google/HDR Efex Pro 2
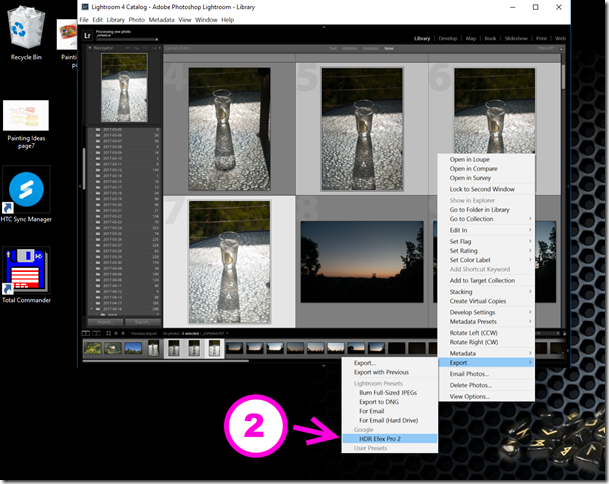
The Lightroom export required

Lightroom will take a little while to export these three files and then start up Nik HDR merge. This occurs in two parts, the first is the Merge Dialogue, which offer three ways to avoid common artefacts and problems when taking multiple photos. This include aligning photos (step 3) when taking the HDR handheld, this is the default so no action is required unless you had previously turned it off. Ghost removal (step4) which searches for and removes ghost images associated with things (usually people) that move between the three exposures. The grey frame around the upper photo indicated the photo that will be used as the ghost removal reference. The strength of 100% is the default but allows you to soften the degrees to which ghost removal is undertaken. Whilst I’m sure this step takes time, I just leave them always on, as it has no impact that I can find when there is no movement. The final artefact (step5) is chromatic aberration (coloured fringes at the edge if strongly contrasting parts of the photo, eg. tree silhouettes against the sky) because the HDR process can over emphasise this effect. Different lenses and lighting will give different effects, I have found more the upper slider to remove red effects and the bottom slider a little less towards the blue works well for most of the photos taken with my Pentax camera and Tamron lens combination. There is a magnifier at the bottom right of the reference image if you want to check who these setting are being applied. The lightness slider underneath the image helps you see and check detail in the HDR image. It does not effect the the processing of the HDR image in the tone mapping steps to follow.

Merge controls in NIK HDR Efex Pro 2Clicking on the Create HDR button at the bottom right, starts the corrections you have set and applies them to the individual exposures and the merges the three images, It can take a few seconds and then takes you onto the interface controls for the tone mapping step. This  is the dialogue window in which you will do all the remaining image adjustments. Nik have provided a library of presets which show on the left hand side, grouped under several effects. When you begin using the software it is probably a good idea to try the look of several presets, a lot of them are over the top. I quickly found I only liked the realistic group and then only a few of those, I personally find the Balanced Preset (step 6) gives me a good starting point.
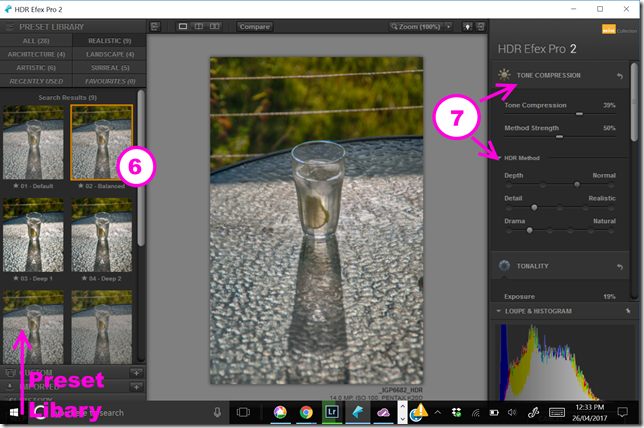
Tonemapping Interface controls in NIK HDR Efex Pro 2

However It is just a starting point, and I suggest moving over to the right hand side and working down through the options to edit your image. The first is tone compression (step 7), these sliders can have a really significant effect. The tone compression moved all the way to the left will leave the dynamic range much close to a single photo (flatter) whereas move all the way to the right gives you an extreme dynamic range putting detail in the shadows and highlights (it will usually look surreal and  over-powering), but a slight move to the right often makes the image snap. The methods and method strength also control the tone mapping but in specific ways. Depth controls how the shadows and highlights are to be treated and again moving to the right will enhance the dynamic range, normal is fine for me. Detail is a lot like clarity in lightroom or structure elsewhere in Nik software, it controls the local contrast and can bring up a lot of detail, realistic is fine for me. Selecting the histogramDrama is like a contrast control and different images respond different, I’m using natural here but moving to the right usually adds drama particularly to a cloud sky.

For the next step Tonality I like to have the Histrogram displayed (step 8) on the lower right panel (normally it is a loupe/magnified view)
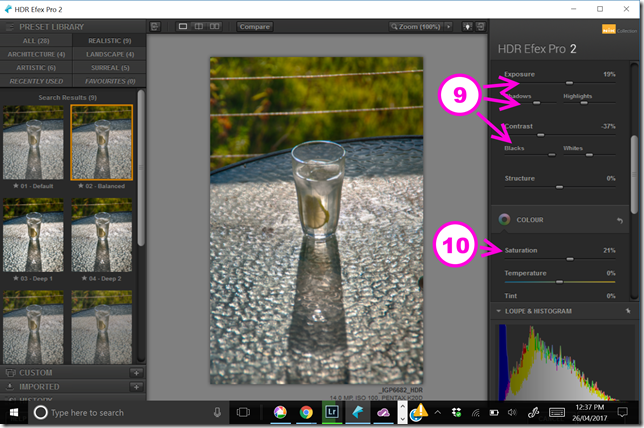
Toneality controls in NIK HDR Efex Pro 2

The tonality controls are  very similar to the Basic tonal controls in Lightroom, but the work across the new combine dynamic range of luminosity in the HDR image. They work on the image as a whole. I wanted this image to better fill the histogram of the available dynamic range to I increased the exposure a little, stretching the whole histogram to the right. I also increase the highlights and lessened the blacks (lifting the left most part of the histogram (step 9). I also increased the saturation just s little (step 10). These last two steps could have just as easily been made in lightroom but it is convenient to do them here.

Normally I would finish here, but I found the wire in the background distraction so I then used OnOne 10 enhance and the magic eraser (a context sensitive fill)  to remove them. Also I cropped the photo a little.

G&T :: Backlit Glass

Friday, April 14, 2017

Extending Dynamic Range

Contrary to want a lot of people believe Digital Cameras, even the best ones, are not capable of capture the full extent of light from the darkest blacks to the purest white. They struggle to get close to the capabilities of traditional film and they are certainly no where near as capable as the human eye. This range of illumination is usually referred to as Dynamic Range. This limited range coupled with an automatic light meter that is trying to get an average exposure (ie matching a mid tone grey overall) is the reason a lot of images turn out boring, washed out and flat looking even though you remember much stronger light (and often colour)._IGP6498 Untouched RAW Image as Rendered by Lightroom

Here are a couple of techniques that can help you get a wider apparent Dynamic Range in your final photo.IMAG0167 - AutoHDR using HTC UPlay CameraThe first is the use a camera app on your phone that will take an “AutoHDR” (this usually means it will take 3 exposure and combine then using software with the app, a few will do pseudo HDR a bit like the next approach.) This is the simplest approach and results can be surprisingly good.

_IGP6497A second approach is to take a RAW image (this is in .PEF format) and use software (I’m using lightroom Develop basic panel only.) I’m following what I once called SDR+ (standard dynamic range plus) and I even wrote a couple of presets to do it. The basic idea is I bring up detail in the shadows (usually moving the shadow slider to the right, sometimes I also change the blacks using the approach often called “finding the black point”, while on the black slide hold down the <alt> and the scree turn black,image the adjust the slider till a few whit areas (these are the areas that will be rendered pure black) show up. You can do a similar operation with the white slider. The objective is to get the illumination histogram to be as evenly spread across the range as possible. This doesn’t take all that long  and I prefer to do it manually to even my own preset, but it requires specialist software, some skills in the oftware and a camera that can take RAW files. Many RAW purist will explain this is why you should always take RAW images.

_IGP6496_HDRThe third approach is classic HDR (High Dynamic Range) and here I am using three bracketed +/-1 EV exposures. Then the Nik HDR Efex Pro 2 software and the balanced preset to create a new 16-bit colour .Tiff file. There are many variation of the HDR technique and software, but it normally involves two steps. First collecting and preserving the full range of illumination values from the three or more exposures. Then a second step of “tone mapping” these into the available dynamic range of your image (and this is also related to how you might reproduce the image, eg print or screen). The downside is these steps and any image prep take extra time and a lot of folk get carried away with the slider options in the “tone mapping” step, thereby producing the sickly vivid and disturbingly surreal images that have given HDR  a bad name. I personally think this method has give me a final photo much closer to the late afternoon light I was photographing in. I have to admit I do take a lot of HDR images, particularly in contrasty light or where I know I need to preserve the Highest Dynamic Range possible.

So if you are disappointed with flat washed out images you might like to investigate at least one of these approaches.

Sunday, October 16, 2016

What I am looking for from HDR

Its a very overcast day after yesterday’s strong wind but with that calm before a storm feel. Not an exciting time to take a few photographs (yet). What I did notice was a new yellow rose had a few buds about to flower but had been very dried by the winds so I gave them a light spray of water and took a couple of bracketed photos of the new buds.

_IGP5315 EV=-1_IGP5316 EV=0_IGP5317 EV=+1
The close up simple composition gives me a great opportunity to compare three of the HDR programs I have used recently, and specifically to discuss what I like to use the HDR Technique to do. I have written a fair bit about HDR. However few people realize how often I use it. I think that is because I am just trying to create an image as I remember the scene, rather that what the camera recorded. The images above are all a bit dark, but that usually doesn't matter within the HDR process. If I was to process just one image I would choose the one on the right and lighten it a little and increase the contrast. Since I have a RAW file that would be simple.


However here are alternative ways to process these photos

Picturenaut

Importing 3 Photos to ProcessThis was my go to program for a long while because it was easy to use, free and could process RAW files (which I reasoned gave the HDR process more dynamic range to work with). Importantly for someone that usually hand holds while taking the bracketed set, it has a decent alignment correction. The ghosting (removing ghost from people or things that moved between exposures) work for small movement but my experience was it could misbehave so I only used it when I saw obvious ghosting without it. I also found that it would often need the EV setting of the images updates (ie they would often just all read EV=0). In the table beside each file used.

Main Screen Once HDR File is created  Tone mapping screen
The HDR image (which can be saved) is very dark like my original photos but when I select Tone Mapping I generally select adaptive logarithmic method and accept the default settings and save it was a .tiff file. Preferring to then finish the result in either Lightroom or OnOne.


AfterShot HDR

Selecting files to mergeWhen the HDR was added to aftershot in version 2 I became an immediate convert. It is also handles alignment (mostly ok). It also handled RAW files (unfortunately version 3 of aftershot Pro does not pass raw files nicely into the HDR merge program, so I must maintain a Version 2 copy just to do HDR) and it is vary easy to set up you just select the files you wish to use and then right click and select to Edit With AfterShot HDR\Exposure Merge

Selecting files to merge Alignment Screen
The ghosting has to be fixed by masking away the ghosts you don’t want (on specific images) which can be a little tedious but can be much better controlled than the automatic methods. Again the aligned image looks very dark. However when you process the three images into one the image generally looks much better exposed (its not magic the dynamic range is being stretched to fit the image)

HDR File Created Screen & options Final Screen giving additional edit options

I have the presets turned off and generally only make some minor tonal adjustments. My preference is to add a little contrast and deepen the midtones and/or shadows. In AfterShot there is an extra step where there are as a number of basic edits to finish the image but again I prefer to save the resulting photo as a .tiff file and then do my finish in Lightroom or OnOne.

Nik Efex HDR Pro

Exporting files to Efex HDRWhilst I’ve had Nik software since google offered it for free download. I was a little slow to try out the HDR merge features. I have been working through the various screen via the rather big collection of presets. To my taste a lot of these are just hideous, those strong halos around constraty edges and super crunchy detail and lurid colours are off putting. Still I like enhanced colours and a little extra contrast so I can see a few presets that are getting me close to the nature feel I am looking for. These include default, balanced, Soft Colour and soft Landscape presets. Nik Efex HDR needs to be run from Lightroom and it has to be started a little differently to other plug-ins. Instead of the normal Edit In option, you have to export the photos to Efxex HDR  Pro via a specific option in the export menu (shown on the right). Lightroom does take a little time to prepare these exports.

HDR Merge Screen HDR file view and preset options

I am still experimenting with how to do minimal tonal adjustments, but already have discovered that I need to slow down the drama (mostly) and often experiment with structure which is a bit like lightroom clarity and OnOne’s dynamic contrast. Again I prefer to save the .tIff image at this stage and do the tonal finish in lightroom. Perhaps with a little more practices I’ll gain more confidence. For the moment Nik’s Efex HDR pro remains an interesting diversion rather than a go to tool.

In the end I choose the Aftershot Pro .tiff image as having the closest to my feelings looking at the water droplets on the new buds. I finished this in OnOne 10 using the perfect eraser to get rid of the hole in the petal and a small curl of another bud below left, crop in a bit and add my favourite big softy vignette to bring the rose forward from the background a little more. #290 The refreshed new buds

All of these steps take considerably longer than just processing a single image but I tend to think the extra time spent is worthwhile and creates a stronger and more real image.

Friday, September 30, 2016

PhotoProject :: Seeing by thinking sideways

The lighting was not so perfect this afternoon, so I had decided to try another seeing exercise from Freeman Patterson. This time I’m looking at the idea of thinking sideways, looking at something familiar, but not normally photographed. However thee trick here s to think of a reason you don’t take the photo and instead look for something to become a photo. Freeman’s suggest trying to break a rule, like not photography into the sun or avoiding balanced and cantered compositions. On the way to my favourite spots on the far side of jells park lake to capture the setting or late afternoon I have to walk along bush tracks. I have seldom photographed them so next I look to break a rule of too.

On my way out I turned and looking back towards the sun (and yes damn there is sun flare). I also took a bracketed set of exposures so I could play with the tonal aspects. I then processed HDR versions in two different applications (firstly on the right using Aftershot HDR merge and secondly of the left Nik’s HDR Efex Pro 2)

IMGP4470 -1EVIMGP4471 +0EVIMGP4472 +1EV

IMGP4470_1_2_Aftershot HDR Manual SlidersIMGP4470_HDR_Efex soft landscape

I treated the Aftershot Pro merge as I normally do (without  using a presets) and adjusting the tonal sliders myself to match the scene I remember. The HDR Efex software is still a bit new to me so I choose to use their Soft Landscape preset.

On the way back further back along the track the sun broke through the clouds for a few moments and Looking Straight Back down the track, with the classic composition you are supposed to avoid. I took another bracketed set of photos. However the cross lighting and shadows in the distance do attract the eye and make the composition appear more interesting. Again I created two HDR versions.

IMGP4490 -1EVIMGP4491 +0EVIMGP4492 +1EV

IMGP4490_1_2_Aftershot HDR Manual SlidersIMGP4490_HDR_Efex soft landscape

Of these images I do like the bottom left one, it has stronger contrast (because I created it that way) and perhaps fits more closely with what I remember of the lighting at the time. I’m glad I spent some time thinking sideways and looked at these tracks a fresh.