Showing posts with label zoom. Show all posts

Monday, February 07, 2022

Connecting What and Who are the Wednesday Wanderers?

 What were you doing during the lockdowns? (well assuming they are over

Here is something I did and we are having an exhibition, If you are in Melbourne or allowed into Victoria please come and have a look.


Wednesday Wanderers was born out of the COVID-19 pandemic.  Unable to meet or paint en plein air during strict lockdowns, three committee members from the Watercolour Society of Victoria were feeling isolated and fed up with their own four walls.  It’s easy to forget that before COVID, many people had never used or even heard of Zoom.  We used it to connect a diverse community of watercolourists interested in escaping from the pandemic blues once a week.  We adopted a quirky speed painting format that challenged our skills and fit in with the technology requirements. 

Immediately it became apparent that there was a need for something like this, as membership quickly grew.  It has enabled artists who could never have come to a real-world paint-out to spend time some enjoyable time painting together in a safe environment.  Time poor artists, artists who live far from Melbourne, housebound artists, and those caring for family members. 

 We continue to meet fortnightly now that lockdowns are presumably a thing of the past.  We now have Wanderers in many parts of Victoria, as well as New South Wales, Western Australia, and the United States.  We have become a warm, welcoming community that continues to grow.

,,, Jane Elliston


Friday, August 28, 2020

MMMmmm you probably noticed I have stopped posting

 I haven't stopped posting because of the COVID19 restrictions. Well not entirely. It's been more to do with frustrations of things changing and either not working or requiring a lot of time to negotiate. The changes in Blogger where kind of the last straw, Ok the new interface is cleaner but....

I happen to have become a lot more interested in streaming, and zoom in prticular. Firstly through setting up a series of Zoom meeting. However it didn't take long to get more interested in how to use the medium (of reliable home streaming and personnal interaction) in a more creative way.

Well there is plenty of good and bad in the wide spread popularity of zoom (and similar video conferencing tools). First the BAD (and ugly) aspect are the one to many sessions where one or two people take over and often show detailed hard to read powerpoints. Its not only "death by powerpoint" its boring and stressfully hard going, its "zoom fatigue". we are all experiencing. I guess you can amuse yourself by looking around the room and seeing all the other bored faces looking back.

There is a GOOD side. It can be one to many but presented as one on one, but here it feels like it is being presented just to you. A very good example of this is Nora Jones Mini concerts live from home on YouTube
.


This YouTube link is an example of my frustration with blogger, the new interface no longer has an edit the html link feature, or I can't find it, but share from Youtube connects to the old blogger interface. so I shared from there as a draft. open the draft up the new interface just shows the clip greyed out ....Ahhhh

There is also the possibility of EVEN BETTER and this lies in the possibility of many to many connections where everyone gets to connect. However conversation on video conferencing can sometimes be a challenge if everyone tries to talk at once, because the technology is set up to only let one participant speak at a time. What is require is some old fashion etiquette, specifically look & listen. Don't keep talking over people take a breath and see if they are listening and want to say something. With this little bit of magic suddenly your opportunity to get together is much more likely to be enjoyable.

Wednesday, May 13, 2020


Ive spent more time than expected making a YouTube video. I suppose I learned a lot but I still have a lot to learn.

I did find something really neat. I was able to record mt phone sequence using zoom. I set up a private meeting logged in from my phone and shared the screen and pressed record meeting locally back on the host PC.  No exotic hardware or software required.

Friday, September 05, 2014

Some Photo Management tools for older eyes

Despite camera getting more megapixel and screens becoming higher resolution a lot of folk seem to struggle a bit expecting to see what they expect to be more detail. The reality is the eye doesn’t see all the detail in a good quality print even if you have 20/20 vision and while most screen are lower resolution and you can see the pixels when you are very close up (even on an ipad with a retina screen), and a data project with a lower resolution may appear to have crisper detail when projected on a wall. So what is going on here?

Blue Eye WallpaperIts all got to do with the viewing distance and how our eye perceive detail relates to the angle separation the light sources and its intensity and we actually only see at high resolution in a small area,  What we see depends a lot on our brain’s assistance filling in detail as I eye moves around remember and assembling a detailed memory rather that a specific snapshot. This is an interesting topic but way too complex to discuss now (this Gozmdo post introduces some of the issues via a neat video). What is also in our field of view also affects what we see (or can focus), A small 10 by 15 cm print is not as compelling as the same image on a large screen TV or projected on the wall, even though the print could have many more pixels  Add to this the normal trend to loose the close vision resolution as we age. So us old folk with always reaching for our glasses for any prints or photos on phones. Buy where does that leave up in photo editing software The zoom function available in most software is a real bonus for older eyes. 
So here are a few of my favourite ways to see detail in a 18mega pixel raw file (ie a resolution greater that the screen could possibly display) They are all various of the zoom tool, usually signified by a magnifying glass Icon
lightroom 100% zoomLightroom’s 100% view. This is a actually a bit of a strange name because it is really a view in which a single pixel from the images is displayed by 4 adjacent pixels on the screen (so perhaps a 400% view would be a better explanation). This view can be easily accessed when viewing any picture and the cursor shows the magnifying glass icon is showing as the mouse pointer, its the normal default). Just move this pointe to the centre of what you want to see and you get this very zoomed in view. Panning this view around the image is a little counter intuitive you have to do it in the navigation preview, on the right hand panel. It is clunky but usable. Click on the image again and you get zoomed out. Getting a partly zoomed in view is a little less obvious, if like most people you seldom use the menu bar. It is under the View/Zoom In menu (or the <Ctrl>= shortcut) and View/Zoom Out (<Ctrl>-shortcut).
This 100% view is more detailed that most people will see and those that go straight to this view are often referred to pixel peepers, (they are probably also obsessed with focus and sharpness). If you don’t have lightroom and want to see this obsessive world of the 100% view there is a web site called pixel peeper which compares reference photos from different camera manufactures with a link into “full sized” views on flickr.
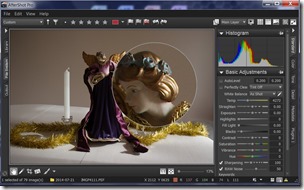
Aftershoot Pro magnifier toolThere are two zoom tools in AfterShot Pro. the best one is the little magnifier on the upper right hand side once it is click anywhere you put the hand icon you will see a blown up view in the circle of the magnifier. Its close to the same zoom factor as the lightroom 100% view but the why you move it with the mouse over the point of interest is  much more intuitive and responsive (than lightroom rectangle). It has become my favourite way to preview photos. At the bottom of the screen is a zoom slider which zooms the whole picture in and out. (see also my recent post on AfterShot Pro’s workspace.)
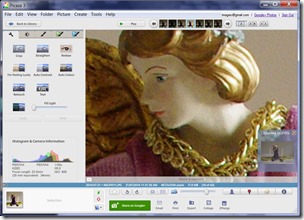
picasa zoom toolThe zoom function in Picasa is limited to a zoom slider, but it is always present at the bottom of any single photo. It can actually go deeper than the lightroom 100% view to a very pixelated/scary view (depending on the original photo resolution). So there is no need to take it to the extreme right. It works a bit more like the lightroom’s zoomed view in that a small thumbnail of the full image appears in a pop up window and you pan the larger zoomed view in the display window by moving the small rectangle of that view in this thumbnail window. (see also my previous post on Picasa’s workspace.)
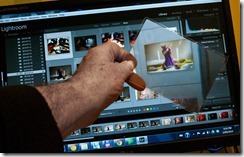
Using a flat fresnel magnifying lensMy last zoom tool works on all software (even the back of the camera).  It is a flat plastic Fresnel lens, they are inexpensive, you can find them in the $2 style shops, often in a range of sizes. I always have one in the back of a small A6 sketch book in my camera bag and another on my desk. For computer work I hold the lens at arms length just in front of the screen.

Sunday, October 16, 2011

Every camera has FREE Digital Zoom

image The simple feature found in almost all image processing software normally called cropping, givens every camera owner access to a digital zoom. Like the much maligned in camera digital zoom feature there are limits. If you zoom in too far your image becomes blocky, noisy and fuzzy, The digital camera will probably have an interpolation built into it6s functions that tries to smooth out and sharpen the image as you zoom in. It will also possibly resize the interpolated output. Another common image processing tool sharpen might help extend the zoom range just a little on your cropped image. However don’t go overboard with sharpening (it can introduce unfortunate edge effects at contrast boundaries in the image)
So here is a recent example, I was taking a wide multi-image panoramic view, with my normal lens 50mm (75mm equivalent to a 35mm) Then I notice some swan flying past in formation and with no time to change lenses I just snapped an image (of them way in the distance, see image above). I then cropped this in picasa and added just a slight tweak of sharpening. The result is not satisfactory to blow up but looks fine at 15 by 10cm (6” by 4”) the standard photo processing snap shot size
IMGP9059-1

Thursday, November 26, 2009

Zooming around

Trying to display wide panoramas on my tiny blog post space has always a disappointment up till now.

That was until I tried out the Microsoft’s  Live Labs tool Sea Dragon, which combines several new technologies to progressively retrieve large amounts of data using a fast, seamless, zoom based interface. Amazingly it works with all types of content, from wall-sized displays to cell phones, regardless of the amount of data or the bandwidth of the network.

Its pretty intuitive just click on the mouse and start moving around, the wheel will zoom you in, or use the plus and minus buttons

Thursday, March 27, 2008

Decent rains at last!

 
Posted by Picasa

Photographing actual rain is a very complex task, its udsually very poor lighting, its falling fast and therefeore blurs in the slow exposre required, it usually has no center of interests, the list just goes on and on. So I have taken the simple way out, just photographing the effects and really zeroing in on just a small aspects, using the macro setting on my trusty telephoto zoom lens, the water droplettes on a grape vine. Still it tells the story well.

Saturday, January 27, 2007

Is focal length still relevant?

Focal length is seldom mentioned anymore in the same breath as digital photography, the jargon has moved onto times zoom. Not that this is that clear, you have to understand the difference between optical zoom (the lens being able to change its focal length) and digital zoom (just a part of the image being magnified in the camera, without any improved resolution). Even with digital SLR cameras which have interchangeable lens, most people just buy a zoom lens, so they pay little attention to focal length.

Increasing the focal length of the lens you use (either by changing the lens on a DSLR, or zooming in) narrows the field of view and magnifies the subject (making it look closer). Higher focal length lenses are called telephotos. Decreasing the focal length expands the field of view and the image looks further away. Lower focal length lenses are called wide angle, because of their wider angle of view.

So here is a demonstration of the magnification and field of view obtained with different focal length. To fully appreciate the difference in magnification involve try if you can see the small "turret" on the house in the middle on the first image at the top, in the final image at the bottom. You will need to click on the images to see the larger versions.
300m (telephoto or 10X zoom) 210mm (telepohoto) 133mm (telephoto)

100mm (telephoto or 3X zoom) 70mm (telephoto or 2X zoom) 50mm (telephoto)

35mm (closest to normal human eye) 29mm (wide angle) 24mm (wide angle)
Whilst a 50mm lens best matches the perspective and magnification of the human eye on older 35mm film cameras, a focal length of 33mm approximates the normal human vision on a digital camera, which has a smaller CCD sensor area.

If you are interested you can find the focal length used for images in the EXIF data embedded in most Jpeg or RAW file formats these days

Changing the focal length also changes the perspective but that can be the topic of another post.