Showing posts with label polarizing. Show all posts

Friday, May 05, 2017

Blinking in the intense light

Whilst I did live in Perth for just over 5 years in the late 70's early 80's I had forgotten how harsh the normal midday sun could be over in this part of Western Australia. Correction make that anytime from about 15 minutes after sunrise to about 20 minutes before sunset. The full sun is brilliant, hot and anything white is shimmering, brilliantly white, But hang on the sky is also a brilliant blue and the dappled shade is full of colour. Still the intensity strains my eyes and IPrisma Filter rather than over exposed have to reach for my polaroid sunglasses that’s better. White it is still white but the colours are even richer now.

If I try taking a photo the results are strikingly different, everything is bleached and washed out. The sky is usually blown out to total white and the shadows are thin and inciped. What's going on, well my eyes have a much wider dynamic range (It can auto tune itself to a broad range of light intensities) whereas a modern digital camera has a smaller range and it my try to expose to get the best "average" intensity and strong light makes this a challenge. Also I'm wearing sunglasses.

So is there a way to get decent photos in this intense light? Well apart for only getting your camera out for the 15 minutes of golden hour light at the beginning and end of each day. Or wait for a cloudy day!

Yes there are many ways

  1. Use a very low ISO (making the camera less sensitive to light, means it can tolerate more light)
  2. Move to a higher f-stop (make the aperture smaller and thus less light)
  3. Use a neutral density filter (it screens out a lot of light)
  4. Use a polarizing filter (cuts glare and works like the sunglasses)
  5. Use a Negative EV setting (many phones won't have ISO or f-stop setting, but they probably have an EV slider on the camera app)
  6. Use an bracketed set of exposures, and post process using a HDR technique

Three Photo Stitched Panorama

C: Pentax K20D Tamron DX 18-200mm Lens 40mm
E: ISO 200 F/11 1/2000 sec (-1.0 EV)
F: RAW .pef
WB: Auto
Polarizing Filter

PP: Autostitched 3 Photos

Sunday, January 22, 2017

The Notan Strip on my Hat

So why would I paint a set of Notan inspired grey shades onto my hat?_IGP1982_HDR

I’ve noticed that when I use a polarizing filter in the strong harsh light, The filter is definitely adding a warming effect into the colours and infact acting a little like a 2 or 3 stop neural density, My experience over the last couple of weeks and particularly a sunburnt nose saw me purchase a basic white floppy hat. Not a high fashion item but very useful on a hot sunny day. Then I realised that if a drop the hat to the ground and included it in at least one exposure I had a perfect reference tool to fiddle with the white balance in post processing, Adding a series of Notan reference tones hopefully will mean I don’t have to keep using my reference card, they are there on my hat.

The acrylic paints I used have, as usual darken once the dried so I may have to repaint the tones again a little lighter

Saturday, October 08, 2016

PhotoProject :: Mad Dogs & Englishmen

Summer, Time for the Sunnies,Lens Pen & Polarizing filterAt last we are getting some sunny weather down here in Australia (it has been an unusually wet and overcast spring so far).i So it is now time to break out the polarizing filter, one of my favourite landscape accessories, The Australian Sun can be really strong and Harsh light and generally the illumination of the sky much stronger than the land (or beach) to typically a photo in the middle of the day will have a bleached out sky, instead of the intense blue it actually appears to our eyes.

Just like polaroid sunglasses the polarizing filter oriented in the correct way can cut back the intensity of the sky and glare and deliver a nice sunny photo with a blue sky. My polarising filter is an older style and it also acts like a 2stop neutral density filter. Compare the photo on the left, taken with my polarizing lens, and the photo on the right normal exposure without a polaroid lens.

With Polarizing FilterWithout Polarizing Filter

There are a lot of purist that might say you should only take landscapes in the golden hours, and never in the harsh midday Australian sun. But I say slap on some sunscreen, sunnies (sunglasses) and a polarizing filter and take a few photos if you want.Especially if the family are enjoying that day at the beach or in the park.

Sun, sand & beach can be a challenge to keep your camera and lens clean so put a blower brush (to blow off any sand or particles) in you camera bag and perhaps a lens pens (or microfiber cloth).

Wednesday, January 13, 2016

Under the Australian Sun

Summer can be hot here in Australia, and today it is supposed to reach 41°C and trying to get a decent photo during much the day just results in a totally bleached out sky. There are basically three solutions-

  1. Only Photograph during the golden hours in summer.
  2. Take separate photo just of the sky and using blending, masking and compositing insert a sky during post processing.
  3. Use a Polarizing Filter

Without any filterThe first option is a bit restrictive, and the second can be a lot of work. I have an old circular polarizing filter it is designed to rotated when screwed onto the front of your lens. I find it pretty much indispensable for any daytime outdoor photos in summer. The polaroid sunglasses use the same principal of filtering sunlight and other strong light source which have reflected off a surface (including the earth atmosphere) and only the light with a particular direction of vibration is reflected so the light is polarized. A suitable filter can reduce this light when place at right angles to this preferred direction (its fairly technical physics) but is easily exploited. Those sunglasses have the polarised direction set to cancel out reflected light off water or surface. The circular polarizer is more flexible on a typical DSLR as you can rotate it to any angle and see the result in the viewfinder. The results are most noticeable at right angles to the sun. There is a good tutorial on using a polarizing filter by Cambridge in Colour.

Polarizing Filter oriented horizontally    Polarizing Filter oriented vertically

Because the polarizer is removing light (in specific directions) it acts a lot like a neutral density filter making the exposure longer, diffusing the harsh contrast a little and frequently enhancing the colours a little.

A circular polarizing filter is almost a necessity in an Australian summer

Tuesday, April 23, 2013

Taming the Glare with my Polarizing Filter

My polarizing filter has been on my camera for most of summer and it does a great job, although I have noticed the general exposure is often appears a little under exposed on some foreground detail, It is well know to photographers that such filters do a great job making the sky more interesting, specifically making clouds look whiter and giving depth to the sky. This is well know and discussed often and probably the main reason given to use a polarizing filter. However there is an even more amazing feature that filtering polarizing light.can fix. That is cutting the glare reflected on the surface of water. This glare is strong polarized itself by the reflection from the flat surface of the water,and crossing the polarizing filter normal (ie at 90°) to this actually cut the glare so you can see into the water.

Vertical

Horizontal

Deeper Blue in Sky Greater contrast, Whiter Clouds
Strong Glare on water surface Without the glare can see underwater detail

On my polarizing filter their is a small triangle ∆ etched into the rim of the filter, That marks the direction of the polarizing filter alignment. So I can reference this to see when it is vertical (Ie on top of the lens), Or rotated to horizontal (ie point to the right or left side of the lens). You can also see the effects are fairly dramatically through the view finder.

Thursday, April 11, 2013

Trying to keep HDRi real

bracketed sunset HDR seriesTaking the sunset tonight, with the polarizing filter still on the lens, I was conscious that the images on the back of the camera was very dark (underexposed) but the colours of the sunset looked rich, like the actual sunset in the +1 EV image from a bracketed set. So I figured I should do a bit more experiments with HDRi in picturenaut using high bits per channel, which this package can only export as .tiff files, but minimal tone mapping. In this case I used just an effective +1.3 EV exposure adjustment of the whole image.. Again I was not able top read the 32 bit version into lightroom, where as picasa could display it? However the 16 bit per channel files loaded easily into lightroom and responded beautifully to some tweaking of the shadows & black tones and slight clarity and luminosity increases. These adjustments did unfortunately highlight the digital noise, which is typical of low light exposures, but this was easily corrected with the lightroom 4’s development/detail sliders.The combine file is no longer a RAW format but it does hold and extended dynamic range that the basic lightroom development controls can adjust, and I feel this approach does it naturally, not in the lurid surreal formats so often blamed on the HDRi technique itself, but are actually related to some preset concepts of the tone mapping options in common HDR packages. So Instead of “finishing” your HDR work in picturenaut, photomatrix or other HDR software, instead try saving the combined image at a higher bits per channel and do the final tonal adjustments in lightroom (or photoshop)
Sequence: {IMGP0673.JPG: TV=0.002857, AV=6.7, Bias=-1.0} {IMGP0674.JPG: TV=0.004000, AV=6.7, Bias=-0.5} {IMGP0675.JPG: TV=0.004000, AV=6.7, Bias=0.0} {IMGP0676.JPG: TV=0.005556, AV=6.7, Bias=0.5} {IMGP0677.JPG: TV=0.008000, AV=5.6, Bias=1.0}

Saturday, March 23, 2013

Towards Blue(r) Sky(s)

Original (Polarizing)

Increased Saturation

Decrease Luminance

original taken with polarizing filter After Increased Saturation After Decreased Luminance
The light in summer here in Australia is very intense and it is really hard to get a decent blue sky. So I normally have a polaroid filter screwed on the front of my camera from November to April. The filter works a lot like the sun glasses, at different angles they will filter out and cut the intensity of the light. By rotating the filter you can see the darkening. As well as helping darkening the blue of the sky versus gulls or clouds, the polaroid can also work like a mini neutral density filter, to give you a slightly longer exposure on some landscapes. The common approach is just make the sky bluer by increasing the colours saturation.
blue sky saturation

In Lightroom you’d go to the develop module and slide the saturation slider to the right. Notice the gulls beak is also a more intense yellow
blue sky intensity
This is a less obvious route, In Lightroom you can go down to colour adjustment and in the HSL tab go into the Luminace panel and hold back on the blue a little. This just darkens the blue only and leaves the tonal range and colours on the gull untouched.

Friday, September 28, 2012

Late Afternoon Rainbow


The rain clouds cleared a little and for a few moments a rainbow appeared against the dark clouds as the last rays of the sunset lit a few low clouds. Just enough time to grab my polarizing filter to enrich the colours of the rainbow. Then it was gone.
Posted by Picasa

Sunday, August 26, 2012

Now you see it, Now you don’t

rainbow 2  rainbow 1
The late afternoon storm, bought dark skys and a few glimpses of sunlight (and rainbows). I took the opportunity to try out my recently "refound" polarizing filter (it is an old filter from film days, and often used back then, but it had been hiding from me for a while). Turn the filter through 90 degrees, took the rainbow from maximum intensity to almost impossible to see.

Sunday, February 17, 2008

Another great day for the beach

HDRi using Auto adaptive tone mapping

Original Photo (taken with polarizing filter) Up till now I had been trying out the HDRi techniques in low light, a theme that seems to be the favourite place to start, at least in the Flickr My first HDR (beginners)group. It has been a magnificnt weekend so it was off to do my usual breachcoming photography ramble and I though I should start with a HDR test in the full glorious light of an australia summer day (a subject most digital photographer soon find out returns a very contrasty washed out image. OK I have been using a polarizing filter for such situations and that helps resort a more natural image, particulary helping to keep the sky blue , not a washed out white) and the three EV bracketed photo used in the HDR image above where taken with that polarizing filter. In dynamic photo I have been movind down hwn tone mapping, avoiding the eye catching and Ultra Contrat setting and i tend to like the smmoth compression, or human eye setting, but in the HDR photo above I used the Auto Adaptive seting because it most closelt captured my memeory the colour of the water and wet sand.

So my conclusion is HDR can be used in the "heat" of the day to help capture the gorgeous colours of an Asutralian summer at the beach.

Tuesday, November 06, 2007

Getting the sky

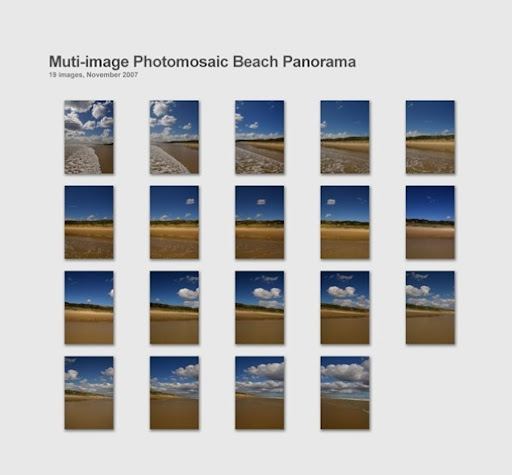
collage I am actually rather proud of this panorama, I hope to generate a 2m long blow up. It is based on 19 individual images and was stitched into a single with autostitch. However that is the easy bit, getting 19 images to look as if they are correctly exposed out in the middle of a late spring afternoon in Australia is the real challenge. Normally because the Australian midday lighting is so harsh, if the beach is correctly exposed the sky would be washed out  (most automatic light meters will do this) or if the sky was nice and blue the beach would look dark. So I have used a polarizing filter, its effect on the beach is minimal but it changes the contrast in the sky and clouds beautifully.

Click on the image to see a large version of this photomosaic

Saturday, October 27, 2007

Blue Sky

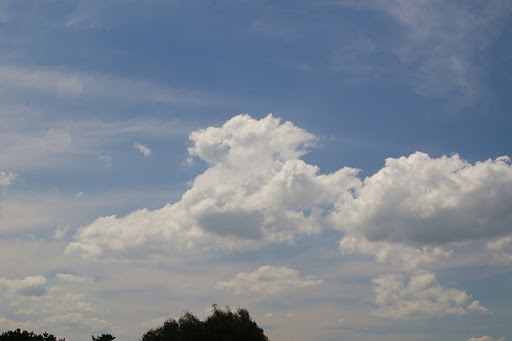
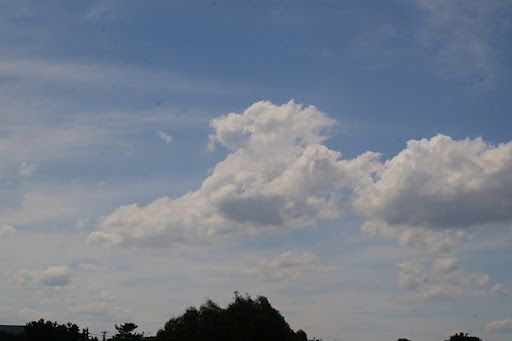
The traditional way to enhance the sky (darken the blues and whiten the clouds) is with a polarizing filter. Whilst filters where much used in with films SLR, they are not that popular with digital photographers, possibly because post processing can do pretty much the same (and more).

Using an polarizing filter 

With a polarizing filter

No filter being used

No filter

post processed in Picasa

No filter on lens, but the "I'm feeling lucky" filter in Picasa