Showing posts with label EV. Show all posts

Sunday, October 01, 2017

Does Exposing to the Right make a difference?

Exposing to the right, isn’t magic and it not applicable everywhere.  Its a relative simple method (“trick” is not the right word) to help capture more light and reduce the underlying signal to noise ratio issues in lower tonal ranges. Whilst it can be applied in jpeg format, with lesser success, it really needs photos to be taken in RAW format, which records more detail and  give the capacity to adjust tones with suitable post processing software for the “finished” photo. It also helps to have a digital camera that can display a histogram (of the light illumination levels) on the back of the camera.

Just a word of warning there is a lot of rubbish written about exposing to the right that will come up early in google searches. If you read this post and try it out for yourself you will realise that it isn’t a hoax or a myth (they are just BS, Fake news)

The other requirement before you can exploit exposing to the right, is having an image with some “head room” in the histogram to increase the exposure without hitting the dreaded white clipping. Once your sensor fills with photons to its maximum, no extra detail can be captures. in 8-bit RGB terms you have reach 255 level in each colour channel. The histogram will be hard up against the right hand edge (see lower right of the examples below). If your camera has the settings you can turn on the feature to show this clipping. They are frequently displayed by blinking zones of colour usually referred to as the “blinkies”.

Originial Exposure Exposing to the right +1 EV Blinkies, opps too far +2EV

I took this series of photo on the way home, trying to beat a storm, the new growth on the oak trees looks photo worthy so I stopped for a quick shot. The sky was darkening and the trees largely in shadow so I got a typical result (photo above left) with what appeared to be an reasonably exposed sky and most of the foreground in deep shadow. Looking at the histogram the exposure is probably ok in terms of average illumination. There is very little  bright light recorded on the right hand side of the histogram. The photo on the left is just not what the scene looked like, it appears darker than what I saw. This is the type of situation where exposing to the right can help achieve a better image.

In my series I am using the exposure compensation to try letting in more light, but if your are shooting on a DSLR you can use any combination of ISO, F-stop or Shutter speed. Just changing f-stop by one stop doubles the light, change to +1.0 EV achieves the same. I have taken +1 Ev (the middle photo above) and +2 EV (The photo on the right above). Immediately I can see that the +2 EV option is too much I am clipping the sky and no matter how much darkening I try to perform it will remain pure white. The histogram for the center photo looks better the histogram is just touching the upper edge but now a lot of the illumination has moved to the upper right, This is what exposing to the right is trying to do. The trouble is, the photo looks overexposed, particularly in the sky.image

The important next step in the exposing to the right method is to post process (the center photo) to “pull back the tones”, particularly the whites & highlights, the sky in this case. I’m using lightroom and just the basic tonal sliders. I’ve moved the exposure slider back –1 (one stop),  highlights most of all, white & shadows less and blacks hardly at all. I have moved all slider to the left, darkening the tones. Essentially I’m reversing the lightening step I deliberately took in the camera, when using the +EV compensation. Avoid pressing Auto (tone) here because it will take you photo back to essentially the same as your first exposure. Just experiment with the sliders and remember “less is more”, be gentle don’ try and over do it.

The result (shown below) better captures both the sky and the shadow detail, with the important side benefit of reducing noise in the dark tones and making the colours and mid tones a little clearer (without having to use the clarity of vibrance sliders). It is definitely closer to what I saw.

Afternoon walk in Jells Park (before the storm)

It is also worth looking at a bit of the detail

Detail from original photo

An insert from the original photo shows some noise in the shadows and flatness in the mid tone details.

detail from tonally adjusted final photo

Similar insert of the tonally adjusted Photo that was originally exposed to the right, showing less noise in the darks and also better detail in mid tones and slightly richer colours.

With RAW it is also possible to also lift the tonal range, (ie lighten the darks/shadows) of the original but this will only increase the obvious noise.

Exposing to the right can be a rewarding approach if your shoot in RAW, and have access to good software for post processing. Try it out next time you see a photo with the “head room” in your histogram to up the exposure (and collect more light).

Friday, April 28, 2017

Stepping into HDR

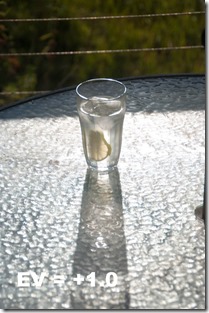
EV Bracketed Setup on my cameraWhilst I am definitely not in favour of setting fixed methods (workflows) for others to follow I figure it would be worthwhile to outline the steps I take to produced HDR images. I’ll be doing it in four different four ways, starting with my current most favoured approach, using Lightroom and Nik HDR Efex Pro 2

I start most of my HDR work the same way, using the bracketing on my DLSR. I have experimented with the number and magnitude of the EV steps. Just three steps of ± 1.0 EV seem to suit a more restrained HDR approach. This give me three exposures, one underexposed, one close to best exposure and one over exposed.

_IGP6682 _IGP6683 _IGP6684

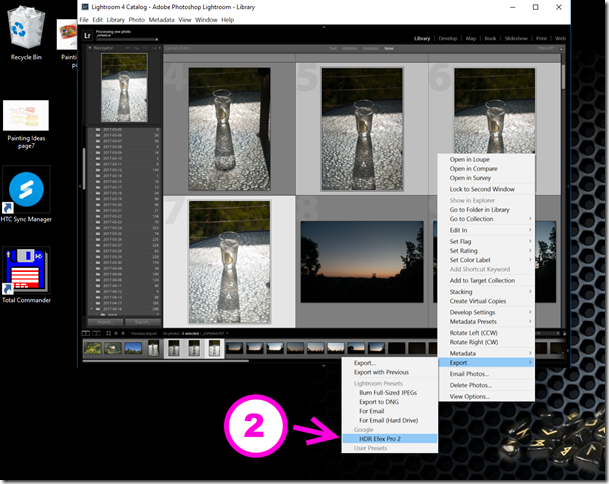
For the first example I’m using Nik software’s (now google’s)HDR Efex Pro 2 plug in via Lightroom. Whilst lightroom has a mechanism to transfer photo out to plug-ins it can only transfer a single image at a time. So instead on the Edit-in tool I need to use the export function and the option google/HDR Efex Pro 2

The Lightroom export required

Lightroom will take a little while to export these three files and then start up Nik HDR merge. This occurs in two parts, the first is the Merge Dialogue, which offer three ways to avoid common artefacts and problems when taking multiple photos. This include aligning photos (step 3) when taking the HDR handheld, this is the default so no action is required unless you had previously turned it off. Ghost removal (step4) which searches for and removes ghost images associated with things (usually people) that move between the three exposures. The grey frame around the upper photo indicated the photo that will be used as the ghost removal reference. The strength of 100% is the default but allows you to soften the degrees to which ghost removal is undertaken. Whilst I’m sure this step takes time, I just leave them always on, as it has no impact that I can find when there is no movement. The final artefact (step5) is chromatic aberration (coloured fringes at the edge if strongly contrasting parts of the photo, eg. tree silhouettes against the sky) because the HDR process can over emphasise this effect. Different lenses and lighting will give different effects, I have found more the upper slider to remove red effects and the bottom slider a little less towards the blue works well for most of the photos taken with my Pentax camera and Tamron lens combination. There is a magnifier at the bottom right of the reference image if you want to check who these setting are being applied. The lightness slider underneath the image helps you see and check detail in the HDR image. It does not effect the the processing of the HDR image in the tone mapping steps to follow.

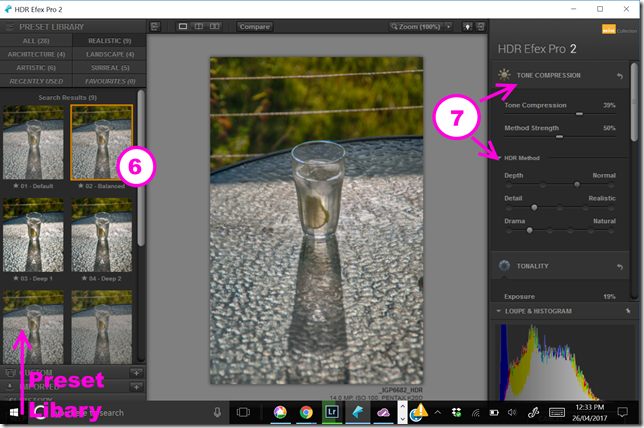
Merge controls in NIK HDR Efex Pro 2Clicking on the Create HDR button at the bottom right, starts the corrections you have set and applies them to the individual exposures and the merges the three images, It can take a few seconds and then takes you onto the interface controls for the tone mapping step. This  is the dialogue window in which you will do all the remaining image adjustments. Nik have provided a library of presets which show on the left hand side, grouped under several effects. When you begin using the software it is probably a good idea to try the look of several presets, a lot of them are over the top. I quickly found I only liked the realistic group and then only a few of those, I personally find the Balanced Preset (step 6) gives me a good starting point.

Tonemapping Interface controls in NIK HDR Efex Pro 2

However It is just a starting point, and I suggest moving over to the right hand side and working down through the options to edit your image. The first is tone compression (step 7), these sliders can have a really significant effect. The tone compression moved all the way to the left will leave the dynamic range much close to a single photo (flatter) whereas move all the way to the right gives you an extreme dynamic range putting detail in the shadows and highlights (it will usually look surreal and  over-powering), but a slight move to the right often makes the image snap. The methods and method strength also control the tone mapping but in specific ways. Depth controls how the shadows and highlights are to be treated and again moving to the right will enhance the dynamic range, normal is fine for me. Detail is a lot like clarity in lightroom or structure elsewhere in Nik software, it controls the local contrast and can bring up a lot of detail, realistic is fine for me. Selecting the histogramDrama is like a contrast control and different images respond different, I’m using natural here but moving to the right usually adds drama particularly to a cloud sky.

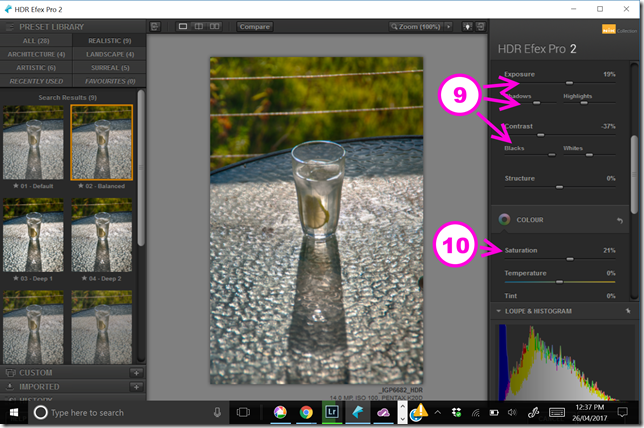
For the next step Tonality I like to have the Histrogram displayed (step 8) on the lower right panel (normally it is a loupe/magnified view)

Toneality controls in NIK HDR Efex Pro 2

The tonality controls are  very similar to the Basic tonal controls in Lightroom, but the work across the new combine dynamic range of luminosity in the HDR image. They work on the image as a whole. I wanted this image to better fill the histogram of the available dynamic range to I increased the exposure a little, stretching the whole histogram to the right. I also increase the highlights and lessened the blacks (lifting the left most part of the histogram (step 9). I also increased the saturation just s little (step 10). These last two steps could have just as easily been made in lightroom but it is convenient to do them here.

Normally I would finish here, but I found the wire in the background distraction so I then used OnOne 10 enhance and the magic eraser (a context sensitive fill)  to remove them. Also I cropped the photo a little.

G&T :: Backlit Glass

Friday, April 14, 2017

Extending Dynamic Range

Contrary to want a lot of people believe Digital Cameras, even the best ones, are not capable of capture the full extent of light from the darkest blacks to the purest white. They struggle to get close to the capabilities of traditional film and they are certainly no where near as capable as the human eye. This range of illumination is usually referred to as Dynamic Range. This limited range coupled with an automatic light meter that is trying to get an average exposure (ie matching a mid tone grey overall) is the reason a lot of images turn out boring, washed out and flat looking even though you remember much stronger light (and often colour)._IGP6498 Untouched RAW Image as Rendered by Lightroom

Here are a couple of techniques that can help you get a wider apparent Dynamic Range in your final photo.IMAG0167 - AutoHDR using HTC UPlay CameraThe first is the use a camera app on your phone that will take an “AutoHDR” (this usually means it will take 3 exposure and combine then using software with the app, a few will do pseudo HDR a bit like the next approach.) This is the simplest approach and results can be surprisingly good.

_IGP6497A second approach is to take a RAW image (this is in .PEF format) and use software (I’m using lightroom Develop basic panel only.) I’m following what I once called SDR+ (standard dynamic range plus) and I even wrote a couple of presets to do it. The basic idea is I bring up detail in the shadows (usually moving the shadow slider to the right, sometimes I also change the blacks using the approach often called “finding the black point”, while on the black slide hold down the <alt> and the scree turn black,image the adjust the slider till a few whit areas (these are the areas that will be rendered pure black) show up. You can do a similar operation with the white slider. The objective is to get the illumination histogram to be as evenly spread across the range as possible. This doesn’t take all that long  and I prefer to do it manually to even my own preset, but it requires specialist software, some skills in the oftware and a camera that can take RAW files. Many RAW purist will explain this is why you should always take RAW images.

_IGP6496_HDRThe third approach is classic HDR (High Dynamic Range) and here I am using three bracketed +/-1 EV exposures. Then the Nik HDR Efex Pro 2 software and the balanced preset to create a new 16-bit colour .Tiff file. There are many variation of the HDR technique and software, but it normally involves two steps. First collecting and preserving the full range of illumination values from the three or more exposures. Then a second step of “tone mapping” these into the available dynamic range of your image (and this is also related to how you might reproduce the image, eg print or screen). The downside is these steps and any image prep take extra time and a lot of folk get carried away with the slider options in the “tone mapping” step, thereby producing the sickly vivid and disturbingly surreal images that have given HDR  a bad name. I personally think this method has give me a final photo much closer to the late afternoon light I was photographing in. I have to admit I do take a lot of HDR images, particularly in contrasty light or where I know I need to preserve the Highest Dynamic Range possible.

So if you are disappointed with flat washed out images you might like to investigate at least one of these approaches.

Thursday, May 12, 2016

Fire in the sky

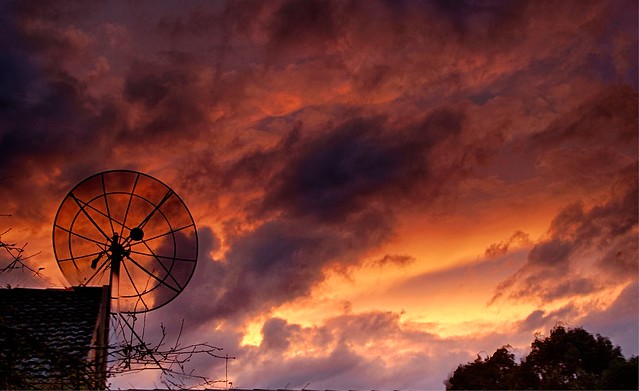
_IGP5455_HDR Fire In the Sky

Tonight’s sunset was spectacular, for a few minutes at least, as the clouds parted and then closed over again. I was keen to get a few more bracketed EV photo sets to test out the three options for making HDR images I currently have on the silver spectre (my new laptop).

image


My old favourite Picturenaut, is not exactly on the laptop (it lives off site on my backup disk drive and/or my Black Darkroom USB key. It is fortunately software that does not have to be installed on a specific computer and can run as a portable app). I purely use it to do the merge and feature alignment, deghosting and colour balanced and the most basic of tone mapping then “finish” the 16 bit HDR tiff-image using OneOne or Lightroom. 


Image result for aftershot pro 2 logoMy new toy, is the HDR merge within Aftershot Pro 2, which tries to take over all the steps, and can lead to those over the top surreal images. However by being a little constrained it can do a realistic albeit snappier results and optionally align features. It can also work directly from the RAW files and can store 16 bit tiff files, to give gorgeous results without a lot of tone mapping required.


Image result for nik hdr efex logoThe really new kid on the block is Nik’s HDR Efex Pro 2, which is currently free to download thanks to google loosing interest in it. I haven’t had much of a chance to play with it but It can be used as an add in from Ligthroom and now OnOne 10.5 (although I can not figure out how to do the merge direct from Onone 10 browse. I can get the merge, alignment, deghosting and defringing done in one set as a special export from lightroom. the raw HDR file actually looks pretty good, ie natural but maybe a little contrasty & dark. It has a number of tone mapping presets to finish the image.


Picturenaut

Aftershot Pro 2 HDR

NIK HDR Efex Pro 2

picturenaut HDR with adptive log tonemapping Basic HDR Merge NIK HDR Efex defalut tonemap
Finished in Lightroom, a little contrast & saturation of purples Finished with OnOne 10.5 Tonal tweak & Dynamic Contrast NIK HDR Efex pro 2 balanced Preset

So which image have I chosen as my Daily Photo?

You need to go the flickr to see.

Thursday, August 28, 2014

PhotoProject :: How to Photograph Nothing

I just read an interesting article in The Artist Magazine by Paul Talbot-Greaves titled “How to paint nothing” (January 2014), in which he comments,

“Many people have said they probably wouldn’t notice the subject in one of my landscapes and would probably walk straight past the scene, … So just how do you notice a composition of nothing?”

There is a video of Paul painting a watercolour below (it is speed up but takes just over 10minutes, and is well worth watching to see how he uses a simple colour palette and strong tonal shapes, lines of the river, skyline and a few trees to quickly build a wonderful yet conventional landscape composition). Unfortunately a well meaning (and probably very experienced) photo critic would suggest his landscape needs a red canoe with the canoeist in a bright yellow life-vest positioned at the first bottom “thirds point of interest”, but he would be wrong it doesn’t need to be like that (ok it might be if you want to win the camera club photo of the month and he is judging!). It needs the artist eye to see the colour, composition and tone! That’s all.

I am inspired to apply his insights into the photographic process. One in particular is that  “compositional designs are best when strong lighting is involved”, for example using shadows to create exciting negative shapes and add dimension to an image. Paul also is attracted to “the bright, high chroma colours against darker muted tones”

So over the past couple of days I have been quick to pick up my camera whenever I see that strong light variation and strong colours against shadows, and particularly interesting shadow patterns. My photos of nothing setDid not really matter what the subject was after all it is a photo of nothing, I was just looking for the right lighting ambience, boldish colour and shadows.

This set of images (on the right) are simply of the shadows of a potted yucca plant on my partly open patio doors. I was sitting enjoy a coffee in the sun at the time. I had the foresight to include an EV bracketed set of exposure, so I sent that set off to Google+ Autobackup and this time they did return a decent *HDR autoawesome, but the composition, as shoot, was a bit boring. Also it had a few damaged leaves on the yucca and they were an unnecessary distraction. My favourite tool to fix composition in any photo is the crop tool, It is normally a simple logo of two opposing L shapes, occasional with a curved rotation arrow. Google+ photos has some good edit tools on-line and the crop tool (shown below) has a feature to control the ratio (aspect of horizontal & vertical axis) to keep the crop within given standard size combinations. There is a separate icon at the top of the panel on the right to do any rotational (straightening) adjustment.

Google+ photo crop tool

I have not bothered about the rule of thirds of any other compositional rule, I was looking for a pleasing combination of colour and shadow and I like the contrast of the vertical door frames and the angled shadows with their lost and found lines feel. An image like this is a great place to experiment with all sort of crops, so don’t stop at your very first try. The wooden door handle on the white door frame is a little distracting but I have not managed to find any cloning tools in Google+ Photo so I have had to downloaded the edited image and then take it through OnOne’s Perfect Enhance 8. Perfect Enhance has a really magic Perfect Eraser which is content aware and does a both quick and reasonable job of removing the handle. Finally I add a big softy vignette.

Final photo of nothing

So the exercise of photographing nothing can be rewarding, and encouraging both seeing more like a painter might but also forcing some creativity in you post processing (in this case perhaps a little more abstract albeit more thoughtful cropping).

Thursday, July 10, 2014

Bracketing, HDR & Tone Mapping via jpeg

O
ne approach I like to use to extending the dynamic range of an image is the technique know as HDR (High Dynamic Range). This  approach has earned a bad reputation, mainly because it has been over applied to to point of lurid surrealUncanny valley”-ness, but it doesn’t deserves this rap.
IMGP3369-HDR Created by google+ AutoAwsomeBehind the method is a simple idea, you can take a set of exposures (to capture the gamut of light and then combine the different exposures into one. This is not exactly new, some folk like Ansel Adams and other zone system proponents and the multi-exposure approaches like those of Gustave Le Gray, have been making composite and darkroom modified images back in the film, enlargers and wet chemical days. The difference now is most of this tonal manipulation is done in software. There is the conventional image merging facilities by way of layers in many packages but what is general called HDR is a more mathematical approach.
The methods begins by taking a series of different exposure of the same scene. In most DSLR camera this can be achieved by using a bracketing of EV values and probably three images will be taken together. (see the set taken for this series of posts) The intensities are combined pixel by pixel across these images.. Rather than just use and average intensity of the intensity of matching pixel, the simples approach might use the standard deviation of the nine adjacent pixels of which that pixel is the centre to adjust the average intensity.Thus making a better allowance of the local variation (ie sharp changes in intensity, or edges of objects) and tending to preserve local detail. (actually there are a real range of mathematical methods to do this “averaging”) The process doesn’t end there because trying to reproduce this wider gamut of intensities onto most forms of display or printing will involve reducing the intensity range again to suit that device or display. If those intensities are just arranged linearly back into the reduced range for reproduction, the image becomes flattened and “boring”, so there a number of methods, similar to the tonal adjustment curves in photoshop, lightroom and many other packages, that can be applied, These tone mapping algorithms take the original exposure range (and local adjustments, such as the standard deviation of intensities as described in my example) and refine the new intensify to be used for each pixels.Tone mapping can basically allows the highlights, midtones and shadows to be adjusted smoothly to a pleasing rendering of the image. Because there are a number of methods (and sliders to set the amount of adjustment) there is a lot of personal judgement that can be applied in the tone mapping step. This is why the “one setting suits all” and the “move all sliders to the right” approached tend to produce garish and disturbing images. Good tone mapping requires constraint and an understanding of how you want the image to look.
A lot of the photos posted in this blog are based on the HDR approach, and most folk don’t even notice, Used sensibly the tone mapping and HDR approach can bring out the detail and lift the photo to be closer to what you actually remember seeing.
The most conversational and probably the  best introduction and advice of using HDR comes from +Trey Radcliff on his stuck in Customs website’.
(BTW You don’t have to buy photomatrix to do HDR, but you could if you want to follow Trey’s methods exactly. I’ve had the image above prepared for me by google+ AutoAwesome and will be discussing using Picturenaut, another “free” alternative in an upcoming post)

Wednesday, July 09, 2014

ETTR :: Exposing To The Right

E

TTR is aftershot histogram thats was shot, exposing to the righta digital photography technique that can be applied to both jpeg and raw photography but it is a very easy way to help extend the “apparent” dynamic range of an image when you want to stretch the tonal range in post processing, but there are some draw backs.

IMGP3369

The theory is by ensuring the the exposure is spread across the full range of the of the camera’s sensor ability, even if the image is slightly overexposed the strength of the intensity can be pulled back to better develop the fullest possible dynamic range. The biggest risk is that the highlight get blown out (turned white) and then the detail within them can not be recovered.

In this example I have taken the +1.5 EV photo from the original bracketed set (ie the one that was deliberately over exposed) and used Aftershot Pro to lift the contrast a little, pull back the exposure and lift the vibrance a little. This has darkened the sky a just a fraction but retained the detail in the shadows in the foreground.histogram shooting to the right


Once again Cambridge in Colour gives a great guide to this exposure & related strategies.

Tuesday, July 08, 2014

Extending Dynamic Range …with & without RAW

2014-07-03

T


his image of a shady spot on a sunny day is the classic example of the scene that challenges the range of light intensities that can be recorded by a camera’s sensory. If you rely on your camera light meter to get the right exposure and point at the shadows and trees the sky becomes blown out, or point mainly at the sky and the shadow detail disappear into the dark gloom. That range of light is often referent to as the camera’s dynamic range. Digital sensors are improving but they still have trouble capturing the range that traditional film could and this is much less than the human eye can handle. so very often such scene will seem very flat or less rich than you remember them. So I have taken a wide set (large EV variation) of bracketed exposures in both raw and jpeg and will run through a number of ways I have found (they are not my discoveries however) to extend the “apparent” Dynamic Range of the scene, which I will post over the coming week and add links to them back here in this article.

My objective being simply to better represent how I remember seeing the scene.

Using Jpeg

Using RAW


This Cambridge in Colour article on Dynamic Range is a very good introduction.

In retrospect, I realise that post this series, doing one step at a time in a blog format puts the posts in reverse order (I’ll do it the other way around in the future, but you can just use the links about as a table of contents to follow my progress). Special thanks also to Jessica Hische for the wonderful Drop Caps I’ve used in this series