Tuesday, February 28, 2017

When more becomes too many

As I walked through the forest I just took almost exclusively bracketed sets of images. Not only for a single scene but also for every image in a panoramics series, the number of images quickly multiplies.

I already take Raw & Jpeg, then 3 brackets means 6 images when I press the shutter. Next I might  take 5 overlapping photos to cover the full range of the very tall trees. And I’m up to 30 images just to get. A single final photo.  I took around 20 such multi-image panoramas and wow over 600 photos on my hard drive. 30 images to make just 1 vertarama

Just looking through that number of images becomes a challenge. It makes a couple of minutes (mainly waiting) to create the HDR image (using default preset/setting). Longer if I want to tweak any settings.Intermediate step of producing individual HDR tonemapped imagesThis steps also creates another larger .Tiff file (I’m creating 16bit tiffs to get maximum dynamic range and colour info). Next the autostitch can be as fast as a few minutes for a small preview but that quickly becomes about 20minutes (again mostly waiting) if I want a large (almost full size, ie as large as assembling to component images). Even though my little HP spectre only has limited disc capacity and slightly lower speed (i5 versus i7 processor) than my desktop. memeory is the same and the HP has an SSD drive which makes everything, even lightroom, look snappier. Suddenly I realise I’m spending half and hour on each separate HDR/panorama. That’s going to be 10 hours if I want to process all images. Worst the photos and sub-stages would take up about 17 gigabytes! This is turning into a nightmare.
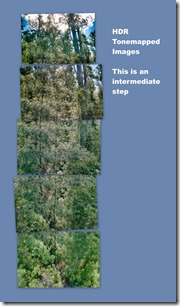
Ok that’s just too much. So I’ve opted to do some preview stitching to a small image size (1400 pixels wide) from the EV=0 exposures to judge the desirability to go to more complete processing. Cutting the task down to just 4 big images at the moment. The first image below I spent over half an hour setting is not one of those I wanted to keep! Such is life.

Trial Vertarama using Autostitch with no straightening

Saturday, February 25, 2017

Sketching Kit Four :: Making a new drawing board

While I was in Tassy I found the blue folio containing my art gear was a bit awkward to always carry around. weight wise it was fine it just always required being held in one hand (eg I had o put it down to take a photo etc) and it was a little on the largish side anyway. So I started leaving it behind and only sketching with what was in my camera bag (which was probably fine). But leaving my better art gear unused seemed a waste, and while passing the Kathmandu Shop in Salamanca place I decide to ask what they had as a temporary backpack to carry the artgear. After being shown a few expensive unsuitables I was eventually shown the 15L pocket pack (it rolls up into it own little pocket, and is designed to take up little room or weight in your luggage but provide a suitable “day” pack if required) It looked sturdy enough and was about the right size and price, I immediately transferred all my gear, including my Derwent Inktense pencils & blocks (a new favourite). Well, except no drawing board or individual sheets of watercolour paper, which where too large to fit. Happy ending, I carried my art gear everywhere after that.

15L Pocket Pack & Contents

I really like the idea of a backpack, so I resolved to make a slightly smaller drawing board to fit in the pack. It was simple to make from particle board. The shape is a little tapered and rounded at the top so it is easy to slide into the pack. Unfortunately this means half sheets are too big and I will have to settle for quarter sheets of watercolour paper! The board is ample sized for A4 sheets or an A4 sketch book held down with clips or a couple of rubber bands. I have also painted one side white and the other a darker gray. I have also been recently experimenting with notan/tonal value cards, so I figured I’d add a simple 5 step gray scale tone checker. Getting the tonnes reasonably accurate with acrylic paint was a bit harder than I expected (since acrylic paints notoriously dry darker than it looks when first mixed) so a bit of trial and error was required. The greyscale is conveniently always at the on the top or right hand side of my drawing board, so it will be easy hold the board out and check tones. The final embellishment was to drill a small hole as a colour checker. By positioning the hole over an area of colour it is isolated from the surrounding colours, and tones, and easy to compare with your work on the drawing board.

Gray Side of new Drwaing BoardClose up of simple tonal & colour checker tools

I’m not certain who much use I’ll get out of these tone and colour checking tools, but they look neat and they will always be easy to access and ready to use

Saturday, February 18, 2017

More time doing, no time for blogging

Photo by my wifeMy endless summer project trip to Tassy was great, did lots, saw lots and got plenty of inspiration (not necessarily a lot of sunshine). C’est La vie.

My instagram @oz_endless_summer has just some of the of the stuff.

In the end it was better to do than blog about it, right?

Wednesday, February 08, 2017

Suddenly Instagram is beginning to look like my sketch books

I’m the first to admit I haven’t figured out the appeal of Instagram, other than its easy of use and a way fast disposal of images (short viewing life and soon forgotten). Then again I have had fun in the grid view with mosaicked images and I’m still posting in threes, BUT….

What the? I’m still posting to my art project specific account @oz_endless_summer and the posts are starting to go all over the place, a bit of that here and something 2017-02-07-14-36-46different there and then back to something else. This is starting to look like the contents of any of my sketchbooks. The worry is, the more I blunder around, the more likes pop up and the followers while going up and down are at least growing. Making all this harder to understand.

What is worse I do already have an on-line sketchbook which has gone from “My Daily Sketch” (it was last years commitment that didn’t last) to “My Occasional Sketches” (aka myscratchings.tumblr.com) on tumblr. Yes I post much the same stuff there still as well. Tumblr being in my opinion a much better platform, specifically I can control the links and syndication. Importantly it is not a walled garden like instagram. However tumblr is quiet (not as dead quiet as Google+ has become) but not many see my stuff and few like or comment. I’d convinced myself no one was interested in my works in progress and idea development. I just didn’t know where and who. So it looks like it time to toast Sketchbook Instagram.

Such is life

Tuesday, February 07, 2017

More Observations on Photographing Art

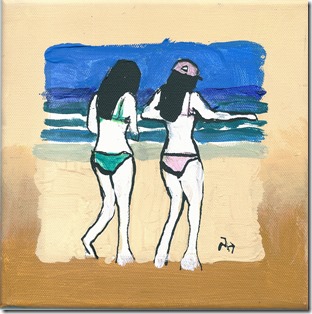
I have previously hinted that photographing art might be superior to using a flatbed scanner (well at least the ones built into most multifunction printers). Well I now have a strong case to confirm this suspicion. I have been working on a series of mixed media painting I’ve called the “Summer People” for my larger Endless Summer Project. Whilst I have left the people blank (they are only temporary visitors to the beach) I decided They need to have coloured clothes, and fluro colours are still popular with the summer people. However when I scanned these I was amazed… The fluro colours were flat and very pale. I’ve been looking for an explanation about the direction of light or quality of the light source but I have none to explain this observation. Taking a Photograph the same painting (images on the right below) in daylight the colours are much truer including the non-fluro ones.
Scanned on flatbed scanner Photographed Art WorkScanned on flatbed scanner Photographed Art Work
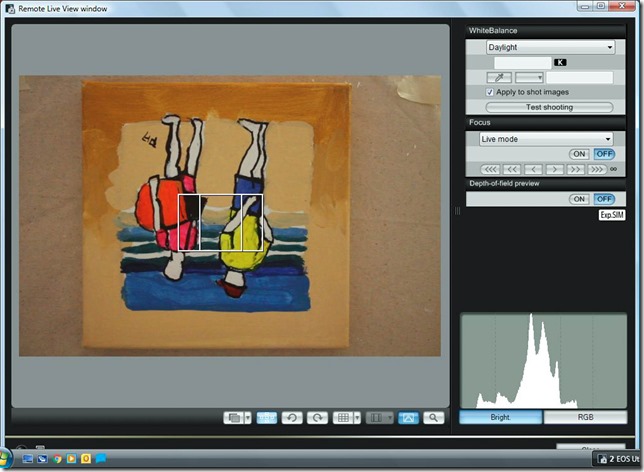
My Studio set up with the copystandThe main advantage of a flat bed scanner is it (in theory) avoids dimensional distortion, such as non paralleled edges produced when the camera is tilted. I did make an old fashion copy stand out of an old enlarger mounting and can connect my canon camera to my studio computer in tethered remote live view mode (see below). The image is upside down here because of the way the camera is mounted on the stand and because the painting is facing me. I could fix this by putting the painting upside down on the table top or just as easy fix in while post processing in lightroom, I can also focus and control exposure from the computer and once I have every thing set up just slide the canvases one at a time check focus and exposure and click. Its actually faster than loading a scanner closing the cover and click then waiting for the scan, Looking at the preview screen doing adjustments (like rotation) and loading the next canvas…
Remote Live View screen
I also need to be careful not to use a zoomed in or wide angle lens, which can cause barreling (curved rather than straight edges to the canvas) A focal length between 50 and 70mm on my crop sensor canon avoids distortion so I have to adjust the camera height up of down to best frame the picture. In this case I lifted the copy stand onto an adjacent counter top.


Another issue with using a camera, is there is less control of the light source and a colour cast can be common. I prefer to only photograph art (and in fact only paint) in daylight. Not direct sunlight but a strong diffuse light such as a window. Even so the colour of the room and its contents will affect the light so it is also wise to consider white balance. By taking RAW format this can easily and well adjusted in post processing. I therefore take a calibration photo using just a commercial colour wheel and one of my notan (greyscale) cards.
Original Photo of Test ChartsAuto White Balance in Lightroom
In this case the test is a little “warm” but may be acceptable. I use lightroom and it has a very decent Auto White Balance, in this case it is colder and more clinical, but better colours and grey scale. You can manually adjust the degree of correction but I’m happy to go with the auto correction. Further lightroom lets to refine the adjustments on one image and then copy that to all others captured at the same time.

I prefer to leave room on the margin to allow for trimming later and to individually crop and rotate each picture (again its easy in lightroom) but if you are copying a lot of items the same you could put masking tape as location makers and then fill the frame and have the cropping automated as well.
I am pleased. Using my DSLR canon camera, mounted on my homemade copy stand and tethered to my studio computer, I can reliably and quickly get superior copies to those achieved with a flat bed scanner. By also taking a calibration shot, and photographing in RAW format and then post processing in lightroom, I can also automated white balance and minor exposure adjustments across a whole series of images. Giving me much better and consistent set of images of my art to post on-line.

Thursday, February 02, 2017

Sketching Kit Three :: The Original (Blue Folio)

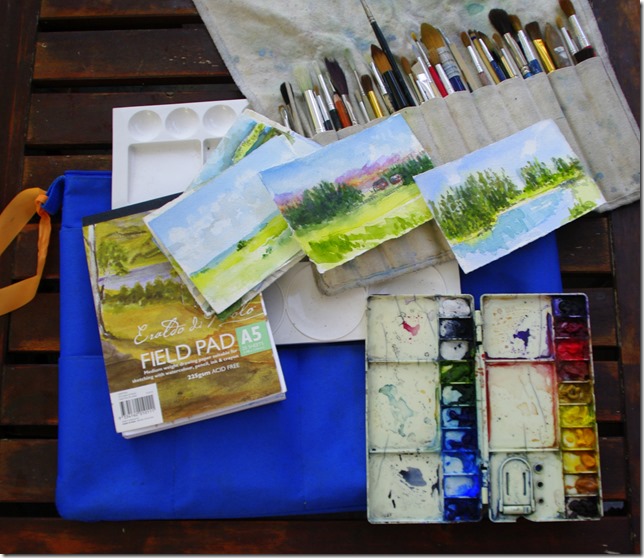
This is actually my long standing sketching kit, having undergone many changes yet remaining much the same.My trusty old folding palette It is based around my small portable folding palette preloaded with colours, I experimented with the layout of colours but reached the current set up a few years ago now.  Top Row are warm colours, and from left to right, Cotman Dioxazine Violet, W&N Alizarin Crimson, W&N Cadmiun Red, Cotman Indian Red, Cotman Yellow Ochre, W&N Lemon Yellow, W&N Cadmium Yellow, Cotman Gambage Hue, Cotman Raw Sienna, W&N Burnt Umber. Bottom row is the cooler colours again from left to right,  Cotman Chinese White, Cotman Lamp Black, W&N Paynes Gray, Cotman Sap Green, W&N Viridian, W&N Phthalo Turquoise, W&N Phthalo Sapphire, W&N Cerulean Blue,W&N Cobalt Blue, W&N French Ultramarine  These started out as mainly Windsor and Newton Artist’ Watercolours (in tubes & expensive) but this has given way to a few Cotman colours (also in tubes but affordable). Where transparency is not a characteristic of the colour I desire, such as in earthy tones like yellow ochre, I suspect the Cotman’s are just as good. For small/quick sketches the Windsor and Newton watercolours may be overkill anyway but they come into their own on good quality watercolour paper and larger works. I have been known to put this folding palette in my camera bag with a couple of brushes a small sketch book but kits one & two living permanently in the camera bags have made that unlikely now.
My most comprehensive field Sketching Kit
I carry the paints and media in a blue canvas folio. It holds my field drawing board, which has a appropriate sized nut glued on the underside so I can amount it on my camera tripod if a portable easel is required, but normally using it on my knee is fine. This board is just a bit larger than a quarter sheet of watercolour paper and I usually carry 4-8 sheets held in place for transport with rubber bands. I often have a sketch block or watercolour pad included, although I now like the idea of having a few post card sized pieces of watercolour paper as well. I sometimes finish a sketch, write a message on the back and post it (my post cards from Canada were popular with my family). I can also fit a full sized plastic palette and my canvas roll of my watercolour brushes. Its a pretty light setup and the canvas handles make this easy to carry. I usually also carry a full set of watercolour tubes in my luggage in a largish plastic screw top jar which can double as a water jar when needed, I seldom take these out sketching. The orange flagging tape is to make the kit easier to find in the field, whilst the blue is strong it can disappear when left in the shade, the orange tape against the blue is hard to miss.
I also still have my foldout studio always ready when I want to create a decent work place on the go. However this blue bag kit is what I will be taking in my luggage for most of my Endless Summer project trips.

Wednesday, February 01, 2017

Sketching Kit Two (Think Tank Bag)

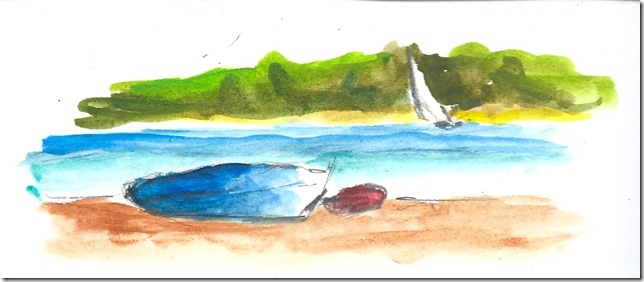
1-_IGP2233Despite having a fairl hefty Pentax K20, typically with a weighty Tamrom 18-200 zoom and polarizing filter, I actually bought a Think Tank Mirroless Mover 30i before the trip to Canada last year. Despite being designed for a mirrorless system but it holds my camera and my sigma 70-300 zoom plus a few small accessories, battery extra cards etc. It also has a slot at the back probably designed to take an ipad mini but it is just fine for an A5 sketch block or A5 Visual diary, so I also slipped in an old tin of Neocolour II water-soluble crayons. I like using them, they have good intense colours once activated by water and I’ve had these for several years but haven’t been able to fine a local supplier so I tend to use then on and off. The discovery of water brushes means I don’t have to carry water but I do also pack in a couple of brushes, pencils and/or pens. All this takes up very little room and almost no extra weight (depends on thickness and paper weight of the sketch book mainly) so I can leave it in my camera bag at all times.

Small sketch using sketcing kit 2