Showing posts with label artproject. Show all posts

Tuesday, February 12, 2019

Further Experiments with Deep Dreaming towards #HANDDRAWNPHOTOs

Yesterday I did a series of panoramas with two different cameras on the leap track in the southern part of Jells Park. This was primarily to test out the panorama stitching in the new version On1 Photo RAW 2019.2 (trial version). I was quite happy with the results, which managed to capture the quintessential nature of the Australian bush. This inspired me try some further experiments in using Ai methods to refine my #HANDDRAWNPHOTO idea. Basically I’m investigating different styles of photography and post processing that might allow the hand of the artist, his mark making/style to shine through and become part of the photograph.

So the first step for me was to create a simple semi-abstract sketch of just the shapes and textures I could see between the trees in my panoramas. This was made with sharpie pens, in simple blue, purple and black hues. (i wasn’t going to try and use the colours from my sketch just the tones). This is very loose and not too accurate but that was what I wanted.

I used this sketch as my default style in the Deep Style module of Googles Deep Dream, This involves a bit of time to process because the software has to create a neural network which will understand the key style elements, lines and shapes and how I draw them. The original photo is uploaded image at the generate screen. I have been constantly tweaking the settings under the style tiles. The important setting in these examples is preserving colours (from the original photo). Its trial and error from there and can take time, so enjoy it, have a coffee.

This pair shows the original photo above and the resulting deep dream below.

I think this is starting to look what I am after.

Sunday, October 28, 2018

The Obvious & the “first” Auction Sale of #AIart

Just a short break in the discussions of digital colour.

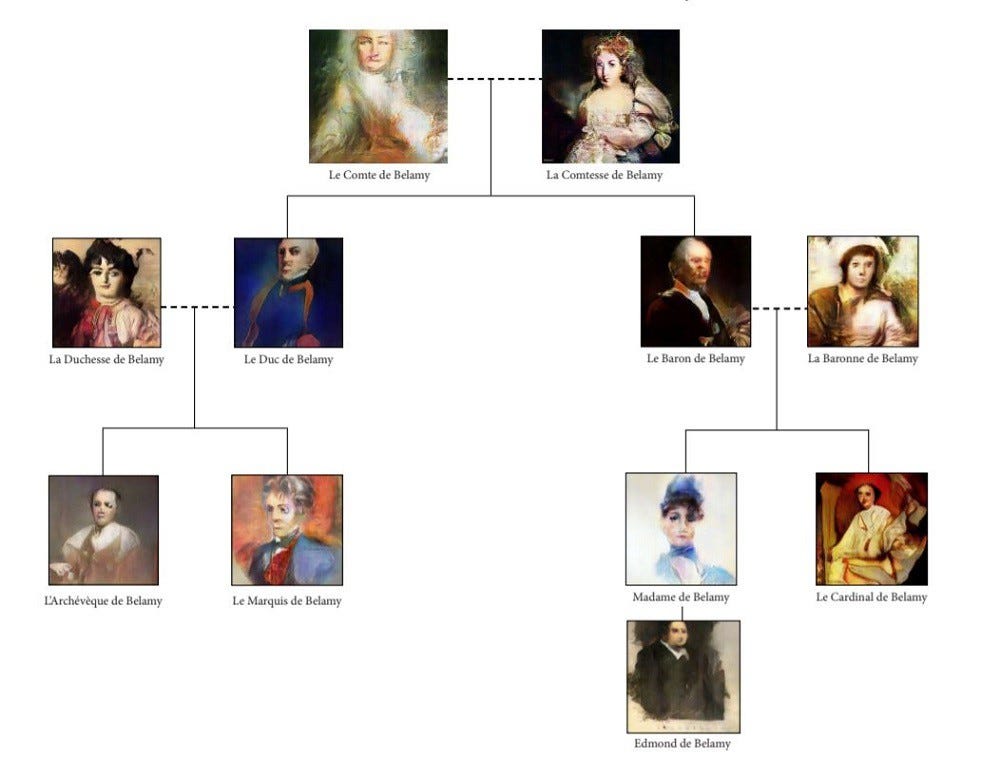
Pierre Fautrel, Co Founder of Obvious beside the "Portrait of Edmond de Belamy"I have been following with some interest the much hyped Auction at Christies of a the “first” AI produced artwork to be sold at auction. The expect price range was USD$7,000 to $10,000 but the actual sale price was USD$432,000 (or around AUD$612,000), That’s a lot given the picture is just 70cm by 70cm. Ok its nicely framed, but…! However I’m sure the value has been realised because it is a first and also the technology and artistic intent behind the image.

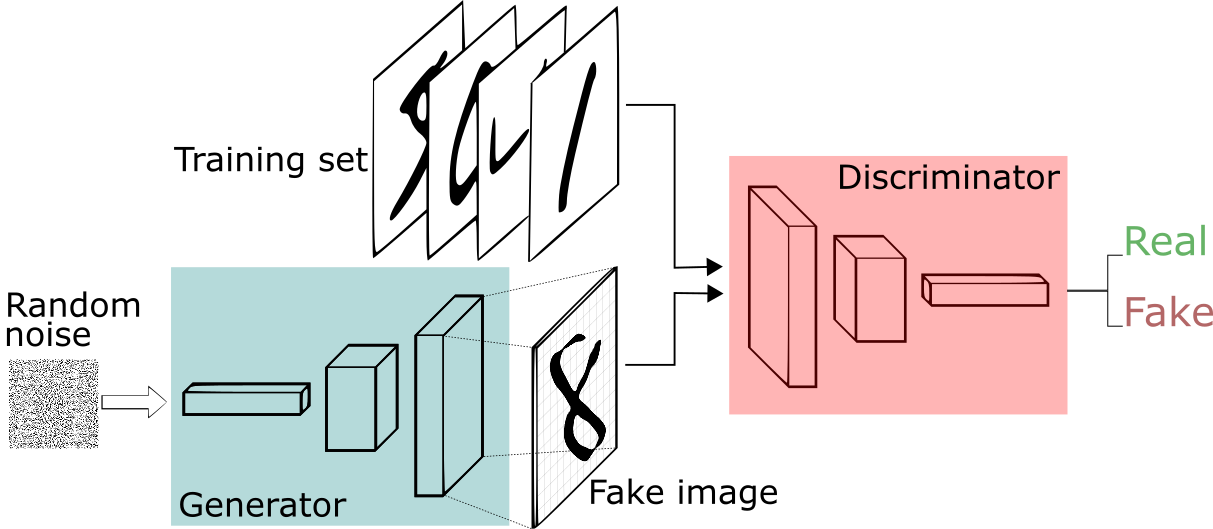
The image was produced by an AI (artificial intelligent) under a Paris-based collective of artists, calling themselves Obvious. Their object was pretty simple “Can an algorithm be creative?”. The their approach has been to carefully select a dataset of 15,000 portraits (this is a very manual step by the way) done between the 14th and 20th centuries, which showed a number of characteristics they where interested in and used this to train their AI (presumably a neural network). Next they applied a GAN (Generative Adversarial Network) whereby two algorithms compete to find and acceptable outcome. They called there algorithm the generator (which took an input of random noise and using the trained network created a “fake” portrait which the Discriminator would then rate are a real or fake outcome from the combined trained results, In simple terms the generated portrait was accepted if the discriminator was tricked that it was actually the features expected (from the training set). This stakes a lot of data processing and their images where small. So they added and additional step where they upscaled the image (again algorithmically) to imply a higher definition outcome.

In a fitting testament to the method the collective have signed the portrait with the mathematical formula of their discriminator.

If you want you learn more I suggest you start at the articles on medium at the bottom of the Obvious web site. You will also find other portaits obvious have produced of other members of the fictious Belamy family.

They name Belamy being a light hearted acknowledgement of Ian Goodfellow one of the originators of the DAG approach (ie Good fellow loosely in french Bel Amie)

Tuesday, May 23, 2017

A drawing board for my tablet

One goal I had set myself on the last endess summer trip was to create more art directly onto my tablet. I had updated to corel painter 2017 and downloaded few free apps to test, including wacom’s Bamboo Paper, Well they do work but trying to use the tablet outside with just my finger, a stylus or the HP pen proved very difficult. So difficult I gave up.

The first problem was glare, which made the LCD screen almost impossible to see. Any direct sunlight on the screen meant all I could see was the mirror reflection of a very frustrated me. picking up the tablet and tilting it away from the sun worked but it soon got heavy and difficult to hold in one hand as I sketched with the other. Normally when I paint I rest a drawing board on my knee or easel.The tablet proved a little slippery for that or trying to rest on a book of box. It was fine flat on the table but …. I just couldn’t see what I was drawing. Tilting the kickstand up into the normal typing position was better but it was not a good angle for sketching freedom.IMG_2223The draw board idea stayed with me. I got an old board and cut some notches in it to exactly match the width of the ick stand and then I turn turned the kickstand right up so the table “hung” on the drawing board. I could rest the drawing board on my knee and the whole configuration was looking move stable, till I split and push up a little and the table slid off the notches and slipped around again.
IMG_2227

2-IMAG0626


It was quite literally back to the drawing board.

I had the brilliant idea of adding a small plastic clip to hold the kickstand from slipping off. Firstly I glued it on but that was no where near strong enough, and soon the tablet broke free and slide off my lap and onto the floor (phew no damage done). So it was both glued and riveted next. I also put a couple of furniture felt wear pad at the position the base of the tablet sat on the drawing board. Magic the whole thing is very stable now.

Time to try it out in a variety of ways.

As a way to keep the tablet steady on my lap or propped against a table, it was perfect. Next I tried to see if it was a way to 1-IMAG0625have a small sketch book open on the drawing board and using the tablet for the reference. It seemed a little cramped at first but it proved wonderful to have the sketch and reference in close proximity. Then I got bold and attached my “portable” wacom bamboo tablet with the pressure sensitive pen underneath the HP screen but paper clipped to the board, except for the usb connector cable hanging down this is a real winner, especially with the touch controls so I don’t need my mouse, I’m sure I will get very productive with this set up. Finally  I tried out just straight photo editing, on my lap (eg while on the couch watching TV). Again pretty comfortable, no extra hands required and no slippy/sliddy tablet behaviour.


Directly sketching onto the tablet Using the tablet to show reference with small sketchbook also attached to drawingboardTablet with Wacom Bamboo attached Photo Editing on my lap

Saturday, February 25, 2017

Sketching Kit Four :: Making a new drawing board

While I was in Tassy I found the blue folio containing my art gear was a bit awkward to always carry around. weight wise it was fine it just always required being held in one hand (eg I had o put it down to take a photo etc) and it was a little on the largish side anyway. So I started leaving it behind and only sketching with what was in my camera bag (which was probably fine). But leaving my better art gear unused seemed a waste, and while passing the Kathmandu Shop in Salamanca place I decide to ask what they had as a temporary backpack to carry the artgear. After being shown a few expensive unsuitables I was eventually shown the 15L pocket pack (it rolls up into it own little pocket, and is designed to take up little room or weight in your luggage but provide a suitable “day” pack if required) It looked sturdy enough and was about the right size and price, I immediately transferred all my gear, including my Derwent Inktense pencils & blocks (a new favourite). Well, except no drawing board or individual sheets of watercolour paper, which where too large to fit. Happy ending, I carried my art gear everywhere after that.

15L Pocket Pack & Contents

I really like the idea of a backpack, so I resolved to make a slightly smaller drawing board to fit in the pack. It was simple to make from particle board. The shape is a little tapered and rounded at the top so it is easy to slide into the pack. Unfortunately this means half sheets are too big and I will have to settle for quarter sheets of watercolour paper! The board is ample sized for A4 sheets or an A4 sketch book held down with clips or a couple of rubber bands. I have also painted one side white and the other a darker gray. I have also been recently experimenting with notan/tonal value cards, so I figured I’d add a simple 5 step gray scale tone checker. Getting the tonnes reasonably accurate with acrylic paint was a bit harder than I expected (since acrylic paints notoriously dry darker than it looks when first mixed) so a bit of trial and error was required. The greyscale is conveniently always at the on the top or right hand side of my drawing board, so it will be easy hold the board out and check tones. The final embellishment was to drill a small hole as a colour checker. By positioning the hole over an area of colour it is isolated from the surrounding colours, and tones, and easy to compare with your work on the drawing board.

Gray Side of new Drwaing BoardClose up of simple tonal & colour checker tools

I’m not certain who much use I’ll get out of these tone and colour checking tools, but they look neat and they will always be easy to access and ready to use

Sunday, January 08, 2017

The Summer People Series begins

_MG_0048-EditAfter mucking around with the frame within a frame idea. I remembered a painted I did almost a decade ago, of beach people in outline with a loosely framed sections of a stylized beach (it is about 900 by 900cm square). I still like it and despite a couple of decent offers have not sold it.

So I decided to update the idea of a smaller instargam-ish fashion image (only 20cm by 20cm) and just paint the background of the sky, surf and sand in bright acrylic colours in a beach sand inspired frame. Once I started I released I should also paint the brightly coloured (or not beachwear) but leave the people blank (representing they are only short term summer visitors to the beach). I also wanted strong outline so I found some Indian ink and cut some reed pens.

_MG_0049-Edit  _MG_0050-Edit

_IGP1001_HDR

I like the result (at least this first attempt)

This is a small step in my EndlessSummer project, and you can follow along on my @Oz_EndlessSummer instagram

Sunday, January 01, 2017

First Endless Summer Art Work

Unfortunately its really overcast, not a perfect start to an endless summer, “Such is life”.
Network Aquatic INetwork Aquatic IINetwork Aquatic III
However it did give me the opportunity to experiment on a small canvas for #PatternsOfNature Series

network aquatic0002

Network Aquatic : Acrylic on Canvas 15 by 15cm (Jan 2017)

Monday, December 26, 2016

Looking Forward, before looking Back

This time of year most folk on the social nets are looking back over the year that was, which is fine but I am focused on looking forward I am already well into the planning of new projects for next year.

Cameras need sunglasses & lens cleaners tooFirst and most significant is my endless summer in 2017 which is a private Art and Photography project visiting and recording some icon parts of the landscape in the sunshine. This brings about some technical issues which many artists and photographers struggle with. How to capture and photography the beauty of the harsh Australia Light. You can follow on my travels and work process at a few social media places including @oz_endless_summer on instagram, @ozendlesssummer on Twiter and  An Endless Summer group on flickr

Photographer's SketchbookThe second project is a Photographers Sketch Book, with is following Ted Forbe’s assignments on his You Tube channel “The art of Photograpy” Whilst the sketchbook is something very physical, you can follow along both its content and ideas behind the images on my tumblr sub-blog mapopaj

Also there are likely to be plenty of posts relevant to these projects in this blog and my normal instagram profile @apimageo