Monday, May 28, 2018

This initially looked promising BUT…

imageI got one of those annoying messages/notifications over the top my chrome browser this morning, but it struck a nerve because I had been looking at the mess that confronts me in google photos (ok not everywhere the older stuff I uploaded from picasa in albums s still there and nicely organized). Glear the clutter, so google is acknowledging it! Thus I clicked on the link and guess what he assistant only wants to clear documents and screen captures BUT imagethey were block post I don’t want them archive (whatever that means because I could find anything to explain what such an archive was?). I’m getting more convinced that google’s “I’m feeling lucky” approach has morphed into “trust us with your precious data, photos, … life” we know better (aka we can play with anonymous AI and algorithms with all that is yours just share more…) Maybe that's a bit dramatic but google, and specifically google photos have totally lost my trust.

Ok I’ll go to back picasa and just upload selected photos or albums like I used to. Hang on I can’t upload, download or even email from picasa anymore. Basically I cannot successfully log into to my google account either within picasa or gmail running under picasa. That really sucks. I can’t find anything on-line other than a lot of complaints and the misguided imagerecommendation to use google photos BUT there is actually no off-line to way to use google photos, its only browser or smart phone based. Its reluctantly back to the vacuum cleaner idea and upload everything to the cloud.

Then to really annoy me, I got the popup to updated my backup and sync. Hmm its not working properly anyway perhaps I need to do that. Well guess what!!! … it wouldn’t update. Technical foul play google your disqualified from the game.

image

Sunday, May 27, 2018

One week on … How are the Cloud Archives going?

In simple terms my testing of the free generic cloud services as a places to save a copy of an archive photo collection are going well. I have dropped drop box. There is nothing wrong with drop box as a backup system, in fact it is so simple to set up, its drag & drop feature on a PC really nce and sharing photos (privately) across the web it could be a winner for most folk. The limitation I see is it relies on the photos being nicely sorted (say into albums before you upload). If your photo collection is a big mass of stuff all over the place (aka a Mess) the backup will be a mess also.

So Sorry Drop Box your the first elimination.


OneDrive was the real surprise. I must admit I have one drive on a couple of machines (not all) and used it occasionally. Setting up the windows 10 OneDive app and phone apps and rebuilding the local OneDrive folder I saw all the right ingredients to build a rigorous and truly “set and forget” way to synch the photos I wish to upload (not everything vacuum cleaner style). The secret is in using the new format OneDrive folder (in Windows 10) on any of your machines (their doesn’t need to be a master catalogue or piece of software, another nail in your coffin lightroom) You just need to export your finished photos (I’m sticking with jpeg for this test) into the appropriate folder.

image

imageThe One Drive folders are just like of folders in Explorer, with the exception that when you right click the mouse to get a options menu you’ll also see the options that control the display of the status icon beside any file or folder, (these are highlighted with the pink dotted box). The best option for my archive is  free up space which change the icon to an open cloud and  often leaves the files in place for a little while but seems to always upload them (during this process the status icon become an animated pair of arrow spinning and clears the space, then what you see is a thumbnail of the photos or icons of file types. If you want to bring the image back you just click on it and providing you have a web connection it downloads seamlessly. If you always what the local folder synched with a given folder (or file) you can select always keep on this device, and the status icon becomes an infilled green circle with a white tick. Files/photos loaded from other computers sharing the same One Drive will automatically appear this type of folder.

Google Drive (aka Backup and Sync from Google) is a Meehhhh! It worked the first time automatically, just like a vacuum cleaner and hasn’t work automatically since (I can restart it manually, it works once and stops). Not sure if this is yet another Windows 10 upgrade problem but I’ll preservere for the rest of the month and see if I can find the issue. Once uploaded you need to access google photos to see the on-line collection and there are plenty of tools, However it is so mobile phone centric I’m not a fan, even the great snapseed style tools they used to have are missing. I’m not sure what going on in there. Anyway I’ll keep testing.

I’m showing a flickr logo now and while I haven’t actually started using to build an cloud based photo collection archive (I’ll defer that until I understand better what Smug Mug is likely to do with the free !TB storage limits. What flickr offeres is some great and well proven ways to organize and share your on-line photo collection over and above the cloud storage, it could be the real winner of the free social media systems

Saturday, May 26, 2018

The Tale of Three Panoramas

Originally I was planning to put the Olympus Camera Panorama “feature” through its paces. Well to cut a short story shorter, the panorama feature in my new M10ii doesn’t stitch the images in camera. It just gives you guide lines to follow. So I abandoned try he feature further and decided to test the stitching of images with different lenses and different camera orientations.

Rather than falling back on my favourite panorama stitcher AUTOSTITCH I decided to do all the post processing in On1 Photo RAW, mainly because it seems to handle the Olympus .orf RAW files best.

TESTING LENSESTESTING LENSES

I’ll begin with the simple panorama, just two images shot semi wide with 14mm ( Jpegs shown above straight from camera). Notice the images are exposed differently. I then used the .orf files and began by stitching them, then I took the result into the On1 develop, adjusted the horizon slightly and did a little tonal tweaking. Finally I took the adjusted but barely post processed panorama into the Dynamic Contrast setting in Effect module via the Natural “filter”. The results are pretty reasonable.

TESTING LENSES

Next I turned the camera vertically, added my circular polarizing filter and took 7 overlapping photos of roughly the same scene. I post processed this in On1 Raw following the same steps. Another decent panorama, much bigger and possibly a stronger image (because I include the strong darks of the trees on the right.

TESTING LENSES

For the last panorama I took 15 photos with an 75mm telephoto and undertook the same steps as the previous two panorama. This took a lot longer and created a massive file 26480x3970 (1,154.MB). It so wide I doubt I ever want to get it printed BUT it is massively detailed. I’ve done it now and may never do it again yet I now know how to do it.

TESTING LENSES

Tuesday, May 22, 2018

DON’T PANIC …about Smug Mug & Flickr

It has been a month or so since the announcement that Smug Mug had acquired flickr, and I deliberately kept away for making an unresearched comment. I had secretly hoped that it might bring back the community (true social) aspects and culture (to advertising focus profit making). Initially there was little detail other than it will be business as usual, well until May 25th. Not sure what was meant to happen on that day but I did pencil it in my diary.

There where lots of snippets in the photo press and news items that gave nothing away. There is a thread an [Official Thread] and discussion about the aquisistion on flickr, which has a mountain of user reactions (some positive and some very trolly and uninfomed, so like anything on the net these days). I think it is encouraging me, as a long term flickr users not to panic. There is also a very video/story oriented piece Smug Mug & Flickr together that is warm and fuzzy but doesn’t give much away other than it seems to suggest they like photographers, photography and share with like minded folk. All good signs. I’m also  not sure why May 25 was mentioned, its this coming friday. Perhaps we’ll all find out then.

I think the best summary of what Smug Mug might bring to Flickr I have read was written on peta pixel by Thomas Hawk a long time serial poster. I’m backing his thoughts.

So why should I be bothered about flickr right now? Well looking at my list of what makes a good photo archive system I realised that dropbox and to some extent OneDrive aren’t really photo centric (eg my first first two important features 1) Photos need to be indexed and catalogued 2) Photo should be easily viewed), Flickr already provides these features and it is free up to 1TB, so I’m adding it to my trial of the free cloud services that could be considered for my photo archive.

Monday, May 21, 2018

The Myth that Digital Photography is free

Even if you consider the cost of your camera, lenses and SD cards are a sunk cost, in accounting terms, there will be hidden costs of photo storage. This is like a sustaining capital it gets spent in biggish chunks and is often over looked as an ongoing cost of being a prolific photographer. (Of course if you are proposing to use a cloud service to be your backup this could be a very real monthly cost, see bottom table, once you pass the free enticer levels). Based on my single shopping trip cost estimates (table below) if I elect to go with a 2TB modular backup system, which will give me a few years of photos at my current rates, I will need 3 by 2TB drives for a 3-2-1 backup strategy. Thus each time I upload one of my 16GB SD cards (which only cost in the vicinity of $20-$30 and are reusable) I will used up 16 times 5 cents or $2.40 worth of my backup capacity. I’m intending to carry an additional two archives, one off line here (my air gap, which is re-purposed equipment and thus free for one copy) and a second 2TB to be off site (making my approach cost $3.20 per 16GB full card. These are pretty reasonable cost but they should be considered as you investigate both Backup and Archiving any largish photo collection.

What is the Cost per Gigabyte? This table shows the cost of various Hardware style storage media. I got these cost walking around office works yesterday looking at decent brands (not the cheapest in each category) that I would be happy to buy. Clearly the Portable USB style external Hard Drives (port HD in the table) are best value and currently the 2TB (terabyte) models from Toshiba,Seagate & Western Digital were similarly priced and good value so I bought 2 yesterday, one as a spare the other for my third copy offsite archive.

  number Capacity
GB
Unit CostCost
per GB
DVD-R504.7$30$0.128
CD-R 50 0.74 $30$0.811
port HD 1 1000 $70$0.070
1 2000 $90$0.045
1 3000 $149$0.047
SD Card 1 16 $20$1.250
1 64 $56$0.875
USB Key 1 16 $12$0.750
1 64 $50$0.781
SSD 1 240 249$1.038
1 480 369$0.769

10-15c per GB
5-10c per GB
<5c per GB

The other interesting observation is that the old DVD format still isn’t to far away in terms of cost. I didn’t consider Blu-ray as I don’t have a blu-ray drive. If you don’t want to fork out $100 plus now on a portable Hard Drive and still have that old DVD drive in your computer, DVDs could still be a reasonable option. Oh and don’t forget your time required to make them!

Monthly
Cost

Cost
per GB
per Month

Drop Box USD$13.99 $0.019
Google USD$9.99 $0.014
OneDrive USD$5.74 $0.008
Smug Mug USD$3.99 $0.005
Creative Cloud USD$9.99 $0.014
Amazon S3 USD$4.99 $0.007

Ok What about the cost on the cloud? This was very difficult to find a comparative set of number because there are free start-up offers to encourage you, they have very different packages and storage size offer and monthly rates once you pass the free limits. So I have used the 1TB storage capacities, which seems to be the current sweat spot in what most services offer (Smug Mug and Creative Cloud don’t give specific capacities, or I could not find them). The monthly “subscription/rental” are in US Dollars (USD$) because that’s how they are given but I have converted the simple cost per GB per month to Australian Dollars (AUD$) to be comparable with the table above. For these outlays Adobe also give you access to Lightroom & Photoshop, and for $10 per month Microsoft will give you access to the Office 365 suite.

The twist that you need to realise is that the monthly cost is ongoing, whether you fully use the capacity or not (and you seldom will). So even while the prorated cost per GB looks very cheap I haven’t taken time and/or percentage used into account (because it isn’t easy to do properly). For instance I could have saved myself a $90 cost for a second 2TB drive and would have been able to afford about 8 months of the Cheaper Creative Cloud package. After that time the cost of the cloud alternative would be ongoing. A truer comparisons might be to compare the cost over the life of the 2TB drive, which I might assume is 3 years (time taken to fill it) in which case the creative cloud option would be  by 1.4cents by 36 (months) which is closer to 50c per GB. or a total cost of over $360 (36 time $9.99). $90 versus $360plus is really a non contest on a cost basis. So cloud storage cost are “rubbery” to say the least; its the real monthly expenditure you need to consider, that is the real cash flow.

Sunday, May 20, 2018

Archive Obsession Three :: Building a Cloud Archive

cloud, images iconThere are a multiplicity of clouds services offered at the moment. It’s a bit scary because it would take ages to properly access them now. So this is a relatively incomplete list, but it is enough to get me started.

  • Free “generic” Cloud Service
    • Drop Box
    • Google Drive
    • One Drive
  • Photo Focused Services
    • Google Photo (its free and uses Google Drive)
    • Flickr (it can be free)
    • Smug Mug (starts at $3/month)
    • Adobe/Creative Cloud (starts at $/10)
  • DYI Cloud Backup/Archiving
    • Back Blaze
    • Carbonite
    • Amazon S3, Glacier

It’s a no brainer to start with a test of the concept on the free services, especial as I already have experience work with all three. Not as a backup oriented services but I have used Drop Box as a way to automatically off load photos from my phone and also exchange big data sets with co-workers, when email struggles to handle the large files. Google Drive I use for blogger photos and as a cloud place to store training material and key documents while I was travelling. One Drive has a bit of a checked history (mainly because Microsoft was changing things a lot for a while there), the service looks nice and stable now.

The last two tiers I will probably leave to evaluate till much later down the track. I need to get comfy with the services I know how to use.

                    box, drop, media, online, social icon        drive, gdrive, google icon        circle, colored, gradient, media, one drive, social, social media icon

So beginning today I’m building cloud archive on all three Dropbox. Google Drive & OneDrive. I’ll let you know in a month or so which, if any suits by archiving requirements

Saturday, May 19, 2018

Archive Obsession Two :: What makes a good Photo Archive

I know I bang on a lot about the difference between an Archive and a Backup. The key difference is a backup can consist of anything, even a great messy mass of files, whereas an archive is a clean long term place to store and easily retrieve information. A

rchives, to be useful must include straightforward ways to find and view photos relatively quickly and easily. It needs a logical structure and whilst an archive should seldom be required, it should not be difficult to use or complex to learn. In other worlds KISS (Keep It Simple). It is desirable that it does not contain duplicates and damaged or corrupted photos. The essence is the collection, whilst it can contain a wide variety of photos and style needs to be clean and consistent. Archive should be managed and will grow with time. Backups should be kept of Archives

B

ackups, their purpose is to quickly restore the mass of data effected in the event that the media on which it is stored is damaged or lost. The emphasis is usually on a full restore, but a few systems do allow for a selective restore. Backup software seldom concerns the structure and viability of the data/files included. A corrupted file will be backedup the same as a good file. They are also focussed on the short term recovery of data. Old backups can become a liability if their contents is not known &/or well organized. Worse still they might be on a media format no longer supported.

Most photo oriented online discussions at present revolve around keeping backups of photo collections not archives. Certainly backing up your working data is important and the 3-2-1 approach is a good starting point. However if your collection of photos is getting large and you want them to be preserved in such a way that you can easily find a specific photo now is the time to start think about building an archive

Features I consider important in an Archive

  1. Photos need to be indexed and catalogued (via metadata)
  2. Photos should be easily viewed
  3. Collection should be free of duplicates
  4. Collection should contain only decent images (out of focus, corrupted or low quality images removed)
  5. Photos should be in a limited number of standard (non propriety) formats

This is a pretty straightforward set of objectives but alas I have struggled to find a single commercial system that has these features. Lightroom sounded like it might be suitable but I found it both wanting and frustrating to use when several computers and people are involved.

  • I have given myself the added burden of quarantining the Archive away from the internet and even my own local area network and housing it within a Linux workspace.

At the moment I use a Hybrid collection of software tools, I now used mainly PhotoMehanic to ingest (upload) from camera cards (I used to mainly use Picasa) and straightway cull the poor quality images and add appropriate metadata. I usually have a short break (could be up to a day or so) and then come back to PhotoMechanic and rate and colour code the images. I use a simple 1, 2 or 3 star rating, photos with 2 or 3 stars are the ones I would like to further process. They will normally be the ones I take into Lightroom (Aurora HDR or On1 RAW these days). Each step in Photo Mechanic is set up to record in both the Jpeg EXIF data and the .xmp side car files for RAW formats. The one star and above photos are the ones that get archived, any unrated photos will be left behind. At present I store the native RAW formats (.cr2,.pef,.orf & .dng) exactly as uploaded from the camera but I’m not convinced this a great long term option. Whilst there is some form of propriety CRC checks in the .xmp files I also create a file in each folder being archived with the .MD5 hashtag for each file. These CRC style checksum are useful to find duplicates and also to check with the files has been in any way altered (ie corrupted)

At the Linux end I read the same files and folders on external hard drives but now I have Linux version of XnViewMP and Aftershot Pro (both of which can view RAW files and read the metadata and ranking in EXIF data and/or the sidecar files. Both these programs can build catalogues or just browse folders. I have not yet tried to catalogue the whole collection but I’m slowly working towards that objective.

Friday, May 18, 2018

Archive Obsession One

My brush with a significant portion of my photo collection “disappearing” has left me with the uneasy feeling that I also need to make sure I have an Archive on a different media (ie not just spinning hard drives). At the moment I am using old hard drives taken from computers I no longer use (this is nice and cheap) but with only two cycles, since starting the air gapped archive approach, I’ve run out of capacity for my full photo archive. More significantly they are old and mechanically, thus liable to eventually fail. The fact that this archive can be accessed from a machine that is not on the internet means that they are largely protected from malware, ransomware, like wanna cry, and viruses. Even though they aren’t spinning all the time, this does not rule out mechanical failure of the drive but it does reduce the risks at lot. As I am only updating the hard disk archives every six months, mainly due to my self-imposed rigorous archiving regime, I only have two cycle a year on which is probably not often enough.

About 1/3rd of my collection is already archived (in two places) on CDs and DVDs. This cover the period 1999 to 2010 and for most of the period to 2013 after that, but I have only one set of DVDs offsite. Thus on the old hard drives I only have to cover my archive from 2011 to present (just under 2TB, terabytes). But due to the lesser capacities of my re-purposed of storage drives, I have had to split the archive across two drives (eg 2011 to 2015, then 2016 to 2018), So everything is covered but it is still a bit messy.

What next?

Thus it is time to consider an alternative media (and/or methodology) to suit my growing photo collect and the growing chorus is suggesting to look at the cloud. So over the next few post I will be investigating -

  1. What I expect an archive to be.
  2. Suitable cloud services for Photographic Archives.
  3. The “hidden” cost of archiving.

Thursday, May 17, 2018

Saved by my Air Gapped Archive

I had a perfect storm of issues over the past week. I had the April Update of windows 10 forced on my computer and in the process the Homegroup networking just disappeared along with some of the network drive letter I used to share folders across my local area network. Also the NBN line to the internet (and my phones) dropped out and took many mobile phone calls to report and get re-established. NBN is not a popular word around here. When the internet was back the modem and router began playing up, WiFi dropping out and weird things happened across my network, including my Netgear Stora NAS (Network Attached Storage) which I use for backup/disk mirroring went silent and these was the pain of another few days of reporting problems. Long hours of automated phne system and support calls and just general frustration.  Then horror I noticed all my photos from 2017 & 2014 and most of my 2018 photos had disappeared off my network. Worse my two external portable hard drives, also seem to have lost the same folders. It all happened so fast I knew it could not possible be an accidental deletion and the two external hard drives where not connected to anything at the time. So how could they possibly have lost the data. Time to panic?
My "Air Gapped"Archive (one should be off-site but wasn't)It could have been BUT last year I had set up an “Air Gapped” Archive, on a Linux computer that was not attached to the internet (or my Local area network). My original plan was to rotate these on a three generation Son-Father- Grandfather cycle and store the grandfather off-site. However as I have only been updating the cycle every-six months (my original plan was every three months)using old computer hard drives. I only have two generations and they are both here. So I broke out the father copy and fired up my little Linux machine. It took a while but what a relief all the missing directories and photos where there. Next the son copy, all there as well, actually only up to mid December last year when I did the last archive backup. So I could be missing a few months, bummer! I unplug my archive drive and went and got one of my external backup drive, the one I knew I had used most recently, to my surprise all the missing folders where there and full of my recent photos.
The Backup Twins, The USB Harddrive I use to keep my ew and working files backedupIn disbelief I unplugged it (after a safe to remove step) and took it back to my desktop, no folders again. What is going on? I took the external drive to my laptop also connected to my LAN, the missing folders and photos could not be found. Back to my linux machine and they are there! What a mystery?
Actually I wasn’t so surprised I felt strongly that it was impossible that so many files on different media and places would instantly disappear. However at the moment I don’t understand why this happened. I’m just very glad I put some time into planning an archive system (with backups of the archive).
If you haven’t already got a backup system in place for your growing photo collection go and do it now. Then before to long plan how best to archive the collection!

Wednesday, May 16, 2018

Day Five … M is for Manual Mode

M mode stands for Manual which means the camera is expecting you to select and set the three exposure settings (Aperture, Shutter Speed & ISO). I’m sure if you are a first time camera owners this mode is very intimidating and if you just select it and started clicking away you may get a few good photos but you will also unfortunately plenty of under or over exposed photo (they are really only good for deletion, so hopefully they were not of an important occasion). The key is don’t panic, manual mode can be very powerful but requires some practice.

If you are happy with the concept that the correct exposure will be somewhere inside the Exposure Triangle, it is pretty easy to find a good exposure even without a light meter. If its a normally sunny day and you are shooting outside, firstly selection M (manual) on the mode dial, next set the Aperture to f8 (usually its a control dial on the front top right of your camera) and the Shutter speed to 100 (1/100th. sec) (usually the control dial on the top back right handside of the camera) and ISO to 200. The ISO is usually setting via the menu and/or a shortcut key on the thumbwheel style dial on the back of the camera. How do I know these settings? Well these are my favourite starting settings I’m taken a lot of photos with these. Other photographers might have different favourite settings to start.

P5160288P5160289

Now press the shutter and  take the photo. Look on the back of the camera (assuming you have an LCD screen), does it seem a bit bright (Over Exposed) or dark (Under Exposed). If its over exposed like first photo appears, you need to let less light in. This could be achieved by using a higher fstop like F9 or F11, I used f9, or by using a faster speed 1/200, or as I choose in this case using a lower sensitivity (ISO 100).  Maybe this is a bit underexposed now. I’m still shooting just jpeg if I was shooting in RAW these difference would not matter I would be easily able to adjust the exposure in post processing. If the image is to dark you need more light and do the reverse adjustments to the settings. Change the setting(s) and take a second photo. Usually with a little practice you will nail the exposure by the second or third attempt and you can just discard the exposure tests, on a digital camera they cost nothing.

I was a bit shocked with my new Olympus OM-D E M10iii which actually recommended that my manual is exposure was not spot on and suggest F9 1/100 at ISO 100! Some other newer cameras will also highlight a suggestion or blink a setting that it would like to change. Smart little buggers they are.

Once you have practised this a little, preferable outside. You can move inside or into the shadows, but start with settings that would give your exposure more light to the sensor such as F6 or ISO 400. This is all great practise and should quickly let you find your preferred starting settings in manual. However there is an easier way, either take an Aperture priority or S Shutter priority test shot first and look at the settings the camera has chosen and start there.

The real power of manual mode, comes with a lot of practise and personal experience of really seeing the different intensity and quality of light. You will soon know the type of scenes you like to photograph and how you like them to look in the final print. There are dozen & dozens of ways shooting manual can help you get better photos, Such as “protecting” highlights or shadows (avoid “clipping” or “blow out”) restricting the exposure just to the subject … lots of creative ways. Too many to even to begin to discuss here. All I wanted to get across is don’t be scared of manual mode.

Tuesday, May 15, 2018

Day Four …cont. introducing the Exposure Triangle

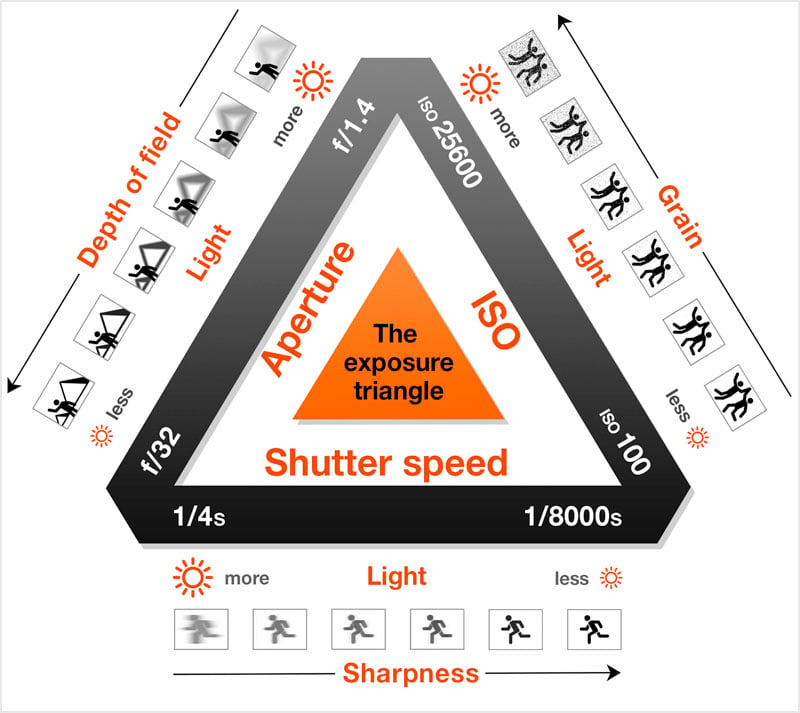
If you are a new camera owner, you and have been following this series of blog posts by now you have realise that I’ve moved into the advance area of setting modes, without asking your to remember the exposure triangle or complex formula. You won’t totally escape, but it is just a brief overview here, and no test afterwards. This stuff is actually quiet straight forward, and it is much easier to understand when you apply it. I like this little infograph from Peta pixel because it includes a basic graphic representation of what happens with each setting.

Somewhere inside that triangle should be the perfect exposure for your scene but where?  Setting the mode to A or S lets the camera change one or both the other sides of the triangle and aims for that best exposure. Tomorrow we will explore M mode which simply means you will have to make all these exposure settings yourself.

The other thing you probably noticed is there is no I (for ISO) on the mode dial. I’m pretty certain this a throw back to the film days when the ISO was dependant on the film in your camera and you got to set that when the film was loaded but that was that and the ISO setting stayed until you changed film. Each type of film and its development process produce different sensitivities to light for that combination. The ISO was written on the outside of the film packet.  If you wanted a different sensitivity you had to buy a different film. These days on digital cameras the ISO can be changed electronically to let the sensor be more or less sensitive to light. In some cameras you get to change it to a single value, more recently most cameras let you set it to Auto within a given range and this lets the camera also flex the sensitivity.

There is a downside to higher ISO, in darker scenes which seem to demand higher ISO (and thus sensitivity) the darker shadows become subject to more noise (seen as a grain or an unpleasant spottiness). So staying with lower ISOs (setting your auto range 100 to 400) will probably be a good move when you are starting out, and you are not trying to take photos in dark rooms or alley ways. You can see am example of this noise in the shadow, of the flying duck photo in the earlier post, and look in the shadows behind the duck. You might have to click on the image to enlarge it. The noise is there because I had hit the maximum aperture of the kit lens I was using f4,6 and the low light meant the camera had to select ISO 5000 to get sufficient light at 1/2000th second. Normally I would have used a noise filter which would probably smooth this out nicely, but I am showing images straight from the camera (ok the duck photo where cropped) but otherwise not post processed

Day Four … S is for Shutter Priority

The S mode (Shutter Priority, TX on Canon cameras). Its very simple to use you set the shutter speed and ISO and the camera chooses the best aperture for you.

There is a lot of advice out on the net and in how to books about the importance of keeping shutter speeds fast enough to avoid camera shake. So setting the shutter speed sounds like a good option. It is also helpful if you need to you can “freeze” action by using and ultra fast shutter speed (like 1/2000th of a second), faster infact than a blink of an eye. While I did use this mode on older film cameras, I have seldom used this setting on any of my digital cameras (I’ll explain later below in this post). Like most cameras  my new Olympus OMD E M10iii does have an S mode and I was trying to think where I might use it and I settled on birds in flight (be warned that is a challenging subject to try yourself especially starting out, kids on a bike would be a better choice)

That was a bit easier said than done, It was a cold dull overcast morning that Melbourne gets a bad reputation for but aren’t really all that common. So there where not many birds out and about. I figured ducks would still be out, supposed this is the weather they like, so it was down to the lake.

Slow speed - stationary duckSlow speed moving duck -> blur
Fast speed flying duck -> sharpFast speed landing duck -> sharp

Despite starting to drizzle the duck did perform for me. He was sitting on the wooden rail on a small pier as I approached and a photo with the shutter speed set to a 50th of a second was almost ok (the image has a slight blur but the duck is recognizable despite the low light and slow speed). However as he took off, the next photo, also at 1/50th second is just a blur of feathers. He circled around which gave me time to change the shutter speed and catch him flying in and about to land at 1/2000th. of a second. Now most of the duck is in sharp focus (perhaps expect for him trimming his wing tip feathers). So Shutter Priority mainly helps in deciding weather you want blur or sharpness when you subject is moving. I probably won’t be using this mode to often, but it will help is some situation (if I have enough time to change the mode dial and the shutter speed before my subject has disappeared into the distance. Which it generally has.)  Thus you need to plan when using this mode before the action starts.

Monday, May 14, 2018

Day Three … A is also for Aperture Priority

I’m leaving the new camera owners to play around with their camera and find what it is capable off. Also the big surprise with my new Olympus OMD E M10iii was how good the jpeg was straight out of the camera (I noticed this because I wanted to just look at the images straight out of the camera and not processed in any way when I post examples in here). Purest might argue that the camera is actually doing some important post processing, and I can only agree with that. This only reinforces the idea that not recommending new camera owners only shoot raw and use manual mode, because it is likely  to leave them with discouraging results. Instead if you are a new camera owner, I think you are much better to stay playing in jpeg and have fun with your camera. The results will be good and you will still be able to improve as you understand your cameras strength (and perhaps weakness).

Unfortunately I couldn’t wait, to follow my own advice, I’m jumping ahead and switching over to the traditional modes, starting with Aperture Priority. On my new Olympus this is marked by a single A on the mode dial. On a Canon camera it is Av. I’m probably letting a secret out of the bag but a lot of photographers, the majority of those I know, (there is even a current survey over on Digital Photography School that also supports this) shoot in this A mode. In this mode you must select the Aperture (which controls how much light is let into the camera, and probably the ISO (the sensitivity of the sensor to that light) and the camera will work out the shutter speed to get an average exposure. This is the mode I usually use, and my excuse is I got into this habit back when I bought the original Pentax Spotmatic film camera many decades ago. It was a technical marvel at the time because you could set the aperture and then use the built in light meter (not a common feature at the time) to balance a needle horizontally in the screen by moving the shutter speed dial. It was magic and it got good results. Ok the shutter speed dial is gone on most cameras and the camera does the balancing itself without showing a big needle in the middle of the screen but it works much the same way.

The big advantage of using Aperture priority is its simple to use and pretty logical. In normal light you can pretty well always use a middle f-stop like f8, in darker situation you may want to open up and got to a lower fstop like f5.6 or lower. Let more light in when its darker, its logical.  With this basic knowledge and your camera in Aperture priority and you will normally be able to get a decent exposure in a wide variety of lighting conditions. Its not fail safe, there can be a downside if the camera chooses a very slow shutter speed (less that say 1/30 second) you may find a hand held camera is inevitably moved a little and your exposure gets a little blurred. Most modern cameras have some built in logic to avoid this and might blink the shutter speed in the viewfinder to highlight that the exposure is getting too slow and out of a safe range. Alternatively the camera may allow ISO to be adjusted within a nominated range by increasing the sensitivity (a higher ISO) in order to keep the shutter speed as fast (quick) as needed.

There can also be a creative advantage (or hinderance) in being able to choosing the Aperture, and that relates to how closely the camera focuses on your subject. In simple terms a tiny hole (like a pin hole camera or say f22) lets the lens focus on a wide range of distances onto the sensor. The bigger the size of the aperture the lower the range the lens can get in focus either side of whatever you choose to focus on. This phenomena is called Depth of Field. As the fstop gets smaller (the aperture is opened wider) and the depth of field gets narrower. Portrait photographer for example often use the feature to get the subject’s face in focus but blur the background to remove fussy distracting detail.  Alternative a Landscape photographer might want everything in focus so they will usually use a narrow aperture, f11 is a good starting point. There are many ways to use this sharpness or blurring creatively. The smaller the fstop of your lens the more power you get too blur but usually the more expensive the lens.

A narrow Aperture F11- Widest Depth of FieldAn Average Aperture F8- Medium Depth of FieldA Wide Aperture F5.6- Narrow Depth of Field

In the three photos above you can see this depth of field control at work. In all cases I focussed on the blade tip of my safety knife (also know as a Box cutter in the USA) which is opposite the 20cm (approx 8”) mark on my metal ruler. At f11 (a smaller aperture hole) you can easily read the markers out to 31cm (12”) mark before the marks and numbers start to become blurred. With the aperture set to f8 the scale starts to blur between 26 & 27 cm (between 10” & 11”) mark. At f5.6 the blurring starts at the 25cm (10”) mark. The important thing also to notice is that my pink plastic safety cutter is pretty much the same exposure in the three images because the camera automatically changed the shutter speed (and in my case also the ISO) to achieve this.

After becoming happy with Auto mode, I believe a new camera owner should next get the courage to try A mode (Aperture Priority). Moving to A will let resulting photos stay nicely exposed and occasionally you could start to pull off really good creative shots by  experimenting with and controlling depth of field. However don’t race out and buy an expensive fast lens (with a low f-stop number) just to become a bokeh master right now. Experiment with the lens(es) you have (a lot of kit lens will be f4 or f5.6, but they’ll be just fine to start).

Sunday, May 13, 2018

Day Two … Live Guides and SCN mode

I’m not sure how many other cameras have a similar features but the Olympus OMD E M10iii has two further features to assist the new camera user.

Location of the "shortcut" key on Upper left of my new OlympusOk I have read the manual to get an overview of how these work. They are very straight forward to use, particularly if you are used to using smartphone apps. They make a great next step from using the fully Auto mode and give you a little more control. To access their power you use the little “shortcut” key on the top left hand side of the camera. it does have slightly different functions depending on which mode he camera is in, yet they show a limited set of the main function you might wish to use in that mode, without having to navigate through the main menu (and/or the manual)

If you use the shortcut key in Auto mode, you will see a small set of live guide button on the right hand side of the back LCD screen. Pressing it a second this key with your eye to the viewfinder will show the live guides in the viewfinder (not sure why you would want this, because the best way to use these guides in in the Live View screen). This set of Live view guides lets get sliders to change the obvious things about the image you are about to capture, and you can use the touch screen to adjust the sliders much like you would do on a smartphone.The best part is you see the resulting changes on the Live view screen, its a lot like post processing before you take the shot.

  • Colour (Saturation <> muting)
  • Colour Temperature (warm <> cool)
  • Brightness (Darker <> Lighter>

Mothers Day Cake - AUTO Mode jpegMothers Day Cake -Auto & Warmer jpeg YUK!Mothers Day Cake -Auto Vivid & Cooler jpeg Nice

Just changing these three things, along with good framing (zooming in, or out of perhaps moving closing and filling more of the picture with your subject is probably enough to take a good auto image to a great photo. So many former smartphone photographer will probably be happy to continue using this approach for some time.

There are also a couple of specialized function, but you would probably leave those till later

  • Blur (Blur <> Sharpness)
  • Motion (Blur <> Stop motion)

Finally right at the bottom of the Live Guides is an item called Shooting Tips, which bring up more guides for common shooting situations and gives advice in example pictorial form. These are actually pretty neat and much more useful to a new photographer than a traditional boring manual or think how to book. Yet they are buried at the bottom of the live guides, I probably would have missed them if I had glanced at the manual and deliberately looked at all items in the Live Guide list. However it you are new to the M10ii definitely press the short cut key and scroll down to the bottom of the live view items.

A Different Mothers Day Cake -in Macro SCN modeUnder the Auto key (if you move the mode dial clock wise) is the SCN  Scene Mode. Many other camera system have something similar which will change a few to several of the camera setting to best suit the type of scene about to be photograph. This Olympus implementation is pretty amazing if you use the shortcut key to access the set of options you get a set of picture tiles of the six main scene types and then tapping your figure on the most appropriate tile brings up some useful advice and a further set of sub-menus to refine the settings further. Think about it with two taps of your finger you can choose some very specific setting to better capture the photo you are about to take. Compare this with finding all those settings amongst the combination of dial and menu setting. I think this would really help a new camera owners to come to grips with their cameras capability.

These features work with jpeg file output. If you are shooting in RAW the camera will switch to jpeg+RAW and while the the jpeg files will be adjusted to match the Live Guide or SCN mode the RAW file will not be adjusted. So stay tune for working with RAW using tradition settings of the P A S M modes. For now just play in Jpeg, and enjoy getting great photos.

Saturday, May 12, 2018

Day One ... cont. jpeg .vs. .orf RAW

This was not a surprise. My lightroom (still ver 4.4) could not read the Olympus RAW format .orf. The same thing happens to most owners of new cameras, they have to wait for an update from adobe and they complain a lot on the internet. Please don’t think I’m just complaining, I understand the issue but I not interested in the adobe subscription so this probably marks the beginning of the end for lightroom in my photographic tool set.

testing olympus camera original jpeg fileProcessed with basic Tone Mapping in Aurora HDR 2018

On the left is the jpeg image straight out of the camera, shot in Auto. On the right is the same image but the .orf version read by Aurora HDR 2018, which can read the Olympus .orf RAW format. To keep with the spirit of using Auto I have only used it’s basic Tone Mapping (just stretching the tonal range) as a fairly basic thing you might do with any RAW file. I like both but the one of the right feels more like being there, so I made it my PhotoFriday post this week.

Day One … A is for Auto

I am always advising those with a brand new camera, to start in Automatic (the green box) because that's where you get to know what the camera will do in any given scene. As opposed to starting in M (manual) which is the implied place “real” photographers hang out. Ok that’s just the myth on Youtube, Vlogs and social media. However pretty well all digital cameras (and smart phones) these days will take really good photos just by themselves. So my theory is, it is better getting some good photos and getting to know your camera (and those situations that the camera hasn’t done such a good job). Compared with struggling with manual setting and getting a lot of disappointingly over and underexposed or flat photos, That would be very discouraging to you, and its not your camera’s fault.

testing olympus cameratesting olympus cameratesting olympus camera

So its time to follow my own advice and thus today is A for Auto. Its the first day with my new Olympus and rather than go crazy and snap everything. I figured I’d go green, and look at straight out of the camera photos. All of these images are just the Jpegs direct from the camera with no post processing (including no straightening, which bugs my sensibilities a bit but I needed not to touch the photo after its come out of the camera)

testing olympus cameratesting olympus cameratesting olympus camera

testing olympus cameratesting olympus cameratesting olympus camera

testing olympus cameratesting olympus cameratesting olympus camera

testing olympus cameratesting olympus cameratesting olympus camera

With the exception of those with strong light and shadow (two on the bottom left which had a very high dynamic range) the photos aren’t bad. My advice seems to be justified.

Ok what about jpeg versus RAW, well that’s another post.