Showing posts with label new camera. Show all posts

Wednesday, May 16, 2018

Day Five … M is for Manual Mode

M mode stands for Manual which means the camera is expecting you to select and set the three exposure settings (Aperture, Shutter Speed & ISO). I’m sure if you are a first time camera owners this mode is very intimidating and if you just select it and started clicking away you may get a few good photos but you will also unfortunately plenty of under or over exposed photo (they are really only good for deletion, so hopefully they were not of an important occasion). The key is don’t panic, manual mode can be very powerful but requires some practice.

If you are happy with the concept that the correct exposure will be somewhere inside the Exposure Triangle, it is pretty easy to find a good exposure even without a light meter. If its a normally sunny day and you are shooting outside, firstly selection M (manual) on the mode dial, next set the Aperture to f8 (usually its a control dial on the front top right of your camera) and the Shutter speed to 100 (1/100th. sec) (usually the control dial on the top back right handside of the camera) and ISO to 200. The ISO is usually setting via the menu and/or a shortcut key on the thumbwheel style dial on the back of the camera. How do I know these settings? Well these are my favourite starting settings I’m taken a lot of photos with these. Other photographers might have different favourite settings to start.
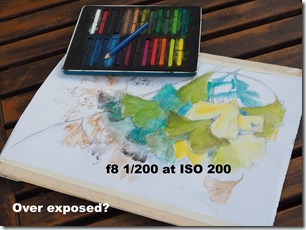
P5160288P5160289

Now press the shutter and  take the photo. Look on the back of the camera (assuming you have an LCD screen), does it seem a bit bright (Over Exposed) or dark (Under Exposed). If its over exposed like first photo appears, you need to let less light in. This could be achieved by using a higher fstop like F9 or F11, I used f9, or by using a faster speed 1/200, or as I choose in this case using a lower sensitivity (ISO 100).  Maybe this is a bit underexposed now. I’m still shooting just jpeg if I was shooting in RAW these difference would not matter I would be easily able to adjust the exposure in post processing. If the image is to dark you need more light and do the reverse adjustments to the settings. Change the setting(s) and take a second photo. Usually with a little practice you will nail the exposure by the second or third attempt and you can just discard the exposure tests, on a digital camera they cost nothing.

I was a bit shocked with my new Olympus OM-D E M10iii which actually recommended that my manual is exposure was not spot on and suggest F9 1/100 at ISO 100! Some other newer cameras will also highlight a suggestion or blink a setting that it would like to change. Smart little buggers they are.

Once you have practised this a little, preferable outside. You can move inside or into the shadows, but start with settings that would give your exposure more light to the sensor such as F6 or ISO 400. This is all great practise and should quickly let you find your preferred starting settings in manual. However there is an easier way, either take an Aperture priority or S Shutter priority test shot first and look at the settings the camera has chosen and start there.

The real power of manual mode, comes with a lot of practise and personal experience of really seeing the different intensity and quality of light. You will soon know the type of scenes you like to photograph and how you like them to look in the final print. There are dozen & dozens of ways shooting manual can help you get better photos, Such as “protecting” highlights or shadows (avoid “clipping” or “blow out”) restricting the exposure just to the subject … lots of creative ways. Too many to even to begin to discuss here. All I wanted to get across is don’t be scared of manual mode.

Tuesday, May 15, 2018

Day Four …cont. introducing the Exposure Triangle

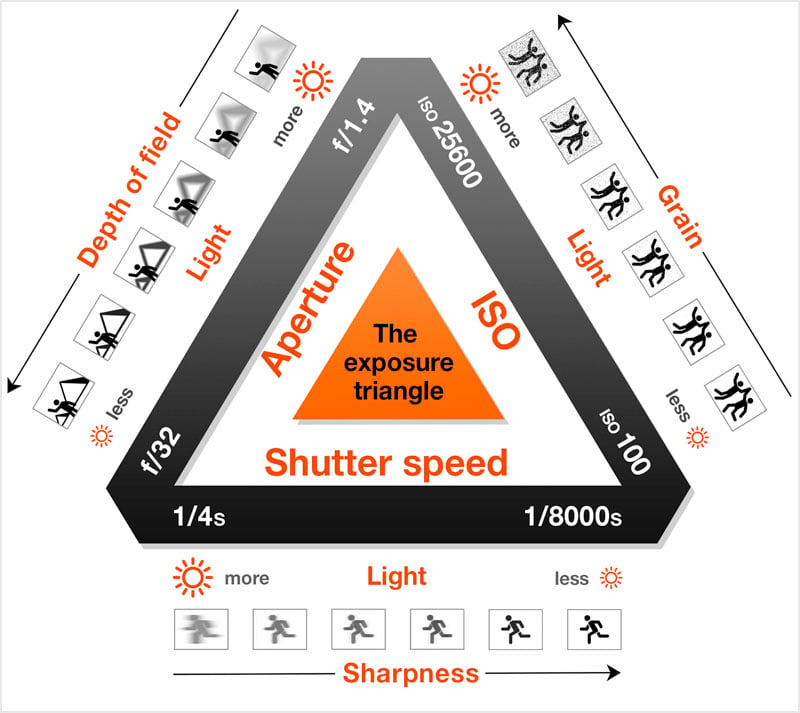
If you are a new camera owner, you and have been following this series of blog posts by now you have realise that I’ve moved into the advance area of setting modes, without asking your to remember the exposure triangle or complex formula. You won’t totally escape, but it is just a brief overview here, and no test afterwards. This stuff is actually quiet straight forward, and it is much easier to understand when you apply it. I like this little infograph from Peta pixel because it includes a basic graphic representation of what happens with each setting.

Somewhere inside that triangle should be the perfect exposure for your scene but where?  Setting the mode to A or S lets the camera change one or both the other sides of the triangle and aims for that best exposure. Tomorrow we will explore M mode which simply means you will have to make all these exposure settings yourself.

The other thing you probably noticed is there is no I (for ISO) on the mode dial. I’m pretty certain this a throw back to the film days when the ISO was dependant on the film in your camera and you got to set that when the film was loaded but that was that and the ISO setting stayed until you changed film. Each type of film and its development process produce different sensitivities to light for that combination. The ISO was written on the outside of the film packet.  If you wanted a different sensitivity you had to buy a different film. These days on digital cameras the ISO can be changed electronically to let the sensor be more or less sensitive to light. In some cameras you get to change it to a single value, more recently most cameras let you set it to Auto within a given range and this lets the camera also flex the sensitivity.

There is a downside to higher ISO, in darker scenes which seem to demand higher ISO (and thus sensitivity) the darker shadows become subject to more noise (seen as a grain or an unpleasant spottiness). So staying with lower ISOs (setting your auto range 100 to 400) will probably be a good move when you are starting out, and you are not trying to take photos in dark rooms or alley ways. You can see am example of this noise in the shadow, of the flying duck photo in the earlier post, and look in the shadows behind the duck. You might have to click on the image to enlarge it. The noise is there because I had hit the maximum aperture of the kit lens I was using f4,6 and the low light meant the camera had to select ISO 5000 to get sufficient light at 1/2000th second. Normally I would have used a noise filter which would probably smooth this out nicely, but I am showing images straight from the camera (ok the duck photo where cropped) but otherwise not post processed

Day Four … S is for Shutter Priority

The S mode (Shutter Priority, TX on Canon cameras). Its very simple to use you set the shutter speed and ISO and the camera chooses the best aperture for you.

There is a lot of advice out on the net and in how to books about the importance of keeping shutter speeds fast enough to avoid camera shake. So setting the shutter speed sounds like a good option. It is also helpful if you need to you can “freeze” action by using and ultra fast shutter speed (like 1/2000th of a second), faster infact than a blink of an eye. While I did use this mode on older film cameras, I have seldom used this setting on any of my digital cameras (I’ll explain later below in this post). Like most cameras  my new Olympus OMD E M10iii does have an S mode and I was trying to think where I might use it and I settled on birds in flight (be warned that is a challenging subject to try yourself especially starting out, kids on a bike would be a better choice)

That was a bit easier said than done, It was a cold dull overcast morning that Melbourne gets a bad reputation for but aren’t really all that common. So there where not many birds out and about. I figured ducks would still be out, supposed this is the weather they like, so it was down to the lake.

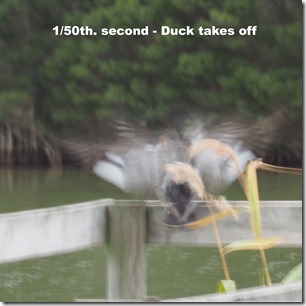
Slow speed - stationary duckSlow speed moving duck -> blur
Fast speed flying duck -> sharpFast speed landing duck -> sharp

Despite starting to drizzle the duck did perform for me. He was sitting on the wooden rail on a small pier as I approached and a photo with the shutter speed set to a 50th of a second was almost ok (the image has a slight blur but the duck is recognizable despite the low light and slow speed). However as he took off, the next photo, also at 1/50th second is just a blur of feathers. He circled around which gave me time to change the shutter speed and catch him flying in and about to land at 1/2000th. of a second. Now most of the duck is in sharp focus (perhaps expect for him trimming his wing tip feathers). So Shutter Priority mainly helps in deciding weather you want blur or sharpness when you subject is moving. I probably won’t be using this mode to often, but it will help is some situation (if I have enough time to change the mode dial and the shutter speed before my subject has disappeared into the distance. Which it generally has.)  Thus you need to plan when using this mode before the action starts.

Monday, May 14, 2018

Day Three … A is also for Aperture Priority

I’m leaving the new camera owners to play around with their camera and find what it is capable off. Also the big surprise with my new Olympus OMD E M10iii was how good the jpeg was straight out of the camera (I noticed this because I wanted to just look at the images straight out of the camera and not processed in any way when I post examples in here). Purest might argue that the camera is actually doing some important post processing, and I can only agree with that. This only reinforces the idea that not recommending new camera owners only shoot raw and use manual mode, because it is likely  to leave them with discouraging results. Instead if you are a new camera owner, I think you are much better to stay playing in jpeg and have fun with your camera. The results will be good and you will still be able to improve as you understand your cameras strength (and perhaps weakness).

Unfortunately I couldn’t wait, to follow my own advice, I’m jumping ahead and switching over to the traditional modes, starting with Aperture Priority. On my new Olympus this is marked by a single A on the mode dial. On a Canon camera it is Av. I’m probably letting a secret out of the bag but a lot of photographers, the majority of those I know, (there is even a current survey over on Digital Photography School that also supports this) shoot in this A mode. In this mode you must select the Aperture (which controls how much light is let into the camera, and probably the ISO (the sensitivity of the sensor to that light) and the camera will work out the shutter speed to get an average exposure. This is the mode I usually use, and my excuse is I got into this habit back when I bought the original Pentax Spotmatic film camera many decades ago. It was a technical marvel at the time because you could set the aperture and then use the built in light meter (not a common feature at the time) to balance a needle horizontally in the screen by moving the shutter speed dial. It was magic and it got good results. Ok the shutter speed dial is gone on most cameras and the camera does the balancing itself without showing a big needle in the middle of the screen but it works much the same way.

The big advantage of using Aperture priority is its simple to use and pretty logical. In normal light you can pretty well always use a middle f-stop like f8, in darker situation you may want to open up and got to a lower fstop like f5.6 or lower. Let more light in when its darker, its logical.  With this basic knowledge and your camera in Aperture priority and you will normally be able to get a decent exposure in a wide variety of lighting conditions. Its not fail safe, there can be a downside if the camera chooses a very slow shutter speed (less that say 1/30 second) you may find a hand held camera is inevitably moved a little and your exposure gets a little blurred. Most modern cameras have some built in logic to avoid this and might blink the shutter speed in the viewfinder to highlight that the exposure is getting too slow and out of a safe range. Alternatively the camera may allow ISO to be adjusted within a nominated range by increasing the sensitivity (a higher ISO) in order to keep the shutter speed as fast (quick) as needed.

There can also be a creative advantage (or hinderance) in being able to choosing the Aperture, and that relates to how closely the camera focuses on your subject. In simple terms a tiny hole (like a pin hole camera or say f22) lets the lens focus on a wide range of distances onto the sensor. The bigger the size of the aperture the lower the range the lens can get in focus either side of whatever you choose to focus on. This phenomena is called Depth of Field. As the fstop gets smaller (the aperture is opened wider) and the depth of field gets narrower. Portrait photographer for example often use the feature to get the subject’s face in focus but blur the background to remove fussy distracting detail.  Alternative a Landscape photographer might want everything in focus so they will usually use a narrow aperture, f11 is a good starting point. There are many ways to use this sharpness or blurring creatively. The smaller the fstop of your lens the more power you get too blur but usually the more expensive the lens.

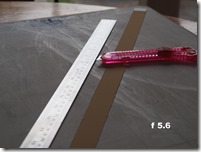
A narrow Aperture F11- Widest Depth of FieldAn Average Aperture F8- Medium Depth of FieldA Wide Aperture F5.6- Narrow Depth of Field

In the three photos above you can see this depth of field control at work. In all cases I focussed on the blade tip of my safety knife (also know as a Box cutter in the USA) which is opposite the 20cm (approx 8”) mark on my metal ruler. At f11 (a smaller aperture hole) you can easily read the markers out to 31cm (12”) mark before the marks and numbers start to become blurred. With the aperture set to f8 the scale starts to blur between 26 & 27 cm (between 10” & 11”) mark. At f5.6 the blurring starts at the 25cm (10”) mark. The important thing also to notice is that my pink plastic safety cutter is pretty much the same exposure in the three images because the camera automatically changed the shutter speed (and in my case also the ISO) to achieve this.

After becoming happy with Auto mode, I believe a new camera owner should next get the courage to try A mode (Aperture Priority). Moving to A will let resulting photos stay nicely exposed and occasionally you could start to pull off really good creative shots by  experimenting with and controlling depth of field. However don’t race out and buy an expensive fast lens (with a low f-stop number) just to become a bokeh master right now. Experiment with the lens(es) you have (a lot of kit lens will be f4 or f5.6, but they’ll be just fine to start).

Sunday, May 13, 2018

Day Two … Live Guides and SCN mode

I’m not sure how many other cameras have a similar features but the Olympus OMD E M10iii has two further features to assist the new camera user.

Location of the "shortcut" key on Upper left of my new OlympusOk I have read the manual to get an overview of how these work. They are very straight forward to use, particularly if you are used to using smartphone apps. They make a great next step from using the fully Auto mode and give you a little more control. To access their power you use the little “shortcut” key on the top left hand side of the camera. it does have slightly different functions depending on which mode he camera is in, yet they show a limited set of the main function you might wish to use in that mode, without having to navigate through the main menu (and/or the manual)

If you use the shortcut key in Auto mode, you will see a small set of live guide button on the right hand side of the back LCD screen. Pressing it a second this key with your eye to the viewfinder will show the live guides in the viewfinder (not sure why you would want this, because the best way to use these guides in in the Live View screen). This set of Live view guides lets get sliders to change the obvious things about the image you are about to capture, and you can use the touch screen to adjust the sliders much like you would do on a smartphone.The best part is you see the resulting changes on the Live view screen, its a lot like post processing before you take the shot.

  • Colour (Saturation <> muting)
  • Colour Temperature (warm <> cool)
  • Brightness (Darker <> Lighter>

Mothers Day Cake - AUTO Mode jpegMothers Day Cake -Auto & Warmer jpeg YUK!Mothers Day Cake -Auto Vivid & Cooler jpeg Nice

Just changing these three things, along with good framing (zooming in, or out of perhaps moving closing and filling more of the picture with your subject is probably enough to take a good auto image to a great photo. So many former smartphone photographer will probably be happy to continue using this approach for some time.

There are also a couple of specialized function, but you would probably leave those till later

  • Blur (Blur <> Sharpness)
  • Motion (Blur <> Stop motion)

Finally right at the bottom of the Live Guides is an item called Shooting Tips, which bring up more guides for common shooting situations and gives advice in example pictorial form. These are actually pretty neat and much more useful to a new photographer than a traditional boring manual or think how to book. Yet they are buried at the bottom of the live guides, I probably would have missed them if I had glanced at the manual and deliberately looked at all items in the Live Guide list. However it you are new to the M10ii definitely press the short cut key and scroll down to the bottom of the live view items.

A Different Mothers Day Cake -in Macro SCN modeUnder the Auto key (if you move the mode dial clock wise) is the SCN  Scene Mode. Many other camera system have something similar which will change a few to several of the camera setting to best suit the type of scene about to be photograph. This Olympus implementation is pretty amazing if you use the shortcut key to access the set of options you get a set of picture tiles of the six main scene types and then tapping your figure on the most appropriate tile brings up some useful advice and a further set of sub-menus to refine the settings further. Think about it with two taps of your finger you can choose some very specific setting to better capture the photo you are about to take. Compare this with finding all those settings amongst the combination of dial and menu setting. I think this would really help a new camera owners to come to grips with their cameras capability.

These features work with jpeg file output. If you are shooting in RAW the camera will switch to jpeg+RAW and while the the jpeg files will be adjusted to match the Live Guide or SCN mode the RAW file will not be adjusted. So stay tune for working with RAW using tradition settings of the P A S M modes. For now just play in Jpeg, and enjoy getting great photos.

Saturday, May 12, 2018

Day One ... cont. jpeg .vs. .orf RAW

This was not a surprise. My lightroom (still ver 4.4) could not read the Olympus RAW format .orf. The same thing happens to most owners of new cameras, they have to wait for an update from adobe and they complain a lot on the internet. Please don’t think I’m just complaining, I understand the issue but I not interested in the adobe subscription so this probably marks the beginning of the end for lightroom in my photographic tool set.

testing olympus camera original jpeg fileProcessed with basic Tone Mapping in Aurora HDR 2018

On the left is the jpeg image straight out of the camera, shot in Auto. On the right is the same image but the .orf version read by Aurora HDR 2018, which can read the Olympus .orf RAW format. To keep with the spirit of using Auto I have only used it’s basic Tone Mapping (just stretching the tonal range) as a fairly basic thing you might do with any RAW file. I like both but the one of the right feels more like being there, so I made it my PhotoFriday post this week.

Day One … A is for Auto

I am always advising those with a brand new camera, to start in Automatic (the green box) because that's where you get to know what the camera will do in any given scene. As opposed to starting in M (manual) which is the implied place “real” photographers hang out. Ok that’s just the myth on Youtube, Vlogs and social media. However pretty well all digital cameras (and smart phones) these days will take really good photos just by themselves. So my theory is, it is better getting some good photos and getting to know your camera (and those situations that the camera hasn’t done such a good job). Compared with struggling with manual setting and getting a lot of disappointingly over and underexposed or flat photos, That would be very discouraging to you, and its not your camera’s fault.

testing olympus cameratesting olympus cameratesting olympus camera

So its time to follow my own advice and thus today is A for Auto. Its the first day with my new Olympus and rather than go crazy and snap everything. I figured I’d go green, and look at straight out of the camera photos. All of these images are just the Jpegs direct from the camera with no post processing (including no straightening, which bugs my sensibilities a bit but I needed not to touch the photo after its come out of the camera)

testing olympus cameratesting olympus cameratesting olympus camera

testing olympus cameratesting olympus cameratesting olympus camera

testing olympus cameratesting olympus cameratesting olympus camera

testing olympus cameratesting olympus cameratesting olympus camera

With the exception of those with strong light and shadow (two on the bottom left which had a very high dynamic range) the photos aren’t bad. My advice seems to be justified.

Ok what about jpeg versus RAW, well that’s another post.