Showing posts with label Bracketting. Show all posts

Friday, April 28, 2017

Stepping into HDR

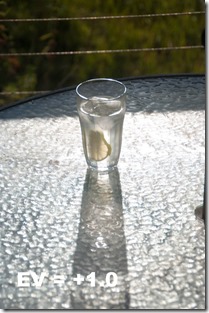
EV Bracketed Setup on my cameraWhilst I am definitely not in favour of setting fixed methods (workflows) for others to follow I figure it would be worthwhile to outline the steps I take to produced HDR images. I’ll be doing it in four different four ways, starting with my current most favoured approach, using Lightroom and Nik HDR Efex Pro 2

I start most of my HDR work the same way, using the bracketing on my DLSR. I have experimented with the number and magnitude of the EV steps. Just three steps of ± 1.0 EV seem to suit a more restrained HDR approach. This give me three exposures, one underexposed, one close to best exposure and one over exposed.

_IGP6682 _IGP6683 _IGP6684

For the first example I’m using Nik software’s (now google’s)HDR Efex Pro 2 plug in via Lightroom. Whilst lightroom has a mechanism to transfer photo out to plug-ins it can only transfer a single image at a time. So instead on the Edit-in tool I need to use the export function and the option google/HDR Efex Pro 2
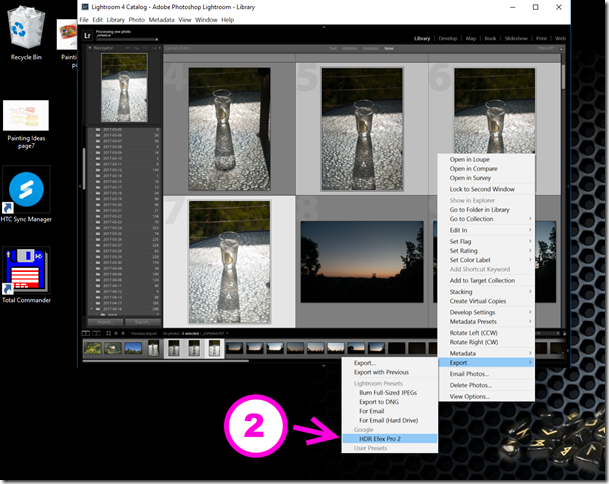
The Lightroom export required

Lightroom will take a little while to export these three files and then start up Nik HDR merge. This occurs in two parts, the first is the Merge Dialogue, which offer three ways to avoid common artefacts and problems when taking multiple photos. This include aligning photos (step 3) when taking the HDR handheld, this is the default so no action is required unless you had previously turned it off. Ghost removal (step4) which searches for and removes ghost images associated with things (usually people) that move between the three exposures. The grey frame around the upper photo indicated the photo that will be used as the ghost removal reference. The strength of 100% is the default but allows you to soften the degrees to which ghost removal is undertaken. Whilst I’m sure this step takes time, I just leave them always on, as it has no impact that I can find when there is no movement. The final artefact (step5) is chromatic aberration (coloured fringes at the edge if strongly contrasting parts of the photo, eg. tree silhouettes against the sky) because the HDR process can over emphasise this effect. Different lenses and lighting will give different effects, I have found more the upper slider to remove red effects and the bottom slider a little less towards the blue works well for most of the photos taken with my Pentax camera and Tamron lens combination. There is a magnifier at the bottom right of the reference image if you want to check who these setting are being applied. The lightness slider underneath the image helps you see and check detail in the HDR image. It does not effect the the processing of the HDR image in the tone mapping steps to follow.

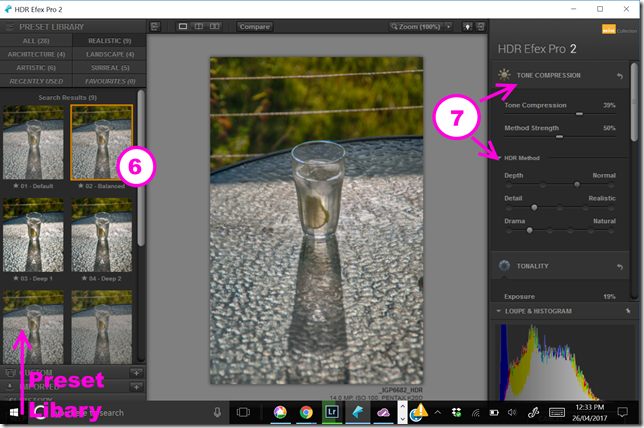
Merge controls in NIK HDR Efex Pro 2Clicking on the Create HDR button at the bottom right, starts the corrections you have set and applies them to the individual exposures and the merges the three images, It can take a few seconds and then takes you onto the interface controls for the tone mapping step. This  is the dialogue window in which you will do all the remaining image adjustments. Nik have provided a library of presets which show on the left hand side, grouped under several effects. When you begin using the software it is probably a good idea to try the look of several presets, a lot of them are over the top. I quickly found I only liked the realistic group and then only a few of those, I personally find the Balanced Preset (step 6) gives me a good starting point.

Tonemapping Interface controls in NIK HDR Efex Pro 2

However It is just a starting point, and I suggest moving over to the right hand side and working down through the options to edit your image. The first is tone compression (step 7), these sliders can have a really significant effect. The tone compression moved all the way to the left will leave the dynamic range much close to a single photo (flatter) whereas move all the way to the right gives you an extreme dynamic range putting detail in the shadows and highlights (it will usually look surreal and  over-powering), but a slight move to the right often makes the image snap. The methods and method strength also control the tone mapping but in specific ways. Depth controls how the shadows and highlights are to be treated and again moving to the right will enhance the dynamic range, normal is fine for me. Detail is a lot like clarity in lightroom or structure elsewhere in Nik software, it controls the local contrast and can bring up a lot of detail, realistic is fine for me. Selecting the histogramDrama is like a contrast control and different images respond different, I’m using natural here but moving to the right usually adds drama particularly to a cloud sky.

For the next step Tonality I like to have the Histrogram displayed (step 8) on the lower right panel (normally it is a loupe/magnified view)
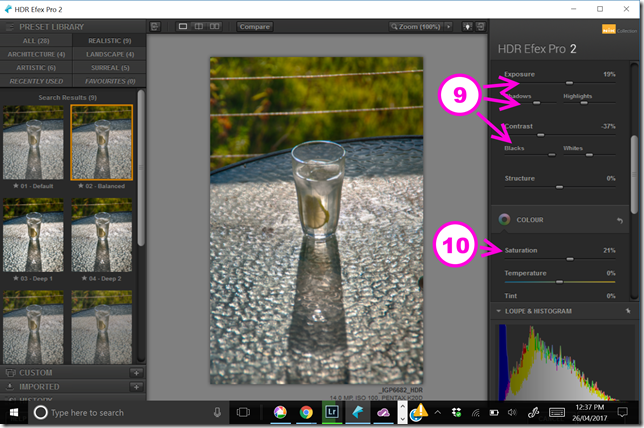
Toneality controls in NIK HDR Efex Pro 2

The tonality controls are  very similar to the Basic tonal controls in Lightroom, but the work across the new combine dynamic range of luminosity in the HDR image. They work on the image as a whole. I wanted this image to better fill the histogram of the available dynamic range to I increased the exposure a little, stretching the whole histogram to the right. I also increase the highlights and lessened the blacks (lifting the left most part of the histogram (step 9). I also increased the saturation just s little (step 10). These last two steps could have just as easily been made in lightroom but it is convenient to do them here.

Normally I would finish here, but I found the wire in the background distraction so I then used OnOne 10 enhance and the magic eraser (a context sensitive fill)  to remove them. Also I cropped the photo a little.

G&T :: Backlit Glass

Tuesday, February 28, 2017

When more becomes too many

As I walked through the forest I just took almost exclusively bracketed sets of images. Not only for a single scene but also for every image in a panoramics series, the number of images quickly multiplies.

I already take Raw & Jpeg, then 3 brackets means 6 images when I press the shutter. Next I might  take 5 overlapping photos to cover the full range of the very tall trees. And I’m up to 30 images just to get. A single final photo.  I took around 20 such multi-image panoramas and wow over 600 photos on my hard drive. 30 images to make just 1 vertarama

Just looking through that number of images becomes a challenge. It makes a couple of minutes (mainly waiting) to create the HDR image (using default preset/setting). Longer if I want to tweak any settings.Intermediate step of producing individual HDR tonemapped imagesThis steps also creates another larger .Tiff file (I’m creating 16bit tiffs to get maximum dynamic range and colour info). Next the autostitch can be as fast as a few minutes for a small preview but that quickly becomes about 20minutes (again mostly waiting) if I want a large (almost full size, ie as large as assembling to component images). Even though my little HP spectre only has limited disc capacity and slightly lower speed (i5 versus i7 processor) than my desktop. memeory is the same and the HP has an SSD drive which makes everything, even lightroom, look snappier. Suddenly I realise I’m spending half and hour on each separate HDR/panorama. That’s going to be 10 hours if I want to process all images. Worst the photos and sub-stages would take up about 17 gigabytes! This is turning into a nightmare.

Ok that’s just too much. So I’ve opted to do some preview stitching to a small image size (1400 pixels wide) from the EV=0 exposures to judge the desirability to go to more complete processing. Cutting the task down to just 4 big images at the moment. The first image below I spent over half an hour setting is not one of those I wanted to keep! Such is life.

Trial Vertarama using Autostitch with no straightening

Thursday, July 10, 2014

Bracketing, HDR & Tone Mapping via jpeg

O
ne approach I like to use to extending the dynamic range of an image is the technique know as HDR (High Dynamic Range). This  approach has earned a bad reputation, mainly because it has been over applied to to point of lurid surrealUncanny valley”-ness, but it doesn’t deserves this rap.
IMGP3369-HDR Created by google+ AutoAwsomeBehind the method is a simple idea, you can take a set of exposures (to capture the gamut of light and then combine the different exposures into one. This is not exactly new, some folk like Ansel Adams and other zone system proponents and the multi-exposure approaches like those of Gustave Le Gray, have been making composite and darkroom modified images back in the film, enlargers and wet chemical days. The difference now is most of this tonal manipulation is done in software. There is the conventional image merging facilities by way of layers in many packages but what is general called HDR is a more mathematical approach.
The methods begins by taking a series of different exposure of the same scene. In most DSLR camera this can be achieved by using a bracketing of EV values and probably three images will be taken together. (see the set taken for this series of posts) The intensities are combined pixel by pixel across these images.. Rather than just use and average intensity of the intensity of matching pixel, the simples approach might use the standard deviation of the nine adjacent pixels of which that pixel is the centre to adjust the average intensity.Thus making a better allowance of the local variation (ie sharp changes in intensity, or edges of objects) and tending to preserve local detail. (actually there are a real range of mathematical methods to do this “averaging”) The process doesn’t end there because trying to reproduce this wider gamut of intensities onto most forms of display or printing will involve reducing the intensity range again to suit that device or display. If those intensities are just arranged linearly back into the reduced range for reproduction, the image becomes flattened and “boring”, so there a number of methods, similar to the tonal adjustment curves in photoshop, lightroom and many other packages, that can be applied, These tone mapping algorithms take the original exposure range (and local adjustments, such as the standard deviation of intensities as described in my example) and refine the new intensify to be used for each pixels.Tone mapping can basically allows the highlights, midtones and shadows to be adjusted smoothly to a pleasing rendering of the image. Because there are a number of methods (and sliders to set the amount of adjustment) there is a lot of personal judgement that can be applied in the tone mapping step. This is why the “one setting suits all” and the “move all sliders to the right” approached tend to produce garish and disturbing images. Good tone mapping requires constraint and an understanding of how you want the image to look.
A lot of the photos posted in this blog are based on the HDR approach, and most folk don’t even notice, Used sensibly the tone mapping and HDR approach can bring out the detail and lift the photo to be closer to what you actually remember seeing.
The most conversational and probably the  best introduction and advice of using HDR comes from +Trey Radcliff on his stuck in Customs website’.
(BTW You don’t have to buy photomatrix to do HDR, but you could if you want to follow Trey’s methods exactly. I’ve had the image above prepared for me by google+ AutoAwesome and will be discussing using Picturenaut, another “free” alternative in an upcoming post)

Tuesday, July 08, 2014

Extending Dynamic Range …with & without RAW

2014-07-03

T


his image of a shady spot on a sunny day is the classic example of the scene that challenges the range of light intensities that can be recorded by a camera’s sensory. If you rely on your camera light meter to get the right exposure and point at the shadows and trees the sky becomes blown out, or point mainly at the sky and the shadow detail disappear into the dark gloom. That range of light is often referent to as the camera’s dynamic range. Digital sensors are improving but they still have trouble capturing the range that traditional film could and this is much less than the human eye can handle. so very often such scene will seem very flat or less rich than you remember them. So I have taken a wide set (large EV variation) of bracketed exposures in both raw and jpeg and will run through a number of ways I have found (they are not my discoveries however) to extend the “apparent” Dynamic Range of the scene, which I will post over the coming week and add links to them back here in this article.

My objective being simply to better represent how I remember seeing the scene.

Using Jpeg

Using RAW


This Cambridge in Colour article on Dynamic Range is a very good introduction.

In retrospect, I realise that post this series, doing one step at a time in a blog format puts the posts in reverse order (I’ll do it the other way around in the future, but you can just use the links about as a table of contents to follow my progress). Special thanks also to Jessica Hische for the wonderful Drop Caps I’ve used in this series

Friday, May 09, 2014

The Benefits of Bracketing for High Contrast Subjects

The set of Bracketed Ev values
The Photographic opportunities at the Alfred Nicholas Gardens was pretty amazing but the sunny autumn day produced strong contrast in the pools of coloured light in the shade of the tall trees. This definitely a situation that gives a hard time for the in camera light meter to get a viable exposure. I have learned to trust my instincts in situations like this and go for slight under exposure to avoid burning out the highlights. If you are shooting raw you will usually be able to get a bit of detail in the shadows, whereas it is hard to fix the highlights when they are burnt out.Histogram from the EV=-0.5 photo I have also learn that this is also the time to run a bracketed set. In this case I cranked up the EV steps of 1.5 and run five exposures. Just looking at the back of the camera I was able to conform that I was approximately right in my choice, The histogram starts to rise up on the right hand edge when the highlights get blown out, In lightroom this is refered to as tonal clipping and when a number of pixel beloe just white (or truely In the case of this series I selected the EV=2.0 photo to post on flickr. Just in case I did run a few more bracketing exposures are I walked around and took different views. So I have a few over and under expose images but most turned out fine. IMGP0322.jpg

Monday, January 20, 2014

Returning to HDR a fresh

I have been taking bracketed set for a long time, particularly I am not certain of the lighting conditions will be interpreted by the cameras light meter. Cases such as sunrise, sunset, strong contrast/shadows are good examples. Even if the exposure is off by also taking a couple of extra photos  with a little extra and less exposure (which is easy on digital cameras) you then have a reduced the risk of missing a good opportunity. Most digital cameras let you do this by changing the EV (Exposure Value) sometimes called the exposure compensation. This is a much simpler number to understand that the interrelation of lens aperture (f-stop) and exposure time (speed). Each unit of EV is equivalent to doubling the light (or in simple terms one f-stop). The EV setting on most cameras are relative to the exposure selected, so +EVs increase the light that lands on the sensor (over exposes) and negative –EVs decrease the light that lands on the sensor (underexposes). This is done by the camera either changing the f-stop and/or speed.
You will probably have to read your camera manual but it is relatively easy to set up most DSLR to automatically taken an appropriate EV set. For example I have my Pentax ‘s User mode set up to take a set of 5 images at steps of 0.5 EV from -1 to +1 EV. I press the shutter … click, click, click, click & click … I get the exposure in pretty rapid fire (depending on the speed of the exposure). By having this already programmed there in user mode I just have to turn the mode dial and press the shutter. It’s very convenient and a good way to quickly fill memory cards but it bring me comfort that I will get at least one half decent exposure. On my Canon I tend to just set it up manually and typically just do 3 photo -1EV, 0EV and +1EV. This is a little more work but I tend to go for my Pentax when it is an important subject.


Now the selection of the best exposure and whether you want to post processing the set as HDR can come later. Even though I am now quiet at ease with the HDR process it still takes time and I have to jump back and forth between programs so I tend to only do a few HDR photos at any time (a lot of the sets just remain unprocessed). That is where a minor side benefit of google+ auto backup comes into play. As it is busily (ok its slowish but I’m not complaining) uploading my old images it tries to run HDR on any suitable sets it finds (it doesn’t do everything, but it does look at many more than I did) and each day I seem to get a new notification of new auto awesomes to look at. I have taken a renewed interest it those it has chosen to do as HDR. Not all are good, but they have been worth a look, perhaps the better ones will be worth a second look and perhaps revisiting the post processing that could be done. I’m not ready to hand over the care and refinement of my photos to an anonymous algorithm quiet yet, but I am keenly interested it what it can do with my photos.

Friday, January 17, 2014

HDR before breakfast

collage of the bracketted exposure as unaltered jpegI had gotten up early to photograph the dawn, which wasn’t as interesting as the moment of pre-dawn. A flush of pastels shades as the sky began to light up but the foreground was still dark (the street lights are still one. However this is a classic situation where any camera has a lot of difficulty capturing the range of light intensity. The sky can easily be bleached out (ruining the pastel tones and the foreground in deep dark shadow. Yet being there, I could remember see a lot more detail is visible, In the past I have used EV bracketing as a safety fall back to get some detail. However with HDR and/or processing RAW file tweak I can usually get close to the dynamic range I felt I has seen.
tweaked RAW image using After Shot proWell today google+ Auto backup beat me by a long way. I had just begun loading my card and going off to get a light breakfast of mango and coffee. When I got back (not long really) my photos where not only in picasa on my laptop they had made it onto google+ backup and only a short time later the little message you have auto awesomes waiting. What a surprise (see below) but maybe it has overdone the lightening the shadows.

Monday, April 29, 2013

Numbered Stacking, is great BUT…

I often take a number photos, in a specific set, usually bracketed groups of +/- EV settings, or adjacent & overlapping images for panorama stitching, etc. These can clutter and overwhelm your grid view or film strip. Light room has a great feature called stacking (it has been around since LR3 days) that lets you, hide the rest of the series behind the first image. It works a lot like having a set of photos underneath the first photo (normally the first photo taken, although it is possible to select the photo you want to be on top of the stack. The photo stack are identified in the library model and grid view by two vertical lines on each side of the photo. Clicking on either line will expand the stack, click on the vertical bar again with close the stack, The short cuts for this is S to open the stack (and once the stack is open press S again to close it). There are a few more stacking options under the menu item Photo/Stacking.imageI use this feature a lot and couldn't help noticing a very nice new way the stacks are displayed in LR5b (that's lightroom 5 beta). The stacks now have a small stack icon displayed (the icon is simple overlapping rectangles with the number inside the inner rectangle) at the upper left which shows you the number of photos in the stack. This is much more obvious than the two vertical lines (which are still there) and because I know what it is I usually leave the stacks compact. The problem at the moment is if I am showing others my recently loaded photos, they are immediately inquisitive and expand the stacks, or  want me to expand each stack. So I got to wondering was it possible to toggle off the stack numbering (and I can't find a way to do it) Then I realised it would be wonderful to be able to flag these boxes with colour (or a different shapes) to differentiate the type of stacked images, (eg HDR set, stitched panorama, group photos). Oh that’s right lightroom doesn’t yet support any form of photo merger (yet!)!
So here are a couple of interim solutions that work fine for me.
  1. I must remember only show others my lightroom collections (not original folders) so they only get distracted by what I want to show them.
  2. I have started to use the colour flagging to identify what are bracketed EV ranges (red) versus overlapping images for stitch panoramas (green)

Thursday, April 11, 2013

Trying to keep HDRi real

bracketed sunset HDR seriesTaking the sunset tonight, with the polarizing filter still on the lens, I was conscious that the images on the back of the camera was very dark (underexposed) but the colours of the sunset looked rich, like the actual sunset in the +1 EV image from a bracketed set. So I figured I should do a bit more experiments with HDRi in picturenaut using high bits per channel, which this package can only export as .tiff files, but minimal tone mapping. In this case I used just an effective +1.3 EV exposure adjustment of the whole image.. Again I was not able top read the 32 bit version into lightroom, where as picasa could display it? However the 16 bit per channel files loaded easily into lightroom and responded beautifully to some tweaking of the shadows & black tones and slight clarity and luminosity increases. These adjustments did unfortunately highlight the digital noise, which is typical of low light exposures, but this was easily corrected with the lightroom 4’s development/detail sliders.The combine file is no longer a RAW format but it does hold and extended dynamic range that the basic lightroom development controls can adjust, and I feel this approach does it naturally, not in the lurid surreal formats so often blamed on the HDRi technique itself, but are actually related to some preset concepts of the tone mapping options in common HDR packages. So Instead of “finishing” your HDR work in picturenaut, photomatrix or other HDR software, instead try saving the combined image at a higher bits per channel and do the final tonal adjustments in lightroom (or photoshop)
Sequence: {IMGP0673.JPG: TV=0.002857, AV=6.7, Bias=-1.0} {IMGP0674.JPG: TV=0.004000, AV=6.7, Bias=-0.5} {IMGP0675.JPG: TV=0.004000, AV=6.7, Bias=0.0} {IMGP0676.JPG: TV=0.005556, AV=6.7, Bias=0.5} {IMGP0677.JPG: TV=0.008000, AV=5.6, Bias=1.0}

Monday, July 30, 2012

PhotoFriday :: Luminous in Luminance

interior_pregamma_1_reinhard05_brightness_-011
Single image of the same sceneThe photo project for this week’s photofriday challenge is luminous, and perfect timing to play some more with Luminance HDR. So it occurred to me that good test of getting the tonality “natural” using a HDRi approach would be a strongly light interior (ie very high contrast). The challenge being to get detail in the shadows but not blow out the highlights, and keep the colouring of the backlit flowers looking natural, So I used a RAW bracketed set and Luminace HDR, and Reinhard Tone mapping. I hope you share my conclusion that HDR can be natural and can help in  areas that might be difficult to capture in a single image.
For PhotoFriday topic luminous

Friday, May 18, 2012

More HDR into the light

typical camera phone phto into the sunThere is one photo that almost all basic photographic advice says never to take “Don’t point your camera at the sun” (or  perhaps a bit more gently advice like, avoid taking you photo directly into strong light). Not only do you risk serious lens flare. The scene in front of the strong light will also be very difficult to expose correctly, because there are likely to be some features blocking the light and therefore in deep shadow producing a very high contrast scene. Most cameras will not be able to capture all the light intensities so their inbuilt light meters will try to find the best compromise exposure. Sometimes that will mean a very dark photo with nice show detail but bleached out areas in the light. alternatively you might get a high key detail in a washed out manner but murky darks,
There is however a photographic technique, available to digital photographers, that can help give decent photos into the light. The technique is HDRi (High Dynamic Range) where by exposures are combined from more than photo taken with different exposure. Probably the easiest way to do this is using a camera phone ap, like HDR Camera+, because the processing of the image will be done in the phone. The apps will take a series of photos, typically 3, at different exposures, then merge the images.Normally you will have preselect the tone mapping options, number and range of exposures before you have the photos. .Make sure you don’t have direct light on the lens, mainly to avoid lens flare, but it will also avoids bleached out areas in your final image. 
HDR Camera+ Bracket Set 2012-05-17_14-33-26_HDR Camera+ 
For those that want more control, there is a lot of specialized HDRi software. I have found Picturenaut a nice utility because it can handle images that are not perfectly aligned (ie they have been taken hand held, rather than forcing you to use a tripod to ensure the images where registered) and gives you several options in how to control the tone mapping into the final image. For a more natural look I prefer to use 5 exposures in my bracketing but with smaller steps between each exposure. The tone mapping method is more flexible, for the image below I used PhtotoReceptor method in Picturenaut.
  Pentax Bracket SetHDR with Photoreceprot tone mapping using Picturenaut
You might have seen some radical surreal HDR effects and been put off by the lurid colours, but HDRi is a technique that can help deliver beautiful photos in otherwise tough lighting situations.

Thursday, May 12, 2011

PhotoProject :: HDR looking towards the sun

2011-05-14After three very wintery days of constant rain, strong winds and bland low grey skys. Not an inducement outside to take pictures. Today the blue sky peaked through late in the day, so I headed down the beach, to find a real gale force headwind. I figured I might get a few of those great moments when the suns rays radiate out from behind a cloud. The sort of thing Turner would love to paint, but happening at a fast and furious pace. The problem is that when  you point your camera towards the sun, you pretty well always give you a very high contrast image, a situation that your camera’s light meter will have a lot of trouble making the right decision. I do know that you will possibly be ok if you wait till a cloud covers the sun and only the darker zones will be black and the sky or sun will not be bleached out. (See the EV=0 exposure in the set above). I also know that a bracketed set at different EV setting is a very easy way to hedge your bets and quickly get a range of exposures “just in chance”. Further that set of bracketed images can be used for HDRi technique. This allows you to slightly expand the dynamic range of the image to put a little in the shadows or fill in a bleached sky. So the fleeting moments in the weather gave me a great little photoproject to test the suitability of using HDRI to refine a very contrasty situation.
Picturenaut Tone Mapping screenFor this test I have used Picturenaut with everything set to automatic. In particular I have used auto contrast during tone mapping. I have found that contrast is the most sensitive setting when you do any HDRI work. The next trap for occasional users is the saturation slider, which tends to produce very surreal lighting (so that was also left at whatever the tone mapping set). The three tone mapping strategies in Picturenaut I like are either exposure, Adaptive logarithm or Photo Receptor Tone mappings and I felt I needed to see how each performed on it own (ie automatically).
Clearly all the HDRI images are nice, and look natural compared with the straight image at a standard exposure. All that was needed was a bit of croping and straightening. It is not clear that there is a massive difference but I can tell there is subtly in tonal range. Was the extra processing worth it? The results are here for you to judge.
Original exposure - Sun through the clouds HDRi - Exposure Tone Mapping HDRi- Adaptive Log Tone MappingHDRi - Photo Receptor Tone MappingOriginal Exposure - The storm arrives HDRi - Exposure Tone Mappinghdri sunset cloud logHDRi - Photo Receptor Tone Mapping

Tuesday, April 12, 2011

And the Cow jumped over the Moon

bull on the hillActually if you look carefully this is a bull. I have seen similar sculptures/billboards (Toro de Osborne) dotted over north western Spain, they where originally advertising, and at one stage banned but have been re-instated by popular demand in many areas. I’m sure that is not the case in Havelock North but the round hill and silhouette bull below the moon made a wonderful composition. The exposure tone mapping in Picturenaut gave the HDRi version above, the true feel of the crisp autumn evening, much more any of the original photos in the bracketed  set I took,
BULL ON HILL