Friday, June 30, 2006

Migrating Plovers


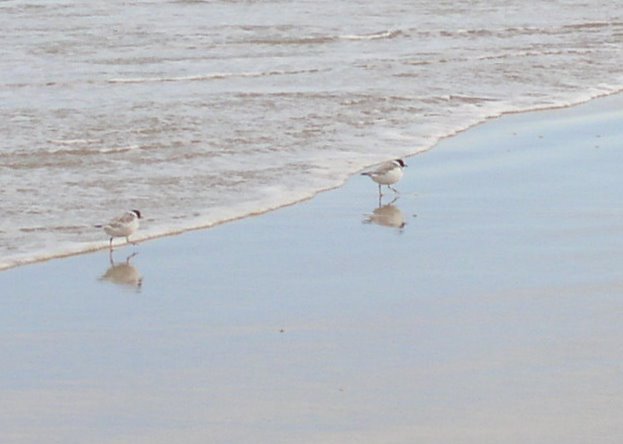
Initially I thought these where a pair or sandpipers, then possibly banded dotterels, but they are hooded plovers Thinornis/Charadrius rubricollis.

If you are keen on bird photography why not join up to flickr group Field Guide: Birds of the world

Thursday, June 29, 2006

Geotagging Photos with Picasa & Google Earth

You don’t have to post on Flickr, or be a member of the geotaggger's group, to be able display your images on a map. A new, and not well publicized feature (at the moment) added to picasa, is a geotag tool, which uses google earth.
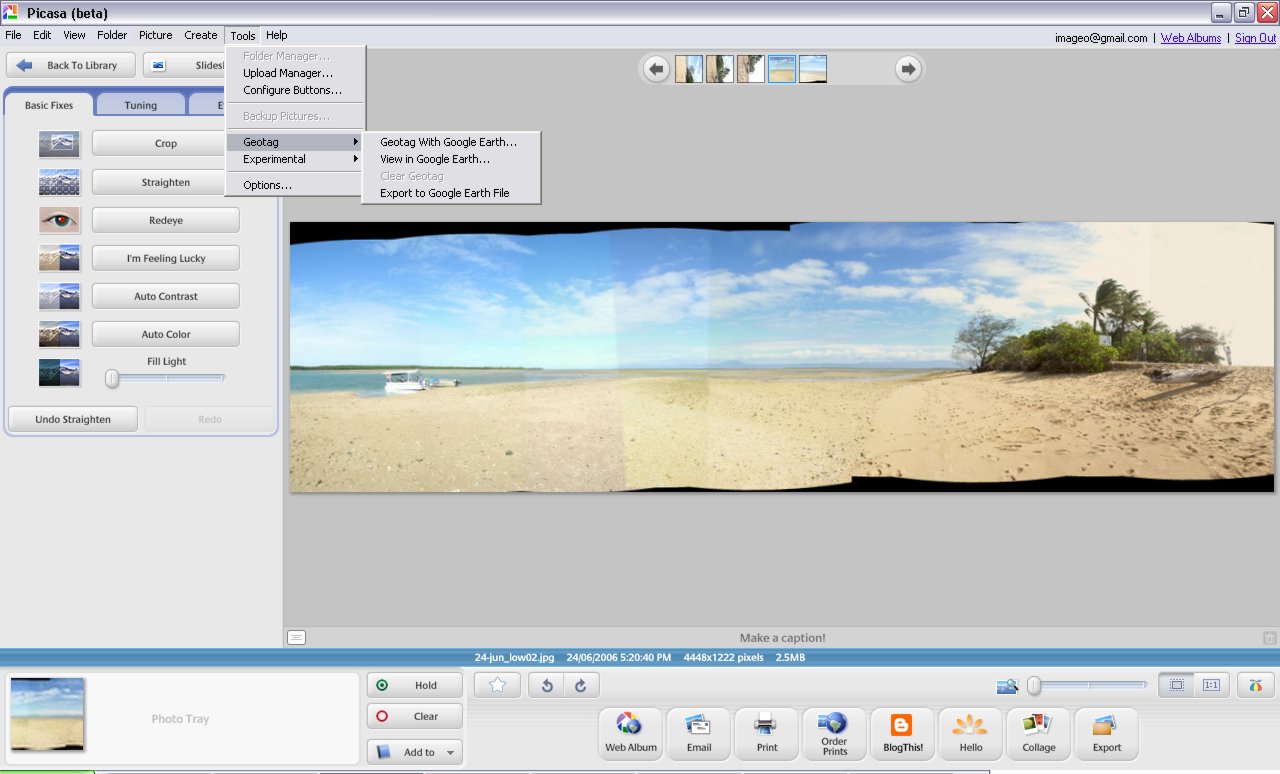
It lets you add latitude & longitude coordinates to your jpeg photo’s EXIF data . It is pretty easy to get working. Select a photo in picasa and then select the geotag with google earth option from the tool menu. This fires up google earth assuming you have it (if not is time you downloaded it’s free)
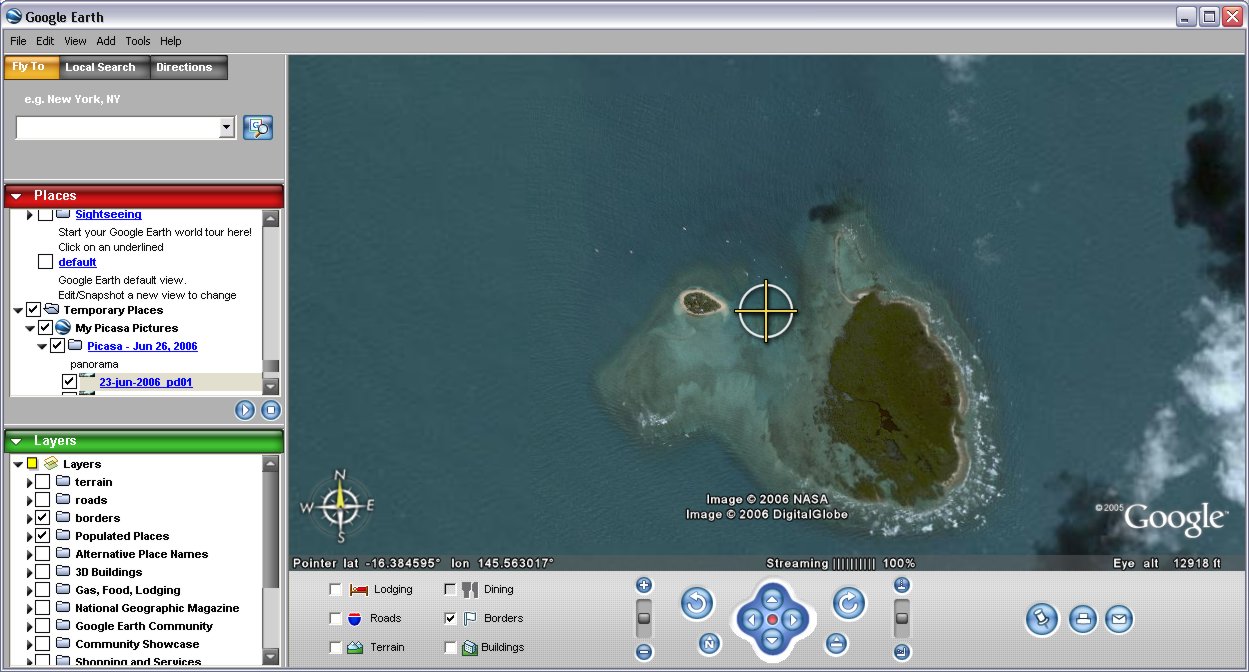
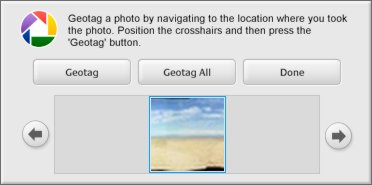
In google earth you will notice there is a central target. Down the bottom of the screen you will see a little picassa generated window with your photo. Just move to the location you took your photo (or the location you want to tag)  and click on the geotag button in the picasa window. That’s it!

Tuesday, June 27, 2006

The amazing localize

The developments in geotagging are racing ahead, literally day by day, so you will find me posting more on this topic.
Example of the localize script in action
This one is a real gem, for flickr users, it’s a little script called localize, (you can download it from this webpage). It allows you to do everything on the one page and the coordinates are passed back without any cut & pasting (well you don’t have to do it). You just go to your photo page on flickr and run the script (by clicking on the localize bookmark) and a google earth map appears, in your flickr window. Locate yourself and click on the blue save location button. That’s it!

Thursday, June 22, 2006

Rainforest (Spider) Hilton


These amazing spider webs are located beside the rainforest walkway at the first rainforest station on the skyrail between smithfield,near cairns, and kuranda, in far North Queensland.


Thursday, June 15, 2006

Geotagging for flick

Almost as soon as I had posted my Making Photographic Placemarkers in Google Earth post I began to realize I was miles behind on what can be done already. There is a lot of discussion in geo tagging group, and this is probably the best place to keep up to date with the latest and greatest.

I personally have tired out and really like the approach created by Andrew Harris, also a Melbourian by the way. You can find his approach discussed on the thread Round-tripping geocodes from Flickr to Google Maps and the actual code can be obtained from his blog “about pretty much nothing at all”. You must first save the two script from his blog article , gmap2flikrtag (which find the coordinates and writes the appropriate flickr tags) and Flickr2gmap (which will take you from a flickr photo display to the google map at the location of the photo). If you have Internet Explorer you need to select the link to these scripts and right click and select “Add favorites”, otherwise you can drag the link and drop it onto your bookmark bar on other browsers. These “favorited” links do not actually take you anywhere, like a normal bookmark would, they just run the scripts for you.

You must be in the appropriate screen to use these scripts. It is also handy to have two windows open in your browser. The first at google maps and the second open to your flickr photostream and displaying the detailed page for the photo you are tagging. By double clicking on the place you wish to locate the gmap will automatically center on that point. You will find that by selecting the area and progressively zooming the map in (you do this by moving up the slider on the little ladder on the left hand side up towards the + button) and re-centering you will be able to get very precise in your location if you desire (in Australia the “satellite” and “hybrid” options only give a “we are sorry we don’t have imagery at this zoom level” once you zoom down so you’ll have to stick on the “map” display if you want positional accuracy). You can also single click on the image and while holding the mouse button down and moving the move pan the map on the screen as another way to center the map.

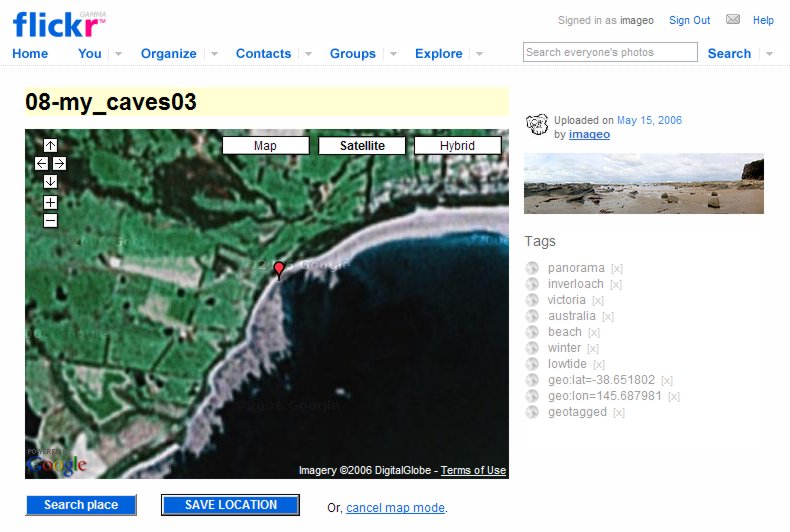
Once you have the map centered on the point you want, go to you favorites/bookmarks and select the gmap2flickrtag and once it runs you will see the coordinates written into the search box at the top of the screen. Select that and copy it. Pretty simple eh!

Now switch to you flickr window and click on the add tag option and paste the corrdinates and also add the tag geotagged. That’s it! Your photo is tagged with its geospatial position and available for all the wonderful spatial search applications (like flyr)

Those using Internet Explorer 7 (its still in beta I think) may find you just get an “error in page” message when you run the scripts. You can avoid this on the gmap2flickrtag script by Disabling Script Debugging (Internet Explorer) and Disable Script Debugging (Other) found under Tools, internet options and then advanced. However at the time of writing I have not found a way to get the flickr2gmap scrip to run under IE7. The scripts run perfectly for me under IE6 & Mozilla Firefox

Finally I also use a hyper link to Jef Poskanzer’s Acme mapper as a link on my geotagged photos. Anyone viewing my flickr stream just has to click on the hyper linked underlined geotagged line and they will be automatically be transfer to a google map look alike that shows the photos location (in a similar fashion to them having their own flickr2gmap script). I also like to post in the coordinates into the comments (but this does not get recognized by the geotagging conventions to flickr, it is just for appearance)

Wednesday, June 14, 2006

getting in close


I'n not sure why it is usually called macro photography, but close up photos are usually easy to take with most digital cameras, which can focus even at objects a few centimters away from the lens. Normally there is a specifical macro mode of focus setting usually indicated by a flower silohette (maybe because flowers are a favourite macro subject) So start looking for simple still life like composition in things you might normally step over.

Friday, June 09, 2006

A feast for bees

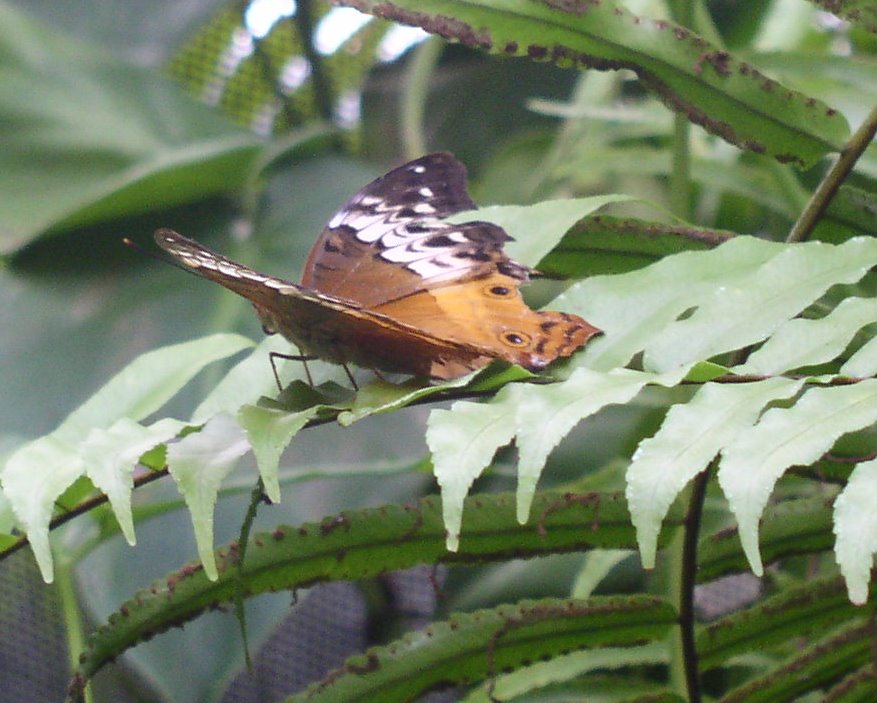
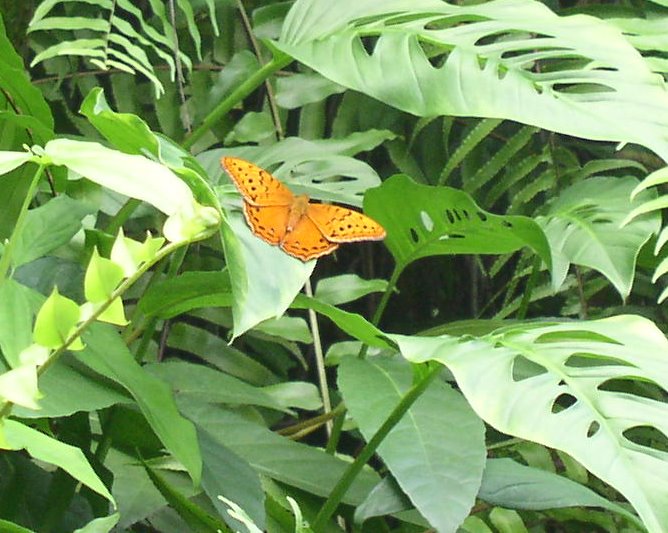
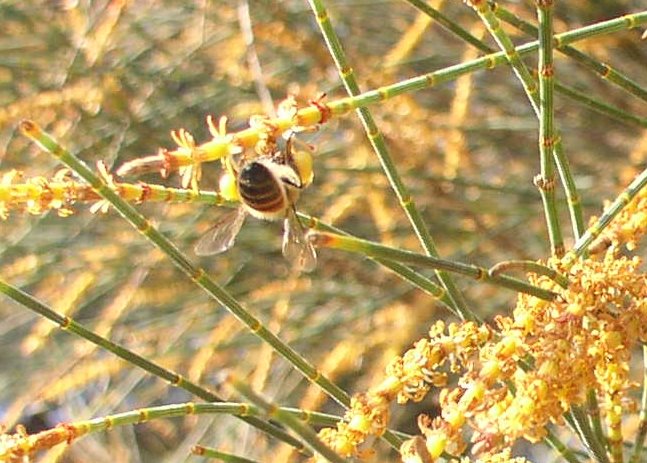
The drooping sheoak's (Allocasuarina verticillata) are flowering, and the natives bees are swaming in delight. The trees are either male or female and have different flowers The male flowers are red elongation at the end of the.round nedle like leaves, These flowers are so loaded with pollen that they bees can be seen to wear large pollen pouches on their legs.>

Thursday, June 08, 2006

The Delay

One of the greatest hassles most new digital camera owners soon find is how to handle “the delay”,  the unique feature (or is that annoyance) of a lag between when you snap the shutter and when the picture is actually taken. This happens because the camera does all sorts of things when you press the button, from focusing to setting exposure and white balance. The delay is not a big problem for still or portrait, but is a pain for action sphotps.

This was meant to be a photo of sparrows skimming across the water, but they are long gone and only little waves give any evidence of their passing. Come on admit you have lots of similar photos

The solution for action photos is to expect the delay!
  • Half press the shutter button as you are waiting for the action to start. Keep it there until you are ready for the photo, and then press the all the way. Pressing half way tells most cameras to  begin choosing focus, color balance, and exposure. The subsequent delay when you take your shot is now quite tiny, comparable to film cameras.

  • A second approach is to switch on manual exposure and focus. Most digital cameras have tremendous depth-of-field, so focus is not critical.  

  • Try panning the camera, which means folowing the action with your body to keep the subject in the viewfinder before, during and after the exposure.

Wednesday, June 07, 2006

C'est la vie

  Posted by Picasa
I normally carry my camera when out walking, and i was drawn to take a photo of this backlit oak. As I approached I spotted the ducks feeding on the grass. So I inched forward in order to have them silohetted against the well lit section of grass behind. Just as I was compositing a great shot, they all flew away! Such is Life!

Tuesday, June 06, 2006

Free Form Collage as Panorama

Melbourne Skyline
St.Patricks Cathedral, East Melbourne
Rather than using my very precise olympus panaorama feature I just took overlapping photos and manually aligned them in HP photosmart

Monday, June 05, 2006

Fading away

I must admit I have been mighty puzzled about photo fading. I have a hp photosmart printer and in general I am very pleased with the quality of my prints. Yet some prints have faded terribly!


The two prints at the back on the photo above where printed on the same day, on the same printer, on the same paper The top one which had faded badly was on display in a well lit room for about 18 months, the other was in a photo album. So sunlight fades inkjet printed photos just like it does curtains, carpets, funiture fabrics etc. However other photos in similar locations haven’t noticeably faded after 3 years. What is going on? Since the only variable can be the paper (I have used the same HP printer and recommended HP inks but not always the same papers) I figured I should do some investigation.

  • My first observation is the “premium” paper I use have brand marking on the back but the “everyday” picture papers do not. All the badly faded photo don’t have brand marking. Interesting! Maybe the paper manufacturers know something about their budget papers, and wish to leave no evidence!

  • My second observation is that the most faded photos were printed on Kodak matt photo paper. My HP photosmart printer automatically moves up to a higher ink usage (from normal to best) when I select glossy papers. So maybe the amount of ink is also an important part of the equation.

  • None of the badly faded photos where displayed under glass. (The glass may filter out the most damaging UV wavelength)

Looking on the web about fading of inkjet printed photos has largely drawn a blank from the big boys (well maybe with the exception of Epson) but I did find a great set of tests carried out by Ted Felix.  Which lead me to the Wilhelm Imaging Research, and their wonderfully informative book on “The Permanence and Care of Color Photographs” (downloadable free in PDF format, but it is 758 pages/79MB so be patient and if you don’t have broadband  just don’t click on this link) The book doesn’t really cover much about inkjet printing as it was written in 1992 but it does comprehensively cover the handling mounting and storage of photos, and negatives. The most honest summary of this apparently “taboo” fading subject comes from a PC world article "How long inkjet-printed photos last depends on who you ask." says Cathy Martin, an analyst for InfoTrends.

Saturday, June 03, 2006

Still Life in afternoon light

 
The low winter light (it is winter here in Australia), gives beautiful soft lighting for those into those backlit subjects (that are impossible to get in stronger lighting conditions) Posted by Picasa

Friday, June 02, 2006

Making Photographic Placemarkers in Google Earth

Those who follow this blog regularly might remember seeing photos with geotagged tag in the comments and also coordinated to locate the photo. When these are used as tags in Flickr, they can be used by a number off applets (and I won’t go into them now) that will let you place your photo on a map. For a good example see the “my geotagged photo” link on the righthand side panel which uses the fylr applet

Well what about tagging your own collection. If you have google earth it is much easier than you might imagine. No GPS required!
The Google earth Placemarker dialogue

The first step is to run google earth (if you don’t have it you can download it for free, but you will need a broadband connection to let it work well). Zoom into the area that you took the photo. You will probably be amazed at how accurately you will be able to find the location of your photo (even on the satellite mosaic only areas, such as Venus Bay). Then click on the little place marker icon (it’s a map pin) on the control bar at the bottom and select the placemaker item at the top of the popup list (you can use <crtl> N if you like keyboard short cuts)

The flickr image linking area
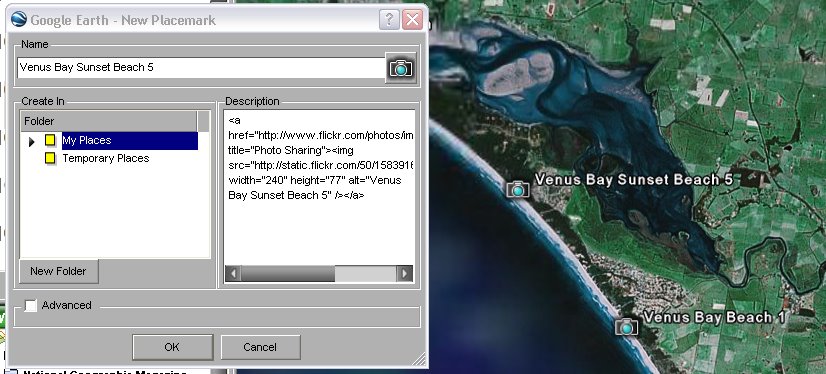
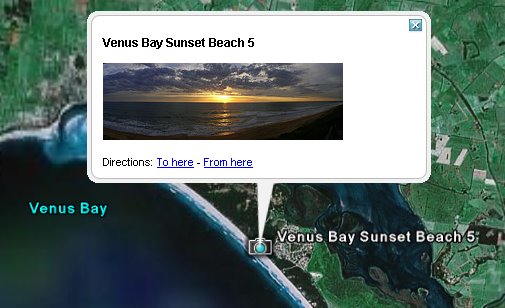
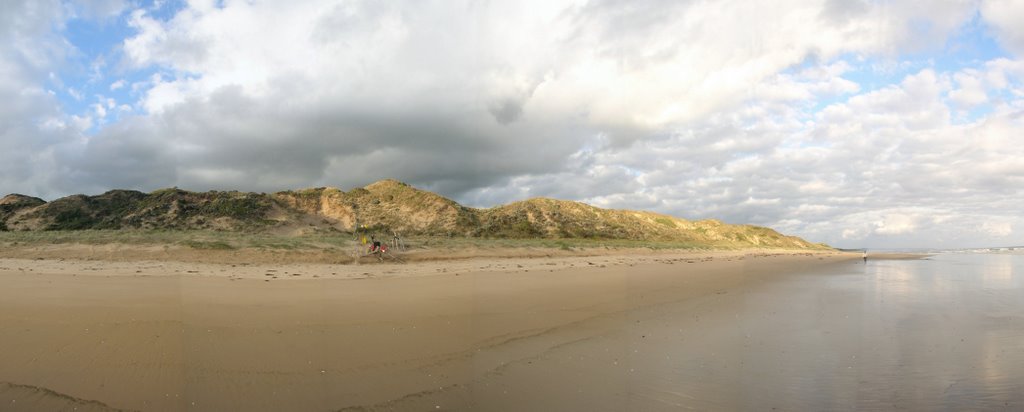
This brings up the placemarker dialogue box. While it is open you can as accurately as possible move the place marker over google earth to position it was accurately as possible. The last step is to past a link to your photo into the comments. In this case I’m using Flickr, but you can use any online photo album that lets you use links, like photobucket . So I  click on the small show all sizes icon above my photo and then I select the small size (I find this is a good size to display in google earth). I ten cut and paste the HTML link back into the google earth dialogue area. Click Ok and that is it!
The final place marker in google earth
Clicking on this new icon, shows the image, clicking on the image opens a window below the control bar and takes you to the full image in flickr. You can email the placemark and links and/or the image to friends (they need google earth to view it, but the can easily also download it). Have fun!

Big Skies


This time of year (late autumn/beginning of winter in southern Australia) you can get get skies and side lighting, which can make for wonderfull landscapes (or beach scapes as the case may be)

[geotagged geo:lat=-38.7104° geo:lon=145.8155°]