
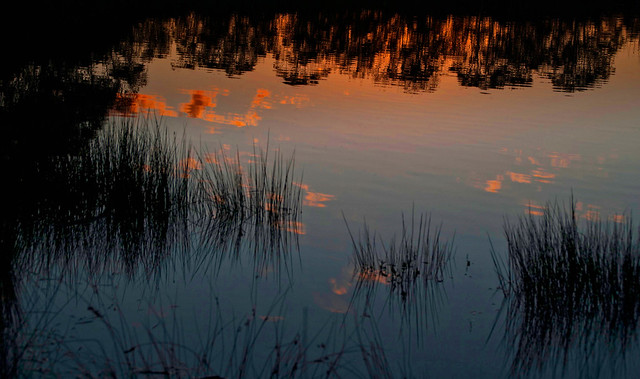
The Story of Narcissus, a fixation on Beauty, to Lighten a Darkness,
told as a Candle in love with its own Dream Reflection.
 For PhotoFriday‘s topic Flame
The Story of Narcissus, a fixation on Beauty, to Lighten a Darkness,
told as a Candle in love with its own Dream Reflection.
For PhotoFriday‘s topic Flame
I am quiet fascinated with the potential of the deep dream generation processes, brought to light by google researchers trying to explain their artificially intelligent process to recognise objects in photos (unfortunately that had started with discovering pictures of cats on social media, I have been know to unfollow/unfriend people who over post cat photos). To demonstrate the way their neural networks work they showed the state of the neural network as it tried to recognize characteristic shapes, outlines, colours & textures/patterns with a given image. As you go deeper and deeper into the layers of the neural network you get wonderfully focused images that eventually become very surreal (trippy) and dream like. Hence the name of the project Deep dream.
There are many competing system around now and I probably still prefer Dreamscope on the web and Lucid on my android phone. The best variation of the deep dream approach also allow you to train your own photos or artwork as the neural network to rank your intended photo. There is a fair amount of computing involved in training these neural networks but google or the other services handles this by spreading the task across its cloud of servers, but it does take time. The deeper you want to go and the larger the output required the longer it takes (google seems to abandon the task after 15 minutes, not sure why yet).

I then feed a square cropped version of my self portrait into another deep style but this time I used the interim photo/sketch as the image to train a new neraul network upon. This is why I am calling this the third generation (1. original photo 2. pastel like photo/sketch 3. neural network filter).
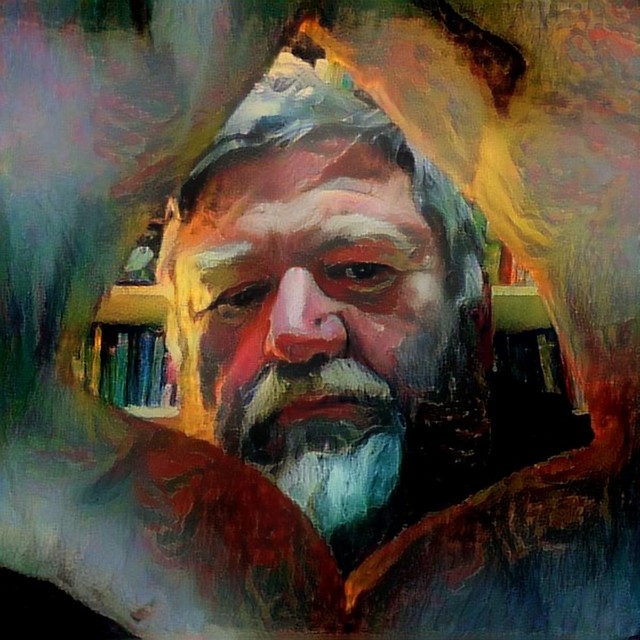
The result was indeed a good combination of the colours and feel of the original photo, along with the style of marks you might get from pastels and yet I was still recognizable peering between my hands forming a diamond shape frame.
I like where this approach is going


As a wide angle of a distant screen it is fine, but I’m not really a fan of the fish eye effect on a landscape. However letting it get right upclose (the macro aspect) definitely gives a different, aka interesting, perspective of some familiar items around my studio
I firmly believe seeing is the most important next step for photographers after the basics of exposure and focus are mastered (and by the way most modern cameras do this already).
Here is a simple task to convince you the difference seeing makes, go to one place you know, it could be inside or outside, look for something familiar but interesting but that you have not photographed before and take a good long look, maybe move around it and then quickly take 10 and 20 well considered photos in short succession. Try to mix up the composition and view, high key, low key, up close, step back, concentrate of capturing what you saw before you picked up the camera.
Have a break perhaps a coffee. Think about a way you can see the object larger than life (or as large as possible). It may be just uploading to your computer with a decent sized screen, or perhaps look at them on your large screen TV, you might have Chrome Cast or Apple TV, a HDMI cable or even via copying the files to a USB stick. You are looking to get the largest possible image, when reviewing your photos.
Now review the photos and delete the photos that don’t show the essence of what you first saw. They might be good photos well exposed or composed but they don’t connect to what you saw. 
Cull them, be ruthless.

You should find at least one photo that amazes you, how well it captures the essence of what you saw.
Full Disclosure, I have photographed my espresso machine before, but that was the previous model (sadly it had to be replaced). I have also often photographed cups of coffee it has made. I can promise I did look at the much loved machine with fresh eyes.
I perceive an apparent growing gulf happening in digitally based photography.
On one side is the use of photography as a substitute way for seeing, the concept that if its not photographed it may not have happened (eg like the Zen question of does the leaf falling in a forest not make a sound if no one is there to hear it). This helps me make sense of Instagram, which I must admit I still do not fully understand. Some people obviously live through their Instagram photo stream and number of likes. I would worry this is a very shallow and short life. It might explain a lot, why people spend so much time scrolling through social media images, they are living the life through others, particularly celebrities, or worse they are snooping. This is kind of photography is characterized by small screens and short viewing times with the occasional zoom into to looking at the logo on a handbag.


On the other side I know some photographers go to a lot effort to cultivate an awareness of what they see and frame that within a photograph. Often this involves leaving some details out to focus attention (depth of field blurring in portraits is the classic example, moving the view so a land post is not growing out of the subjects head). These photos usually demand a longer look. Artists have been following this same path for centuries, they have used sketching as a way to record what they see, refine composition etc. The well seen photographs may be telling a story, have compelling composition or eye catching colours or intricate patterns. They are typically larger and physical, perhaps more likely to be in an older photography book or on a gallery wall. Considered photographs are unfortunately dying out, or perhaps disappearing into the first group where they are overwhelmed and scrolled over.

In the middle there exists a lot of what we can see and experience that just cannot be adequately photographed. This was bought home to me in the panoramic dome on VIA’s the Canadian train. There is just too much to save into a single frame that truly records experience of being there. Yes there are 3d cameras, wide angles and multi stitched panorama but you still have to look through a limited window (I haven’t yet tried the current range of virtual reality googles, but I am skeptical). These images is obviously distorted, occasionally this is charming, but usually it jars and fails to deliver. 
We see and should be aware of much more, both in terms of dynamic range of light and spatially, than a camera. Yet I worry bombarding ourselves with 1000’s of small images is dulling our ability to see. Improved seeing is not hard, can be taught and even (self) learned. So I hope you join in my next series of PhotoProjects which will be exercises in seeing.

The Pink Floyd song (my I am showing my age) comfortably numb (I prefer the Van Morison cover) contains the lyrics
There is no pain, you are receding
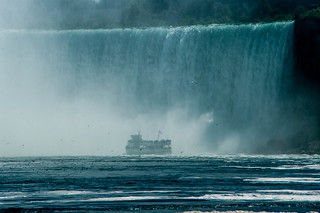
A distant ship smoke on the horizon
You are only coming through in waves
Your lips move but I can't hear what you're saying
When I was a child I had a fever
My hands felt just like two balloons
Now I've got that feeling once again
I can't explain, you would not understand
This is not how I am
I have become comfortably numb

This nicely summaries how I feel about uploading to on-line services, on the go. Once upon a time I thought I had it figured out but that is now just a smudge on the horizon. On my recent trip I totally lost confidence in google (and using picasa to upload to google “Private” photo albums, By the way, If you share a photo or photo album on google it is no longer private, just the weird address will be hard to guess). The waves of change are confusing and too often surreal like someone talking but no sound a kind of metaphysical painting in a very still piazza. I can feel/see something happening but it is hard to comprehend and where it is going. Thus I am shrinking back on the number of ways and places I try to share my work. DropBox for private shares, Flickr & Instagram for public shares with the occasional Tumblr. I am well over the pain of change and things not working or being deprecated, I just want to be Comfortably Numb.
PS All three versions of these flowers where processed on and posted from my phone.
My investigation into problems on my small computer network is deepening. As soon as I apparently fix one leak another springs up.
I have reviewed the chrome problems and noticed a few weird things (like pop ups trying to encourage software installs). I started to suspect some of the add-ins and chrome apps I had loaded (but mainly haven’t used). So I deleted chrome on the effected machines and re-installed it a fresh. Trouble is once you log in with your google account it picks up the previous settings. Still chrome is behaving now, and I will get rid of extension, apps and add-ins I don’t used (some time soon).
My other suspicion was at least some of these problems are related to was a virus, but my virus scans are up to date and came up all clear. All except my windows desktop which clams windows 
The biggest niggling doubt is on my main desktop computer. Every time I restart the computer I get a swarm of windows notifications that “an app default” had to be reset. Which app? Why so many? And bugger now edge is behaving weirdly! How do I delete Edge?
Strangest of all I’ve quadruple checked and none of my windows machines has got the anniversary version of windows 10 yet!

PS: Why Snapfish (*), It’s the service I’ve used before. For a long while snapfish was the only service in Australia that you could get flickr photos printed. That built in service was discontinued when flickr released their own (expensive) photo books. Most importantly Snapfish has always done a decent job on my photos, I am careful to have all images in higher quality jpeg (>80% quality) and in the sRGB colour space and appropriate ressolution (2000+ pixel on the longest axis is fine for the typical small photo book). Finally they are reasonably priced on both printing and postage.
Deep in the haze of jet lag after travelling and waiting at airports for a combined 30 hours and crossing 10 time zones, including losing an entire 11th August somewhere over the pacific, I was home and listening to last week’s This Week in Photo/Family. Just a small part of the discussion was about free lensing. Using the camera without the lens actually screwed in.
![]() The creative potential immediate switched on a light blub in my mind so I just had to try it out for myself. Rather that take the cautious approach of perhaps reading up on it or even looking for a you tube video. I jumped in! After all I had already begun a taking a few photos using no lens at all. All seemed reasonable and it was, but here are a few pointers to make it easier to get decent results.
The creative potential immediate switched on a light blub in my mind so I just had to try it out for myself. Rather that take the cautious approach of perhaps reading up on it or even looking for a you tube video. I jumped in! After all I had already begun a taking a few photos using no lens at all. All seemed reasonable and it was, but here are a few pointers to make it easier to get decent results.


The depth of field that is in clear focus (the sweat spot of focus) is typically very thin. So only a small area of the photo might be in focus. Slight tilting of the axis of the lens relative to the sensor will move the sweat spot around the resulting image. This is where the real charm and creativity comes it. and not always predictable
Using Free Lensing you will be able able to get the lens closer to the subject and bring the camera close without much tilt will work exactly like extension rings and give you a significant enlargement/macro lens effect.
This can be a little of a challenge but slight tilts, using your fingers on the lens, rather than the camera, will elongate the image on the sensor and careful selection of an offset focus plane ( the “sweat spot” is actually a plane) can give the resulting image with a tilt shift style appearance.
The gradual out of focus drop off at the edges can make free lens photos wonderfully dreamy and artistic. Go and have some fun with this method, it will cost you nothing if you has a digital camera with an interchange lens.
There are a couple of obvious limitations and problems. Because the camera is open there is a significant chance of light leakage and flares (which may just be represented as a colour fogging). This is particularly likely if you are photographing into the light (ie a backlit subject), but such flares can be used creatively and really add to the dreamy effects.

The other concern is dust on the sensor. Because the camera is open you run a real risk of getting dust and dirt and your sensor. I am quiet happy to clean my sensors with a an air blaster (I take the brush off the hand blower). So I recommend it is good practise to have a air blower handy lift the mirror and do a dust blast with the camera inverted (so any dust/dirt falls out of the camera safely) before you reattach the lens. Its probably also a good idea to practice the free lensing technique indoors until you are proficient enough to minimize the open exposure outside.

I doubt free lensing is a particularly new technique. I joined a flickr group that is at least 7 years old. The original lensbaby, a popular photographer’s toy, is basically a flexible tube that achieves the same as separating the lens from the camera (it just covers the gap, avoiding the light leaks, and a has simple single aperture lens and costs much more than just unscrewing the lens)
 Google Chrome frequently crashing on two of the windows 10 machines
")
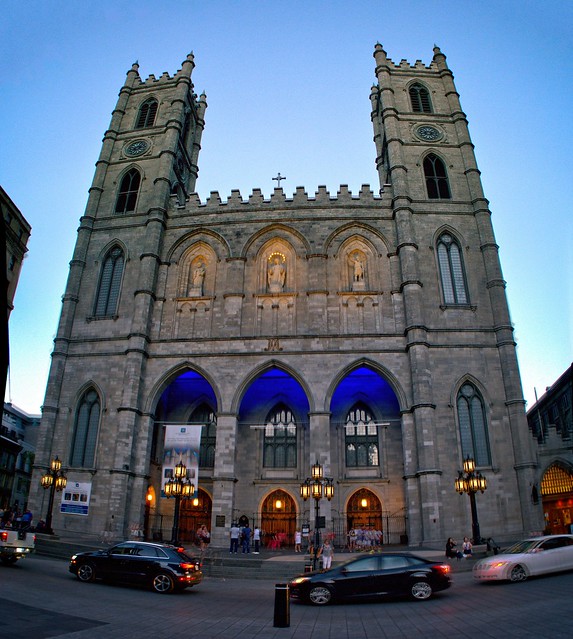
Overall Old Montreal was worth a visit. I found the photography more rewarding at dusk.
I have (been trying) to use a google photo album for my travel shots on the go. I am mainly using a conventional DSLR camera and loading them onto a computer first using the now deprecated picasa, but I am struggling because google photos wants to vacuum up everything (via autobackup, and I strongly advise you not to install that) then do most of the editing and organizing for you via Auto awesome and stories, (but they are not very satisfactory and you have to edit a photo at a time, very tedious, and doing your own organization can be equally as tedious).
What I was able to do until last week was keep using Picasa to load and organize my photos, then uploading to my google photos albums. I often edited the photos in other tools (Picasa is still great in these import and organization tasks and works well with other software that my edit the photos). Picasa’s RAW file rendering is not as good as lightroom, AfterShot Pro or OnOne but there is no penalty for using those other editors. It is a decent little workflow. However things are falling apart at the google photo end.
 The bigger worry is what might happen when you press the big green button upload to google photos. It started playing funny about two weeks ago, Uploading a whole days photos. Then it started forgetting some photos in a multiple upload selection. Then often not uploading anything. Now it also log me out of my google account after any upload. Logging back in for each upload is very tedious especially when the log in dialogue is frequently blank and it often forgets files when there are multiples of your selection tray. All super frustrating when you are relying of available WiFi and generally low bandwidth.
I haven’t downloaded a new version of Picasa so these must be issues at the on-line google photo end, I find it hard to believe they are trying to annoy the Picasa faithful, but they are. A big #FAIL google.
PS: Whilst I don’t understand Instagram, it is clearly an easier way to share photo from your cameraphone, when you are on the go.
Coincidences are an amazing thing, not unlike memories, they are pretty must impossible to design or encapsulate. They just happen through some deep hidden connection in your mind. I have been thinking bit about memory and I happened upon an exhibition of Angela Grauerholz’s Photos at at RIC in Toronto. Her “almost retrospective” focusing on an ongoing theme of hers, she is interested in the French concept of ”Lieux de Memoire” (sites or places of memory). Her take is this is the very opposite of Henri Cartier Bresson’s “decisive moment”, which is more a coming together or a special geometry, of people, of places and light, a serendipity, perhaps a coincidence. Both of these concepts that need a mind to expose them but they are perhaps opposites.


