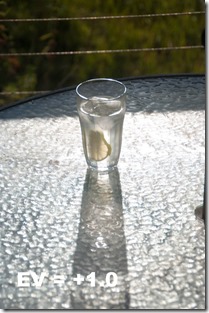
I start most of my HDR work the same way, using the bracketing on my DLSR. I have experimented with the number and magnitude of the EV steps. Just three steps of ± 1.0 EV seem to suit a more restrained HDR approach. This give me three exposures, one underexposed, one close to best exposure and one over exposed.
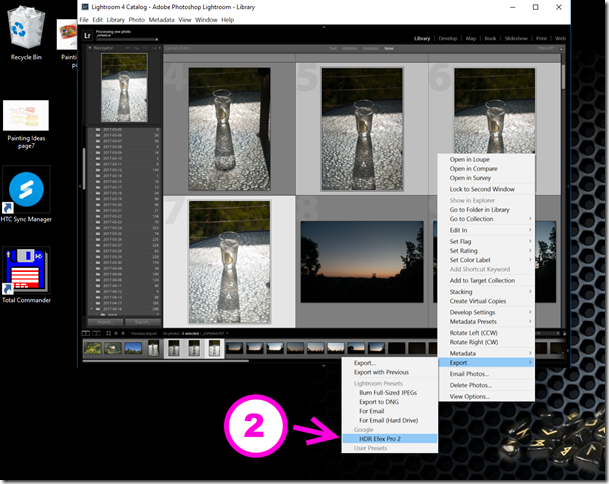
For the first example I’m using Nik software’s (now google’s)HDR Efex Pro 2 plug in via Lightroom. Whilst lightroom has a mechanism to transfer photo out to plug-ins it can only transfer a single image at a time. So instead on the Edit-in tool I need to use the export function and the option google/HDR Efex Pro 2
Lightroom will take a little while to export these three files and then start up Nik HDR merge. This occurs in two parts, the first is the Merge Dialogue, which offer three ways to avoid common artefacts and problems when taking multiple photos. This include aligning photos (step 3) when taking the HDR handheld, this is the default so no action is required unless you had previously turned it off. Ghost removal (step4) which searches for and removes ghost images associated with things (usually people) that move between the three exposures. The grey frame around the upper photo indicated the photo that will be used as the ghost removal reference. The strength of 100% is the default but allows you to soften the degrees to which ghost removal is undertaken. Whilst I’m sure this step takes time, I just leave them always on, as it has no impact that I can find when there is no movement. The final artefact (step5) is chromatic aberration (coloured fringes at the edge if strongly contrasting parts of the photo, eg. tree silhouettes against the sky) because the HDR process can over emphasise this effect. Different lenses and lighting will give different effects, I have found more the upper slider to remove red effects and the bottom slider a little less towards the blue works well for most of the photos taken with my Pentax camera and Tamron lens combination. There is a magnifier at the bottom right of the reference image if you want to check who these setting are being applied. The lightness slider underneath the image helps you see and check detail in the HDR image. It does not effect the the processing of the HDR image in the tone mapping steps to follow.

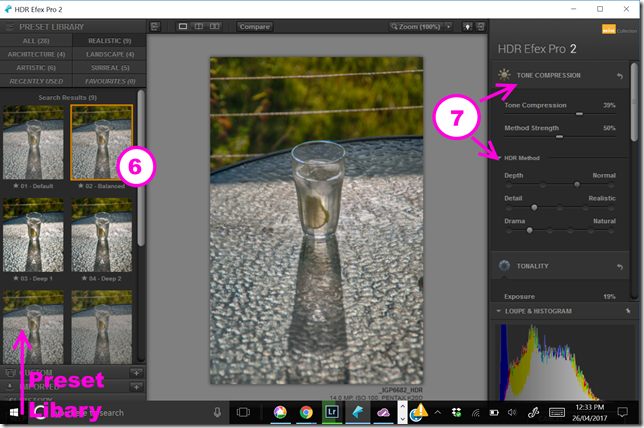
However It is just a starting point, and I suggest moving over to the right hand side and working down through the options to edit your image. The first is tone compression (step 7), these sliders can have a really significant effect. The tone compression moved all the way to the left will leave the dynamic range much close to a single photo (flatter) whereas move all the way to the right gives you an extreme dynamic range putting detail in the shadows and highlights (it will usually look surreal and over-powering), but a slight move to the right often makes the image snap. The methods and method strength also control the tone mapping but in specific ways. Depth controls how the shadows and highlights are to be treated and again moving to the right will enhance the dynamic range, normal is fine for me. Detail is a lot like clarity in lightroom or structure elsewhere in Nik software, it controls the local contrast and can bring up a lot of detail, realistic is fine for me. 
For the next step Tonality I like to have the Histrogram displayed (step 8) on the lower right panel (normally it is a loupe/magnified view)
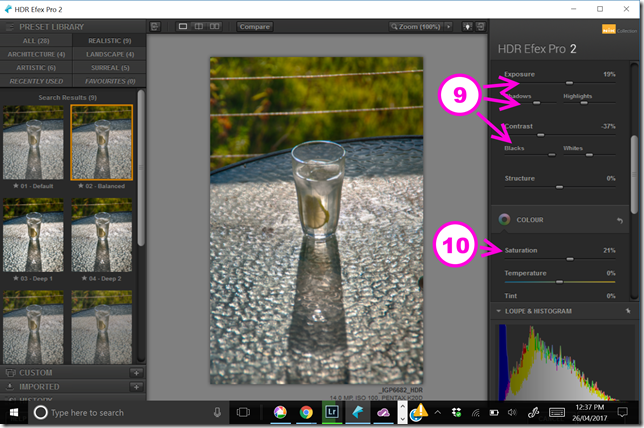
The tonality controls are very similar to the Basic tonal controls in Lightroom, but the work across the new combine dynamic range of luminosity in the HDR image. They work on the image as a whole. I wanted this image to better fill the histogram of the available dynamic range to I increased the exposure a little, stretching the whole histogram to the right. I also increase the highlights and lessened the blacks (lifting the left most part of the histogram (step 9). I also increased the saturation just s little (step 10). These last two steps could have just as easily been made in lightroom but it is convenient to do them here.
Normally I would finish here, but I found the wire in the background distraction so I then used OnOne 10 enhance and the magic eraser (a context sensitive fill) to remove them. Also I cropped the photo a little.


No comments:
Post a Comment