I've been progressively refining the gear I take on my endless summer travels, my sketching kit is now cut back to just the essentials.
I've had a little fun posting the contents of my stuff on KIT.com. It’s very sales oriented (with big green buy me buttons under each item, and I get no commission by the way) but it is fun, a nice and clean presentation and a FREE way for me to share a little of what I find useful, and I get to tell a brief story or two of why I like/use the stuff. My advice is read the stories and look though the kit, before you hit the green buttons.
Showing posts with label endless summer. Show all posts
Showing posts with label endless summer. Show all posts
Monday, July 10, 2017


Sunday, April 02, 2017
The Challenges of Watercolours at the Beach
 I now have a very comfy beach chair that is perfect to sit and do some sketching at the beach. I also have a nice little backpack that holds my art gear. So I should have little trouble making decent sketches. However there are two challenges wind & sand that introduce a fair bit of stress to the watercolour sketching process.
Using my wet/watercolour portable pallette on the beach is a like a magnet for sand. The mixing areas in particular have areas of wet paint being mixed and any small sand grains tend to collect here. The sketch book itself often collects a lots of sand on the damp areas and the little grains tend to suck in the surrounding moisture and pigments creating a speckled effect (nice for foliage and sand but not attractive in the flat wash of sky). If I put the sketch book down on the beach to dry … sand everywhere.

However it is the wind even just a brisk breeze that plays more havoc. It blows around more sand and also pulls at the pages of my sketch book )one sketch book was pretty much unbound on this trip so it is now a lot of loose pages. Also the wind makes it hard to balance my portable paint pallette, brushes and water
There are a couple of good solution to windy days, that I discovered, and relied on, on my recent trip. The first is big bulldog clips and/or masking tape. to hold my sketch book securely on my drawing board. The second is my set of Derwent Inktense Blocks which I use little like a “dry” pallette. Using a water brush I can just pick up the paint I need from the blocks and essentially leave the blocks dry (and less sand attracting). I tend to then mix the colours on the sketchbook page and I’m pleased with the results.


Saturday, February 18, 2017
More time doing, no time for blogging

My instagram @oz_endless_summer has just some of the of the stuff.
In the end it was better to do than blog about it, right?
Thursday, February 02, 2017
Sketching Kit Three :: The Original (Blue Folio)
This is actually my long standing sketching kit, having undergone many changes yet remaining much the same. It is based around my small portable folding palette preloaded with colours, I experimented with the layout of colours but reached the current set up a few years ago now. Top Row are warm colours, and from left to right, Cotman Dioxazine Violet, W&N Alizarin Crimson, W&N Cadmiun Red, Cotman Indian Red, Cotman Yellow Ochre, W&N Lemon Yellow, W&N Cadmium Yellow, Cotman Gambage Hue, Cotman Raw Sienna, W&N Burnt Umber. Bottom row is the cooler colours again from left to right, Cotman Chinese White, Cotman Lamp Black, W&N Paynes Gray, Cotman Sap Green, W&N Viridian, W&N Phthalo Turquoise, W&N Phthalo Sapphire, W&N Cerulean Blue,W&N Cobalt Blue, W&N French Ultramarine These started out as mainly Windsor and Newton Artist’ Watercolours (in tubes & expensive) but this has given way to a few Cotman colours (also in tubes but affordable). Where transparency is not a characteristic of the colour I desire, such as in earthy tones like yellow ochre, I suspect the Cotman’s are just as good. For small/quick sketches the Windsor and Newton watercolours may be overkill anyway but they come into their own on good quality watercolour paper and larger works. I have been known to put this folding palette in my camera bag with a couple of brushes a small sketch book but kits one & two living permanently in the camera bags have made that unlikely now.

I carry the paints and media in a blue canvas folio. It holds my field drawing board, which has a appropriate sized nut glued on the underside so I can amount it on my camera tripod if a portable easel is required, but normally using it on my knee is fine. This board is just a bit larger than a quarter sheet of watercolour paper and I usually carry 4-8 sheets held in place for transport with rubber bands. I often have a sketch block or watercolour pad included, although I now like the idea of having a few post card sized pieces of watercolour paper as well. I sometimes finish a sketch, write a message on the back and post it (my post cards from Canada were popular with my family). I can also fit a full sized plastic palette and my canvas roll of my watercolour brushes. Its a pretty light setup and the canvas handles make this easy to carry. I usually also carry a full set of watercolour tubes in my luggage in a largish plastic screw top jar which can double as a water jar when needed, I seldom take these out sketching. The orange flagging tape is to make the kit easier to find in the field, whilst the blue is strong it can disappear when left in the shade, the orange tape against the blue is hard to miss.
I also still have my foldout studio always ready when I want to create a decent work place on the go. However this blue bag kit is what I will be taking in my luggage for most of my Endless Summer project trips.
 It is based around my small portable folding palette preloaded with colours, I experimented with the layout of colours but reached the current set up a few years ago now. Top Row are warm colours, and from left to right, Cotman Dioxazine Violet, W&N Alizarin Crimson, W&N Cadmiun Red, Cotman Indian Red, Cotman Yellow Ochre, W&N Lemon Yellow, W&N Cadmium Yellow, Cotman Gambage Hue, Cotman Raw Sienna, W&N Burnt Umber. Bottom row is the cooler colours again from left to right, Cotman Chinese White, Cotman Lamp Black, W&N Paynes Gray, Cotman Sap Green, W&N Viridian, W&N Phthalo Turquoise, W&N Phthalo Sapphire, W&N Cerulean Blue,W&N Cobalt Blue, W&N French Ultramarine These started out as mainly Windsor and Newton Artist’ Watercolours (in tubes & expensive) but this has given way to a few Cotman colours (also in tubes but affordable). Where transparency is not a characteristic of the colour I desire, such as in earthy tones like yellow ochre, I suspect the Cotman’s are just as good. For small/quick sketches the Windsor and Newton watercolours may be overkill anyway but they come into their own on good quality watercolour paper and larger works. I have been known to put this folding palette in my camera bag with a couple of brushes a small sketch book but kits one & two living permanently in the camera bags have made that unlikely now.
I carry the paints and media in a blue canvas folio. It holds my field drawing board, which has a appropriate sized nut glued on the underside so I can amount it on my camera tripod if a portable easel is required, but normally using it on my knee is fine. This board is just a bit larger than a quarter sheet of watercolour paper and I usually carry 4-8 sheets held in place for transport with rubber bands. I often have a sketch block or watercolour pad included, although I now like the idea of having a few post card sized pieces of watercolour paper as well. I sometimes finish a sketch, write a message on the back and post it (my post cards from Canada were popular with my family). I can also fit a full sized plastic palette and my canvas roll of my watercolour brushes. Its a pretty light setup and the canvas handles make this easy to carry. I usually also carry a full set of watercolour tubes in my luggage in a largish plastic screw top jar which can double as a water jar when needed, I seldom take these out sketching. The orange flagging tape is to make the kit easier to find in the field, whilst the blue is strong it can disappear when left in the shade, the orange tape against the blue is hard to miss.
I also still have my foldout studio always ready when I want to create a decent work place on the go. However this blue bag kit is what I will be taking in my luggage for most of my Endless Summer project trips.
Sunday, November 27, 2016
Thinking Outside the Frame
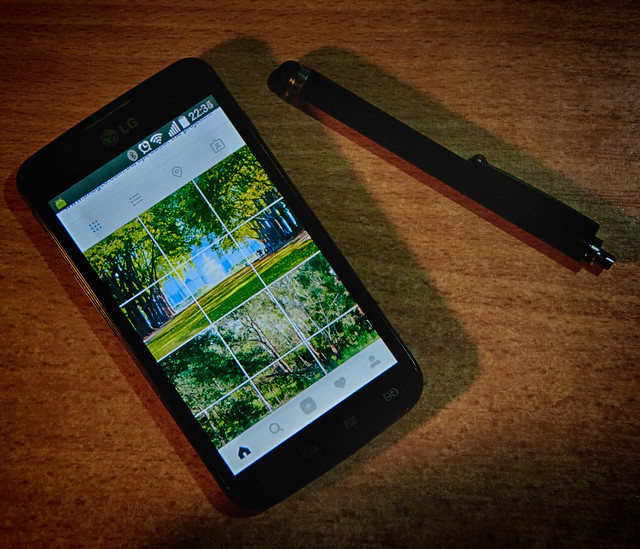
This photo was almost an after-though, since I hadn’t taken a daily photo to post on flickr. I did take a couple of others but came back to this one as it summarized where I had “misspent” by photographic energy. You see I’ve become a little hooked on the idea of making the 3 column grid view in Instagram work as a secret place to display bigger images. In a strange twist this humble image made it onto explorer and there have been 1000s views over night. The real hero is actually over on Instagram @oz_endless_summer, and is meant to be promoting my photo project next year.
I first got the idea looking at making a photo of water lilies into a more painterly image. I knew Monet created a few large painting that needed to be displayed together. So it was not a big step to split my panoramic view up into 3 square images. I probably really confused my followers but slowly I can see they are starting to look at my grid view.
I have since found that there are a few others doing similar multi-panel posts and even found a tool called Instagrid that will do the splitting. However its a bit tedious to use because Instagram doesn't let 3rd party apps upload images so the individual panes still have to be manually uploaded via an official Instagram supplied app. Anyway I’m having a bit of creative fun
Subscribe to:
Posts (Atom)