
Let’s move onto the more Scientific/Enginering aspects of how the camera captures light of a specific intensity and wavelength. My schematic sketches of the camera cross section is meant to represent both traditional DSLR and newer mirrorless cameras. Both have exchangeable lens elements that focus an inverted image onto the sensor (or in the case of older SLR film). The DSLR however has a mirror that reflects the light up into a prism whose job it is to turn the inverted image up the right way and back through the view finder. So the DSLR user sees optically what the lens is focussing on. Whereas the mirrorless camera (obviously doesn’t have a mirror) and the image is captured on the sensor (often continuously) and this is sent to a graphics processor in the camera where the data from the sensor is converted into a conventional image (a jpeg) and this is displayed in a small screen behind the view finder (or alternatively the LCD screen on the back of the camera). The diagrams do not include the shutter and both systems have a shutter which control the length of time the sensor can capture light to give the required exposure.
The camera sensor (or film) collects the light that falls on it and the more light the closer to white the resulting image will be. In conventional SRGB Black is given the value 0 (zero) and white 255.  This is usually called luminance. In a digital camera there are a multiplicity of small compartments each collecting its own luminance value.
How does this create colour, well it doesn’t for each compartment, but instead each set of 2 by 2 compartments have a set of coloured filters (known as Bayer Filters) over them. Each allowing only Red, Green or Blue Light to pass through. In a process known as demosaicing sets of these 2 by 2 colours are combined into single pixels with 3 colour. See the Cambridge in Colour page for a more detailed discussion of bayer demosaicing.
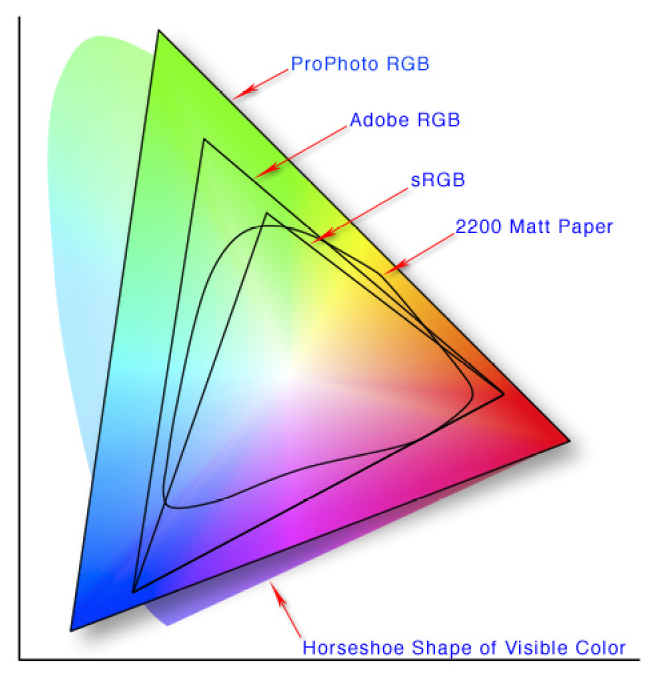 The best way to consider what is happening is to use the CIE chromaticity diagram, Unfortunately I have not been able to locate and camera manufacturers publishing their colour gamut, they seem to prefer to say they have better “colour science”. They all seem to offer a close fit to sRGB colour space and some offer the extra colour space and bit depth of Adobe RGB &/or ProPhoto RGB
I will again hand over to Craig Blackwell, To continue the journey of how the RGB colour space can be used to create colours.


