Showing posts with label layers. Show all posts

Saturday, September 17, 2016

PhotoProject :: Surreally into the Night

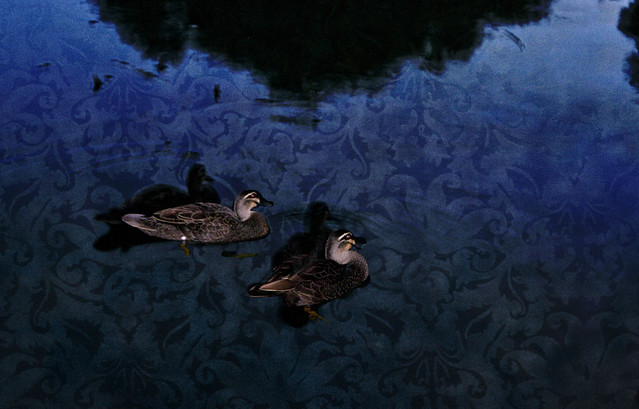
I have been interested for sometime in multi-exposure and superimposing subjects across time. This image is not a multi-exposure in camera instead it combined two photos taken only a short interval apart. It was just on dusk and there two ducks where lazily swimming by. I already had though of the idea of using flash and non-flash for the multiple images so I grabbed my camera and two a couple of photos, trying to keep the ducks in the center of the frame.

IMGP3596IMGP3597

Back home I put the two images together but it was quiet boring because light water in the normal exposure cancelled the dark water  in the flash photo (it a boring blue/grey)and the ducks where cut in half because they did overlap. So I had the idea of using a luminosity mask in OnOne 10. First I used a dark brocade textures layer and replaced the lighter values in the photo (the water) and kept the darks (the ducks and shadows). Next I overlayed the flash image and using an inverted luminosity mask let the blend bring the modified original photo and texture into the dark background. A slight crop, leaving the illuminated duck swimming on a surreal surface, with their available light selves becoming living shadows,

#261 IMGP3597 Surreally into the night

Friday, June 24, 2016

Artinspired :: from Photo into Mark Making

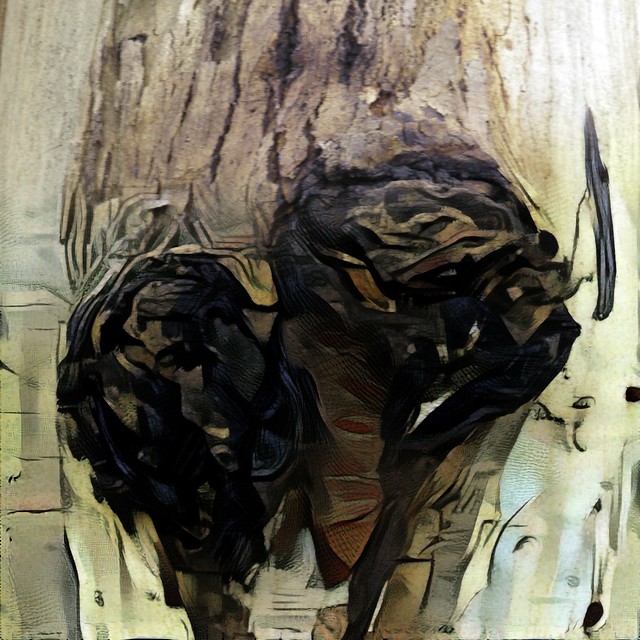
_IGP6426 Original PhotoI am very inspired by the works of Fred Williams, at the obvious level they are very abstract, yet at the same time they capture both the colours and textures of the Australian Bush. more particularly the bush around here. That's not surprising as Fred used to regularly spend one a day a week in the bush painting and sketching what he saw. Today I am beginning with a “non-bending marco” taken of the truck of a gum tree in jells park. A couple of limbs have “dropped’ and left large gashes where the gum is leaking out. Parts of the bare truck can be seen as well as the corky rough bark normally around the base of the tree. Its a pretty ordinary subject to photograph.

Fred’s work often has two levels a rich colour ground, and then an almost calligraphic decoration of texture, squiggles and lines that are a kind of shorthand to describe the terrain, the trees and other aspects of the landscape. So I have decided to create two separate dreamcope images. One that captures the colours in a rough fashion. I tried a few filets including a couple of my own and ended up using two stacked filters, one after the other. First a watercolour then a sketch filter. There are not conventional parametric filters that adjust a given slider like exposure of saturation. The deep dream process takes the image and builds a neural network like matrix and iterate through looking for parts of the image that have the same characteristics as the filer. In this case I was looking to enhance the colours, and colour harmony (ie not just pumping up vibrance of saturations) Then I created a separate layer that focuses on the lines and textures, for this I used the money filter, which I have used before and it definitely searches out the strong design elements, shapes and textures.

coloured background Line work

The final step is to combine them, and I must admit I liked the way you could still see the three layers, fully exposed in different parts of the image on my previous art inspired piece, the autumn leaves on the ground. In this case I used OnOne 10 layers again but used soft light blend mode for all layers, to let each layer bleed through but I also used simple gradational filter to start with the original photo at the top that fades into the strong line work and with the background coming through and dominating the bottom.

Gum Bark Texture II

Reality transforms to abstract.

Friday, June 17, 2016

ArtInspired :: The Banksia in the rain

Still thinking of the process used by artist to create an image versus how a photographer might capture that image. It has been a overcast and drizzly day but I managed to get a photograph of a banksia cone in flower. A almost good photo in itself and I had run a bracketed set (handheld) but it was windy so it was hard to merge and properly register. Rather than commit them to the reject bin it was a worthwhile starting point to reconstruct an image in the manner an artist might.

I’m just using my HP Spectre Tablet in tablet mode so I started with the original image and used the Polarr app to add a little contrast, contrast and strength to the red (both luminance and saturation, but not two much). I might have normally preformed this in lightroom and/or OneOne but they are not as touch screen aware as Polarr, which is a pretty neat photo edit app with really intuitive and easy to use basic tools that can easily be used by hand in tablet mode. An artist might start with the background and the overall colour, so I switched to Corel painter essentials and first set up what they call smart blur (which help highlight the strong compositional elements) and also refined the colour palette (I just wanted to enhance the two colours red and green, classic complimentary colours so I pulled back the saturation of any other colours). I use painter essential to do a very quick starter clone painting of the background. Unfortunately this smeared out the red so I use a soft clone brush to bring out sharper edge  of the Banksia flower (this helped later registration of the images). Next I re-ran the HDR merge using Aftershot Pro, with particular focus on getting best registration on the banksia. However the droplets of water where no longer perfect.

_IGP6049 original photo enhanced in Polarr prelim clone painting in Corel Painter HDR created with After Shot pro

I now had three separate and subtly different images and used OnOne 10.5 layers to blend them together.  The background from the clone painting, the foliage and water droplets on the upper stamens from the original photo and the flower itself a combination (a soft blend mode) of the original photo and HDR image (mainly to enhance the colour).  With a Brush Border from OnOne Enhance

Between Painting & Reality

I’m not sure how to refer to this style of image. Is it digital art, a faked photo (aka photoshopped which of course it isn’t) or photomontage or something different (and new)?

“We called it photomontage because it reflected our aversion to claiming to be artists”  …Hannah Höch

Wednesday, May 18, 2016

Time for a coffee & creative ideas

Its later in the afternoon and not a daily photo taken yet. So I was finishing a coffee and contemplating what to do. I had an idea to try a series of my self looking at the camera and painting as if it was a self portrait, perhaps to make into a time series collage. So I set up my canon on my tripod and set it to take a series of images. I finished my coffee and then played with the brush.

A blurry series that should have been rejected

However it was one of those session where nothing worked as planned. Just as the cameras started firing the sun came out, brilliantly, casting unfortunate shadows. Collage of dreamscope images of me finishing coffeeThe camera was still manually focused, and everything turned out  blurry. There where many other problems especially that I had other more urgent duties to attend to, so I didn’t get a chance to repeat the photos. All I had was 12 terrible exposures, normally they would be deleted BUT I often tell people to keep a few rejects to experiment on. These were terrible and thus perfect for an experiment. My first thoughts was to try some simple dreamscope transforms and build the collage, but the three initial images of me finishing my coffee told the best story. Yet the simple transforms didn’t exactly look creative enough.

I decided to build three layers, The painting ground I made by leaving the image blurry by increased luminance and saturation. Next I made a simple stipple pattern and used it back in dreamscope as my custom filter, and created some line work. Then I recreated the the final patterned overall with the watercolour cartoon filter. I finally I experimented with OnOne Layers and different blend modes to give a composite image, that was once a rejected photograph.

#139 Coffee Drinker & Yellow Vase

Wednesday, May 11, 2016

In the Surrealist Shadow

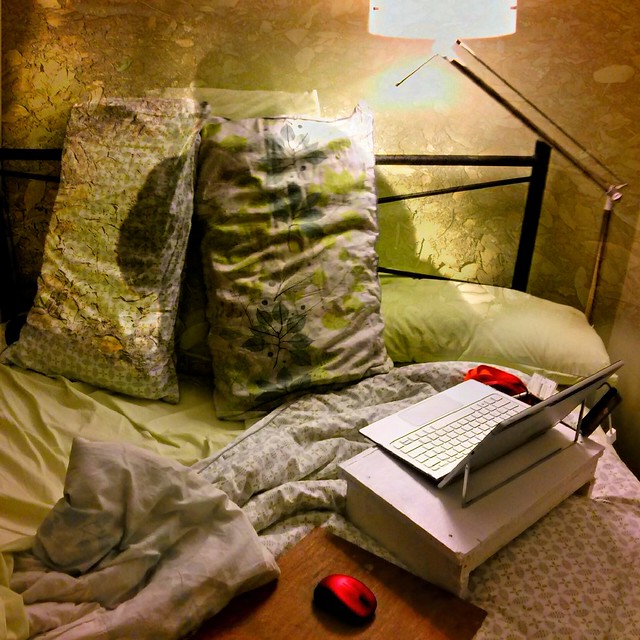
Paying homage to the surrealists seems logical on the 112th anniversary of Salvador Dali’s Birthday. Shadows and dreams are common motives so making a composite of my shadow superimposed on an unoccupied bed seemed to fit. 
2016-05-11_17-14-58_HDR  _IGP3146-001
I used my phone and HDR Camera+ for the unoccupied bed (the dreamer is “away”) and a silhouette portrait taken of my shadow on the ground (again the body is not shown). I used OnOne layers and the soft light blend mode to combine them, nothing trickier than that.#132 In The Surrealist Shadow

Monday, February 01, 2016

Letting myself have a more creative eye

Show me the money

I have been thinking more about what I might do creatively than about the themes of my daily photos. This week’s Friday photo is about eyes and the subject is very predictable. My eye is already in lots of photos so I was trying to think outside the oval/almond, or whatever shape my eye is. I began by using my camera on a tripod teathered to my computer via lightroom amd taking photos a regular intervals so all I had to do is get close to the camera and look deeply into its lens. This is a pretty simple way to get a self portrait, that I hadn’t tried before. Its easy ad works well. None of the photos where all that remarkable but I like a couple with me looking over my glasses, I enhance this one in the develop moduloe since I was already in lightroom. The only unusual step was I reduced clarity (so as not to make the skin to crunchy). I then loaded this image into the web version of dreamscope and played with a few likely looking filters.

Getting a set of self portrait in lightroom with my tethered cannonPlaying with different filters in DreamscopeMaking a composite image with OnOne Layers

Once I had the original photo and a set of “arty” renderings built from it. I then loaded the seleceted photo and a few of the better filtered imaged into OnOne Layers. the filtered on top of the photo. It was then just a case of loading a mask, inverting it and then painting out around eyes. so the eyes are phoyograpohic while the rest of the portrait becomes an artwork. Finally adding a border, lots of fun and not hard to do.

See the PhotoFriday contribution below.

Saturday, January 23, 2016

Experimenting with layers

Yesterday was wet and drizzly most of the day (I’m not complaining about that we need the rain) but it discouraged going out to get my daily photograph. Just had an opportunity to capture some interesting seed pods but into a bright background. I like the seeds hanging down but decided to refine the background, with layers in OnOne 10. There are three layers the original photo, tweaked in lightroom, the texture “brocade cool” from the Onone sample textures, and an “interrupted” autoclone watercolour paint of the photo with more saturated colours. The photo is the upper layer and I’m using a luminosity mask to just show through to the brightest background areas, with some hand adjustments to keep those lights in the seed pods. The brocade layer is next and has the opacity slider back to about 20%. The autoclone watercolour is on the base, a true underpainting.

IMG_9940-Lightroom Brocade Cool IMG_9940-Autoclone_Painting

Not sure I’d rave about the result, but the approach has potential

20160122_IMG_9940_Experimenting_with_ayers

Monday, July 13, 2015

PhotoEditingTools :: Straighten in Paint.Net

Paint.net is a really nifty little program, ideal for those that just working on jpeg files. However on first look it doesn’t seem to have a straighten tool (ie something to level the horizon), the image menu seen to have rotates (only 90° left and right or a 180° twist and horizontal and vertical flips, no obvious small and definable rotation! However a deeper look around will show you there is such a rotation tool under the layers menu item. Yet there is an even bigger omission, no simple levelling tool to help pick the horizon and overlay guides (like aftershot or picasa) of a drag to mark a second point to define the rotation (like lightroom or perfect photo). Trying to straighten a horizon is starting to look tedious, but it isn’t!

image

No need to panic, it is easy to use the layers to create your own temporary guides. Starting with the Layer item on the menu pick the add new layer item on the menu to create an empty and transparent second layer. Now mow to that layer by clicking on layer 2 in the layers window. Next using the shape tool from the main drawing tool bar and use and open rectangle, mark a suitable large rectangle on the screen. It will be easier to judge if you have this rectangle cross the horizon somewhere near the middle of the image. This rectangle becomes your level guide.

image

Now you can return to the background layer and this time select the rotate/zoom tool.It looks a bit complex (and it can do a lot) but we are only going to use the little rotation ring on the round shape tool on the upper left) As you rotate this by clicking the mouse on the reference mark on the outer ring and moving you mouse up and down. you will see the photo rotate, while the rectangle your created on layer 2 remains steady. Gently rotate until the horizon is parallel with the rectangle edge. Simple. If you want more control of the rotation you can enter an angle or use the little up and down adjusted beside the angle dialogue box..

To finish you will need to delete your temporary layer 2 (go back into layer 2 and select delete layer from the layers menu) and then crop the image to avoid the undefined edges, but that's a subject of a future post!

Thursday, July 09, 2015

Taking the time to really look

There is a slight optical trick here, go to flickr and make this image full screen then look at it from close up. Your eye will be fascinated with the pattern and texture of the bark, and that will dominate what you see, Then stand and move back a few place and you will start to see the beach where this tree grows.
Really looking
Working on the inspiration of Fred William's paintings of the essence of the Australian Landscape.

Friday, August 01, 2014

Bad Hair Day

_IGP4970 copy

The return to cold and windy wintery weather has apparently forced a lot of the birds to ground. This galah suffered the double indignity of being photographed as the wind ruffled his head feathers. Then the image suffered further as I has a play around with textures, layering and boarders in Perfect Photo Suite 8. I’ve also had a play with watermarking, adding a little to alvin’s campaign to bring creative commons licences back to prominence on the social webs

Monday, July 21, 2014

ThePatch :: Decoration/Celebration

2014-07-19_11-54-054I began this week fairly determined not to leave the patch project to the last day, but I did not find to much celebration. There was some decoration in the local shopping mall, but it didn’t scream celebration. In Australia having a Christmas in July Dinner has become a popular family event. Whereas in the middle of summer on a hot day sitting down to the traditional Christmas roasts and rich puddings, can be less than fully appreciated but having a second festive feast in Winter is a perfect excuse for more excess. Anyway some of the Christmas decorations can be pulled out to decorate the table, so that sounded close to the theme.The bracketed exposure set
My first thought was to just use the table decorations under some natural light and get a classic bracketed exposure set to create a conventional HDR. I have also added a little tweaking of clarity on the angel's wings and the tinsel with lightroom.

IMGP4111-HDR (2)

The results says decoration and is pleasing, but its a very calm celebration!
2014-07-21[6]
My second idea was to try an available light shot, something a bit moody, a photography of the angel that has become somewhat of a traditional Christmas in July centrepiece for my family, she needs to be in the spot light. I wanted to set this against Christmas tree lights, just outside the depth of field. That was a plan, but as I was testing out the low light conditions I also got me the idea of including a small crystal angel to add some awe and wonder. I experimented with lighting just with a torch and painting the light where I wanted it (back lit and below on the crystal angel, more straight on for the purple angel). My experiments where a bit hit and miss and I could not get the background far enough away to achieve the bokeh effect I want. So armed with several photos that were ok in one or another area I figured it was time to have a lengthy play in Perfect Photo Layers, to merge sections of different photo and Prefect Effects to give me a better bohek on the Christmas lights.  I am pleased with the result given it is my first foray into these steps and the limitation of the exposures I started with.


Thursday, February 20, 2014

ThePatch :: Is Loneliness a natural part of the Creativity?

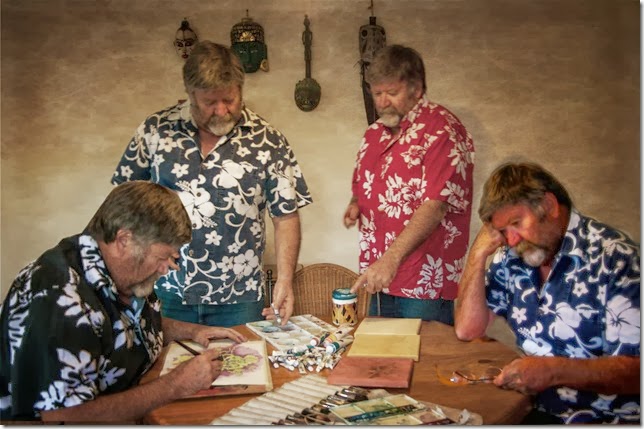
The Patch theme this week is Loneliness/Togetherness, which at first looks like an Oxymoron. How can someone be lonely when they are part of togetherness? Yet deep in the creative process there is often that point where you are totally alone in yourself, trying something new, different, original … it is often the point at which the inspiration arises sometimes from deep within, sometimes as a chance observation. Once conceived other aspects of yourself need to kick in, the skill to design, the talent to make your marks and the wisdom to evaluate your creation. This is a perfect scenario for a little “multi-exposed” story of an artist sitting around a table. Now how to do that?
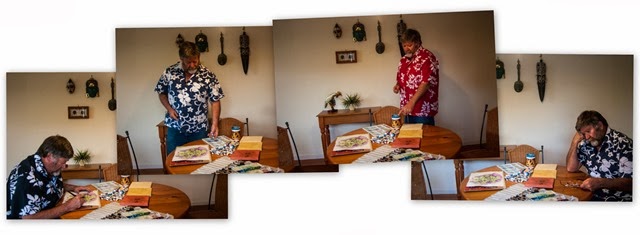
loneliness-002First I took a series of photos of myself in the individual poses, to tell the story. That bit was easy. The camera was on a tripod and you can see the remote control in my hand in the third shot, the one with the red shirt. Next I was keen to have a play with perfect effect 8’s layers capabilities. Alas it can only work on layers within one image, it doesn’t let you stack the layers from a number of images. So first I had to do that in corel photo paint. I little further tweak of the tone and clarity in lightroom, then back into perfect effects. You have to save a copy as a psd (photoshop format) to get the ability to use layer in perfect effects. This time I set up three different layers. The first a texturizer layer, there are dozens but I liked the Rice Paper Vignette, which I set to around 80% opacity. Next I had to set up setting up a mask around the fourth “lonely” me on the right. I used the “perfect brush” to paint in the mask and it did a very good job of stopping at the change of contrast. However it was a bit “laggy” as I used the brush so it was a bit fiddly to use (compared with the same task in corel photo paint). I then copied the mask (a really excellent feature) and pasted that onto my next layer which was a colour saturation control, called not surprisingly color reducer and here I went into the filter options and adjusted then saturation slider back to the left about -20%, rather than use the opacity of the filter. Finally I created another layer and this time using the portrait enhancer and the strong version. I paste the same mask again but this time I selected it in inverse, so what was painted out of the filters in the layers underneath was now painted in on this layer. I did experiment with incorporating another option inside this filter to give cooler colours but I felt the strong colouring suited the now darker image. These steps might sound a bit complex but it was actually relatively simple, not frightening at all! IMGP5295 collage 2 copyOne disappointment was I don’t think I set the feather large enough, because the perfect brush masking was a bit more precise than I expected. Unfortunately once you to commit to save and close the edits in perfect effect you loose the layering and the mask itself. I now know that you can get around this by saving your work as a new preset before you exit. That way you can reload your original, apply your saved preset and have access to all the layers, filters and masks.
Tuesday, January 28, 2014

Lightroom has found a friend

I took up the offer to download perfect effects 8, its was for a limited time. However i didn’t write about it during the offer because the stand alone version always froze in browse mode and in fact hung my computer everytime (so fully I could start task manager so I had to turn off the computer and restart it to get going again). This was a bit disappointing because I have a couple of OnOne presets (some are free to download)  and they are a cut above the rest. Even so I wasn’t about to recommend the free perfect effect 8 download, till I could find out more and possibly get it working.

At the moment I suspect the problem related to the version of drivers for the graphic cards I have on Windows PC (you need at least 256MB of dedicated VRAM and a video card driver that is OpenGL2 compliant, I found this looking in the manual, there is a downloadable pdf) and elsewhere on the web this “freezing” is not just for me and in fact wide spread. Strangely this topic is missing from the OnOne’s Knowledge base and specifically the Perfect Effect 8’s FAQ section. Also I haven’t yet had a reply to my more direct email requests.

perfect effect 8 screen as used via lightroom

The good news is providing you also installed the lightroom plug in, you will discover that perfect effects brings you two really significant features into you lightroom world. They are masking and layering, which normally require round tripping into photoshop (which many of us lightroom users don’t have). You have to look past the one filter one effect approach and start playing with the masking brush, masking bug and layer, particularly the blending controls. Whilst the capabilities of these features in perfect effects is not as extensive as those in the full perfect photo suite, I’m sure they will open up some amazing possibilities for those who have been using just lightroom alone.