
The Patch theme this week is
Loneliness/Togetherness, which at first looks like an Oxymoron. How can someone be lonely when they are part of togetherness? Yet deep in the creative process there is often that point where you are totally alone in yourself, trying something new, different, original … it is often the point at which the inspiration arises sometimes from deep within, sometimes as a chance observation. Once conceived other aspects of yourself need to kick in, the skill to design, the talent to make your marks and the wisdom to evaluate your creation. This is a perfect scenario for a little “multi-exposed” story of an artist sitting around a table. Now how to do that?
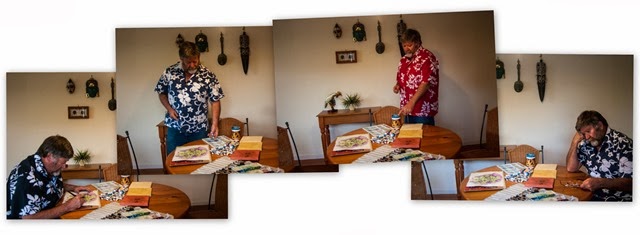
First I took a series of photos of myself in the individual poses, to tell the story. That bit was easy. The camera was on a tripod and you can see the remote control in my hand in the third shot, the one with the red shirt. Next I was keen to have a play with perfect effect 8’s layers capabilities. Alas it can only work on layers within one image, it doesn’t let you stack the layers from a number of images. So first I had to do that in corel photo paint. I little further tweak of the tone and clarity in lightroom, then back into perfect effects. You have to save a copy as a
psd (photoshop format) to get the ability to use layer in perfect effects. This time I set up three different layers. The first a texturizer layer, there are dozens but I liked the
Rice Paper Vignette, which I set to around 80% opacity. Next I had to set up setting up a mask around the fourth “lonely” me on the right. I used the “perfect brush” to paint in the mask and it did a very good job of stopping at the change of contrast. However it was a bit “laggy” as I used the brush so it was a bit fiddly to use (compared with the same task in corel photo paint). I then copied the mask (a really excellent feature) and pasted that onto my next layer which was a colour saturation control, called not surprisingly
color reducer and here I went into the filter options and adjusted then saturation slider back to the left about -20%, rather than use the opacity of the filter. Finally I created another layer and this time using the
portrait enhancer and the strong version. I paste the same mask again but this time I selected it in inverse, so what was
painted out of the filters in the layers underneath was now
painted in on this layer. I did experiment with incorporating another option inside this filter to give cooler colours but I felt the strong colouring suited the now darker image. These steps might sound a bit complex but it was actually relatively simple, not frightening at all!
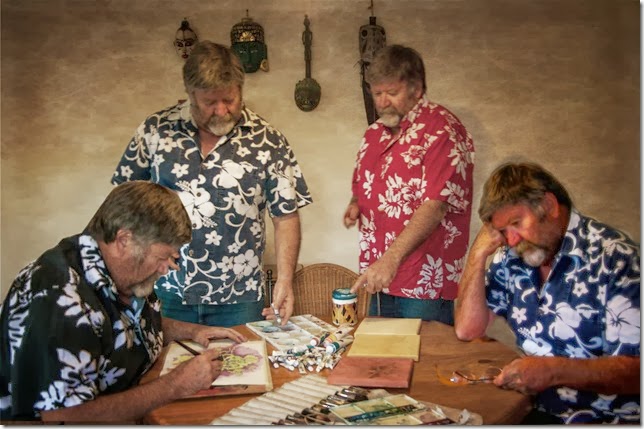
One disappointment was I don’t think I set the feather large enough, because the perfect brush masking was a bit more precise than I expected. Unfortunately once you to commit to save and close the edits in perfect effect you loose the layering and the mask itself. I now know that you can get around this by saving your work as a new preset before you exit. That way you can reload your original, apply your saved preset and have access to all the layers, filters and masks.
 First I took a series of photos of myself in the individual poses, to tell the story. That bit was easy. The camera was on a tripod and you can see the remote control in my hand in the third shot, the one with the red shirt. Next I was keen to have a play with perfect effect 8’s layers capabilities. Alas it can only work on layers within one image, it doesn’t let you stack the layers from a number of images. So first I had to do that in corel photo paint. I little further tweak of the tone and clarity in lightroom, then back into perfect effects. You have to save a copy as a psd (photoshop format) to get the ability to use layer in perfect effects. This time I set up three different layers. The first a texturizer layer, there are dozens but I liked the Rice Paper Vignette, which I set to around 80% opacity. Next I had to set up setting up a mask around the fourth “lonely” me on the right. I used the “perfect brush” to paint in the mask and it did a very good job of stopping at the change of contrast. However it was a bit “laggy” as I used the brush so it was a bit fiddly to use (compared with the same task in corel photo paint). I then copied the mask (a really excellent feature) and pasted that onto my next layer which was a colour saturation control, called not surprisingly color reducer and here I went into the filter options and adjusted then saturation slider back to the left about -20%, rather than use the opacity of the filter. Finally I created another layer and this time using the portrait enhancer and the strong version. I paste the same mask again but this time I selected it in inverse, so what was painted out of the filters in the layers underneath was now painted in on this layer. I did experiment with incorporating another option inside this filter to give cooler colours but I felt the strong colouring suited the now darker image. These steps might sound a bit complex but it was actually relatively simple, not frightening at all!
  One disappointment was I don’t think I set the feather large enough, because the perfect brush masking was a bit more precise than I expected. Unfortunately once you to commit to save and close the edits in perfect effect you loose the layering and the mask itself. I now know that you can get around this by saving your work as a new preset before you exit. That way you can reload your original, apply your saved preset and have access to all the layers, filters and masks.


