Showing posts with label multiexposure. Show all posts

Thursday, July 20, 2017

Day 2 :: Playing


Day 2 Playing

The concept behind todays photo for this week of daily photos, was to be playing an older style or board/card game but with a little participant movement to make the playing aspect obvious. Getting the board/game in sharp focus but having moving hands was easy enough with a long exposure and the camera on a tripod but moving the hands during the exposure. I took a couple of images but decided I needed the hands to be recognizable not just totally blurry. I though a bracketed set and HDR processing might be perfect but it look that surreal unnatural (and a little sinister) effect HDR so often suffers from.

1-_IGP13122-_IGP13133-_IGP1314

It was not hard to reset the three EV steps back to roughly the same exposure, then I used OnOne’s Layers module to blend the three images according to the amount I wanted to either highlight or blur the hands and then merge them down using normal Blend mode. A final run though  dynamic contrast and finally cropping.

Saturday, September 17, 2016

PhotoProject :: Surreally into the Night

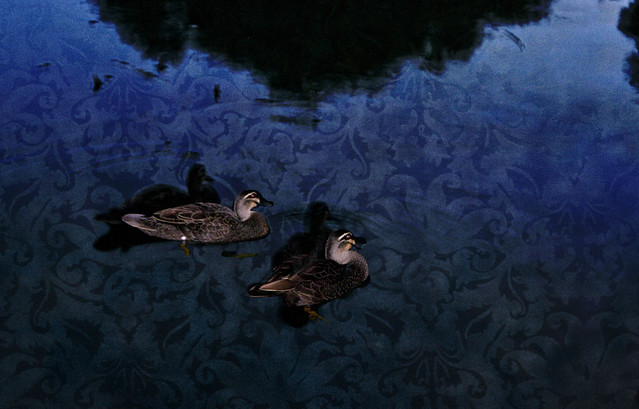
I have been interested for sometime in multi-exposure and superimposing subjects across time. This image is not a multi-exposure in camera instead it combined two photos taken only a short interval apart. It was just on dusk and there two ducks where lazily swimming by. I already had though of the idea of using flash and non-flash for the multiple images so I grabbed my camera and two a couple of photos, trying to keep the ducks in the center of the frame.

IMGP3596IMGP3597

Back home I put the two images together but it was quiet boring because light water in the normal exposure cancelled the dark water  in the flash photo (it a boring blue/grey)and the ducks where cut in half because they did overlap. So I had the idea of using a luminosity mask in OnOne 10. First I used a dark brocade textures layer and replaced the lighter values in the photo (the water) and kept the darks (the ducks and shadows). Next I overlayed the flash image and using an inverted luminosity mask let the blend bring the modified original photo and texture into the dark background. A slight crop, leaving the illuminated duck swimming on a surreal surface, with their available light selves becoming living shadows,

#261 IMGP3597 Surreally into the night

Monday, July 28, 2014

ThePatch :: Celebration/Musical Instrument

Queue the samba drums, Timbalada, Daniela Mercury and/or Olodum, that’s my idea of celebration music. Well a good excuse to get out the bongle drums and another party shirt. It was a dull day and the light fading but It did let me experiment with a few options to try and capture the rhythm of the carnival.
Composite image using Perfect Photo Multi-Exposure using Picasa Collage Talk about Stop motion
Ok none of these get close to the atmosphere of the real thing, but I’m not in Brazil I’m in Oz. AND Hopefully the light will be better tomorrow when I can work on finding a better composition. in the meantime …

I know this clip is a little on the long side but if you enjoy drum music it is worthwhile (and you will recognise that Paul Simon used them and their rhythms in his obvious child.)

imageSo the new plan too many hands!is to try the composite motion again by perhaps more front on and playing the bongos in the more conventional sitting position, so more hand action can be captured. So I found a sunny spot, turned up the burst mode to max and only captured jpeg, Set up the tripod and delay, then pressed the shutter, quickly in position. Now I have 355 images pretty much the same from which to find half a dozen hand positions and learn how to do multiple masking bug techniques in Perfect Layers, ok I have bitten off more than I can chew, So I’ve settled on using just a few hands, less is more,  in my final submission.

Thursday, February 20, 2014

ThePatch :: Is Loneliness a natural part of the Creativity?

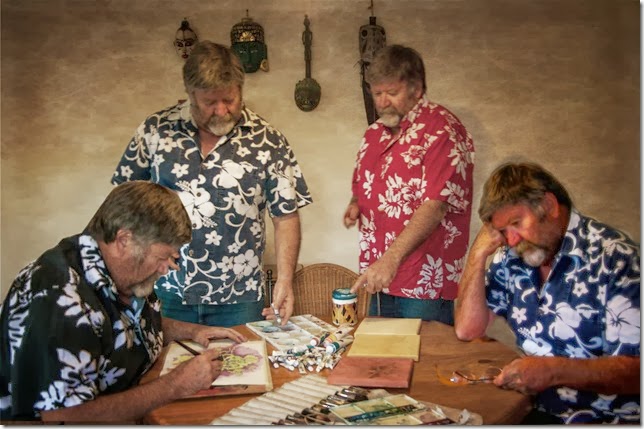
The Patch theme this week is Loneliness/Togetherness, which at first looks like an Oxymoron. How can someone be lonely when they are part of togetherness? Yet deep in the creative process there is often that point where you are totally alone in yourself, trying something new, different, original … it is often the point at which the inspiration arises sometimes from deep within, sometimes as a chance observation. Once conceived other aspects of yourself need to kick in, the skill to design, the talent to make your marks and the wisdom to evaluate your creation. This is a perfect scenario for a little “multi-exposed” story of an artist sitting around a table. Now how to do that?
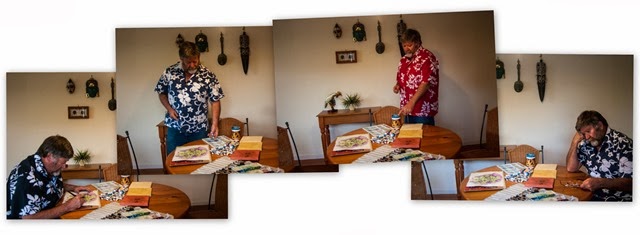
loneliness-002First I took a series of photos of myself in the individual poses, to tell the story. That bit was easy. The camera was on a tripod and you can see the remote control in my hand in the third shot, the one with the red shirt. Next I was keen to have a play with perfect effect 8’s layers capabilities. Alas it can only work on layers within one image, it doesn’t let you stack the layers from a number of images. So first I had to do that in corel photo paint. I little further tweak of the tone and clarity in lightroom, then back into perfect effects. You have to save a copy as a psd (photoshop format) to get the ability to use layer in perfect effects. This time I set up three different layers. The first a texturizer layer, there are dozens but I liked the Rice Paper Vignette, which I set to around 80% opacity. Next I had to set up setting up a mask around the fourth “lonely” me on the right. I used the “perfect brush” to paint in the mask and it did a very good job of stopping at the change of contrast. However it was a bit “laggy” as I used the brush so it was a bit fiddly to use (compared with the same task in corel photo paint). I then copied the mask (a really excellent feature) and pasted that onto my next layer which was a colour saturation control, called not surprisingly color reducer and here I went into the filter options and adjusted then saturation slider back to the left about -20%, rather than use the opacity of the filter. Finally I created another layer and this time using the portrait enhancer and the strong version. I paste the same mask again but this time I selected it in inverse, so what was painted out of the filters in the layers underneath was now painted in on this layer. I did experiment with incorporating another option inside this filter to give cooler colours but I felt the strong colouring suited the now darker image. These steps might sound a bit complex but it was actually relatively simple, not frightening at all! IMGP5295 collage 2 copyOne disappointment was I don’t think I set the feather large enough, because the perfect brush masking was a bit more precise than I expected. Unfortunately once you to commit to save and close the edits in perfect effect you loose the layering and the mask itself. I now know that you can get around this by saving your work as a new preset before you exit. That way you can reload your original, apply your saved preset and have access to all the layers, filters and masks.
Tuesday, May 31, 2011

Fractured Threads Exhibition

an extension of the still photograph
RAMP GALLERY pano
Rob Birze & Sandy Birze and myself are having an exhibition of our Photography in The Ramp Gallery of The Monash Gallery of Art. We are three local photographers who came together through the VIC/TAS thread of the Australian Photographers Group in Flickr. We are all active on the photographic social webs, sharing interests in some common themes, multi exposure, multi-image works and fresh ways to look at still photography. Our techniques are very individual and authentically photographic. Using both film and digital photography they bring together multilayers of details and glimpses in time to create very strong impressions of the subjects they photograph.
Exhibition runs from May 31 to June 19
Gallery Opening Hours: Tues to Fri 10am–5pm
Sat & Sun 12noon-4pm