This is a really
hard thing for a lot of photographers, maybe even me. The simplest way to cull
photos is actually not take them in the first place. However with digital
cameras it is just too easy to keep pressing the shutter button, well until
your memory card fills. These cards are very affordable (now less in most cases
than a roll of 35mm film). So the temptation is there to "Spray &
Pray".
I don't think there
is a perfect way to sort and organise photos. It is a very personal thing in
reality. However I don’t really like being forced into a specific
"workflow" that must be religiously followed (are you listening
lightroom?). Trying to rate images immediately by "chimping" (looking
at the LCD screen on the back of the camera), not only wastes time you could be
taking photographs, the ambient light will probably make the image hard to view
and evaluate properly. I know in my bones that as you first load and review
your photos (whether that is from your phone onto a web service or from a DSLR
onto your computer), that the right time to do the culling is as you first view
your images. Trust your first
impressions and gut feel they are probably right.
Here is my list of
what should be discarded immediately
Very poorly exposed (see
caveat below)
Subject out of focus (the
degree of sharpness is a personal thing because post processing sharpening
has come along way)
Subject is awkwardly cut off
The photo is not flattering
or shows potential for embarrassment (no definitely don't post it on
instagram delete it now!)
There is a set of very close
photos/images (unless that are really good just keep one, it may be the
first rather than the last!)
To be honest you can
"rescue" a lot of poorly
exposed photos, particularly if you have the RAW original, but if the image
doesn't "grab you" to begin with, you will just end up with a boring
yet better exposed image. You may as well discard it.
At the same time you
are culling you should also flag those images that have potential for post
processing. I have found I much prefer doing this stage in Picasa or Corel
Aftershot Pro. In Picasa I delete both the jpeg & RAW files immediately and
flag the photos with potential with a star (Picasa only has a one star rating).
In AfterShot Pro I don't bother importing the images into its library/catalogue
but I do use their flags, which are the same as lightroom's also I'm finding
after shot's compare view (like lightroom's survey mode) nice to use (picasa
can compare two images nicely but after that its complex) and also after shot's
little magnifier is a real gem. The nice thing with after shot is you can save
the metadata and ratings done at this stage to an XMP sidecar file and these
settings will be loaded in lightroom later. The big advantage of this approach
is speed (if you have a full 4GB card) I can pretty much guarantee you will be able to the load the photos from the card, do the culling and rating in Picasa and/or AfterShot Pro before
lightroom has even finished importing the photos off the card.
There are certain disadvantages to learning new software away from the net, especially when the help system is on-line. Quickly realizing that I downloaded the Flat version of the help system as a pdf. It not exactly the same but I was able to find and answer to most queries. The next and probably the biggest draw back was I was out most of the days either travelling around on the boat’s tender, visiting remote island, or scrambling over rocks to visit cave painting site, walking along remote beaches or out spotting birds, crocodiles, whales, sharks, turtles and not to mention getting some photos of sunrise and sunsets. In other words I was doing a lot and when back on the cruise vessel I was pretty much eating or sleeping which left precious little time to review and cull photos.
Still I had three cameras to upload (aka ingest in photo mechanic jargon). My favourite pentax, my old faithfully canon rebel, which I tended to use for wet beach landing and rock scrambling outing, just in case it got dropped, wet etc (which it didn’t) and finally the camera in my mobile phone. I must admit I could not get Photomechanic to ingest directly from my phone (a HTC UPlay) either with a cable or via wifi. There are generally only a few photos so copy copying them via a USB cable was fine. Actually I had two smartphones, even though there was no phone signal most of the trip. The oldest was used just simply as a GPS to collect wayfiles, I’d set it in the morning and put it in my camera bag (or backpack), The new phone I used used both with My Tracks to save a wayfiles and also with the default camera and location set to include geocode in the EXIF header, mainly for checking purposes. GPS logging is a pretty heavy battery drain om the phones so they often ran out of puff. So I went over to different morning and afternoon shifts on each phone for GPS tracking. I usually managed to upload every thing at least every second or third day and made a point of also running a backup to one of two external drives each time anything new was loaded, all simple to set up in Photomechanic.
Photo mechanic did make culling a lot quicker, but I couldn’t find an auto-advance setting (such as lightrooms) as I rated photos, I kept using my favourite 1, 2 Or 3 stars. However I could not use the press X for flag images to reject. These star rating are written to a .xmp sidecar files, so all the rating where useful in lightroom and AfterShotPro. Photomosaic tagging system works a bit different so I actually just used the keyboard delete key instead of a shartcut (it does also mean also doing a confirm delete each time). I will also admit that I had trouble doing selective transfer of files into lightroom if it was running. I tried both drag and drop and setting up lightroom as the external editor. However both attempts to work on the images in lightroom starts the import from disk function but without and files selected and as I had already culled I could just click on select all (and go have a coffee).
Whilst Photo mechanic process is fast, the step of just copying the photo files to the computer is actually not as fast as a straight system copy file, or Picasa or Aftershot Pro imports. They all loaded all the photos faster than the limited comparity Photomechanic testing I did. However what photo mechanic lets you do was start working on the first files loaded straight away, so you could begin your rating and culling quickly and didn’t have to wait for all the photos to be copied or loaded before beginning. This is a big deal if you have a lot of images to load (I was averaging 800 a day but had a 2,000 day in there). You can easily halve the time to load and rate your photos.
Other than the ingesting process and culling I didn’t really get to exercise photo mechanic a lot. I also have beta version of Luminar for windows on my PC but was not successful in opening an image directly from photo mechanic into Luminar, again I did have access to the on-line help for Luminar. The transfer to edit in AfterShot Pro worked beautifully but there is so much overlap in what the browser mode in AfterShop and Photomechanic do I probably wouldn’t be using them together.
I was also very keen to get the GPS tagging running but ran into a series if unexpected issues. The synchronization of timing sounds simple but because the phones had no mobile signal they kept defaulting to different time zones (not “ship” time) and the camera let me change times (both have dual cloaks) but they too often just reset themselves to the base, my home, time. So figuring out time shift was a confusing and annoyingly repeated problem. A second contributing issue was the tools I had at my disposal to show the photos on a map (ie Photo mechanic, Picasa, lightroom and google earth all require and on-line connection) This meant even when I did merge the wayfiles and photos I could not check the location on a map. Recognizing this could lead to a lot of frustration I just gave up.
In the process of getting off the boat in Darwin the screen of my beloved little HP Spectre got cracked (no idea how) and the touch screen and pen functions have stopped working. So this has put an end to my investigation for the moment.
I have had XnView on my USB Darkroom Key (its always in my camera bag and has portable Apps so that if and when I only have access to a cyber cafe or library computer I can still work on my photos). It is a really simple to use but feature rich photo viewer/manager, I have also had XnViewer MP (a multi platform enhanced version) running on a repurposed Linux machine and my desktop computer and they do get frequently used, However picasa is still my go to application for loading organizing and culling new photos. The newest version of XnViewer MP (0.81) may change my mind.
There are three reasons
Its RAW rendering is fast and decent. I would not suggest that it is a fantastic replacement for other RAW editor but it is is an ok conversion. The downside is it converts the RAW image into an 8 bit jpeg, and thus you will loose a some of the potential dynamic range,
It now includes (from version 0.80) the ability to read and write metadata in .xmp sidecar files. Which means you can transfer rating and metadata into other photo mangers (that can read the adobe sidecar format). You have to go into settings under the browser/metadata tab and click on the options highlighted on the right. Again there is a small caveat in that XnView does not include a pick and reject flag (so useful in lighroom and other software) when first reviewing and culling newly loaded photos. Also the XMP compatibility does not extend to post processing options (just the metadata and ratings).I can not write to xmp in picasa so this is a big plus.
It has a simple tools/import and sort feature that can load photo from a variety of sources (the can be camera, card readers, external drive, they just need to be connected to the computer and have a drive letter and/or folder directory. Whilst XnView MP does build a catalogue entry and thumbnail at this time it is way faster than lightroom for example. You can also add metadata and do some filtering by time (assuming the photo has EXIF data). It can also write data to a subdirectory yyyy_mm_dd according to the day it was photographed and this is how I like to organize my files
There are heaps of other well loved features that have come from the original XnView program. The real power of XnView is the organizing your images, doing a few basic edit and sharing your photos via email or getting them to go to a social media site (nothing ”one click” automatically upload to those sites but there are the right tools to make the files the appropriate size and format). There is also the great range of batch editing tools which can simplify task like changing timestamps to synchronize camera times and external GPS tracks, for geocoding (an all to tedious a task in lightroom).
There is also the ability to read and write an extensive array (the web site claims 500 format) of graphic file formats. Ok there are only a few formats I regularly need but it is handy to be able to at least look at the strange files that turn up from time to time in graphic art. Thus this would make a great for managing the reference photos for a graphic artist who normally works in illustrator or Corel Draw/Painter.
I’m still only luke warm on it being able to replace picasa in my toolkit, but I have made a commitment to put this version on all my computers along side picasa and give it a fair work out.
One disappointment already is on the HP Spectre (2 in 1 windows 10 laptop) where it its decidedly awkward to use in tablet mode and where it can be very touch screen frustrating.
I’ve been using lightroom as my primary photo editor again on my travels, because my light HP spectre with its SSD drive have made lightroom fast enough again. There are things about lightroom that still hold me up and things about the way it has to organise everything in her own way that still frustrate me. In particular how to handle working copies. in my case these are files being past onto third arty plug-ins like Nik Software Efex range, OnOne and Perfect Exposure. What happens is the little PCPlugin windows pop up and I can chose to edit a copy with lightroom setting (the default and most common response), a copy without lightroom settings (seems to only works with jpeg files) or edit the original (except this doesn’t work with most plug-ins). Then there is a small dialogue area at the bottom which contains the file format you will use in the exchange (jpeg, Tiff or PSD).This is all fine and I’ve done it hundreds of times because I just press ok, but the annoying part is lightroom now takes the copy and the original to the very end of your photo series. If you have more than say 50 photos in you directory this can be a few screen’s scrolling away of forever removed on the film strip. It is a tedious interruption to my thoughts and concentration.I have found one work around, just change to a different folder in the library module and back to the folder you working in, and Voila the files are back in their normal order, but these is even more tedium and frustration. Ahhh!!! Then I notice after I had done this at least once (but sometimes twice) the photos where not copied to the end of the folder on the lightroom screen but arrive beside the original in the alphabetical/numerical order or the origin photo.
The next discovery, I’m sure must be documented somewhere, but I just haven’t found where, is that photos in subdirectory/folder get displayed in the parent directory. I came across this by accident. To get my autostitch panoramas I need to export my starter images (they are now often HDR and tiff format) into jpeg because autostitch only works with that format. So I normally export it to a specifically named directory over in my photo scrapbook. Unfortunately it doesn’t take long to forget where an image is in that confused space. At some point while I was travelling, and probably late at night, I accidentally reset the the destination of export from lightroom from a specific location to same folder as original plus sending it to a defined subdirectory. Suddenly the export shows up beside the original? Not only that I could then create my panorama and import that back into lightroom in the sub directory/folder and it to shows up in the parent folder also. I don’t have to have duplicated files over in another scrapbook folder! Then I can stack the whole series behind the panorama (gaining a lot more organizational control of this folder)
Whilst I have been using lightroom for a long time, (I stopped upgrading from version 4.4) have read the manuals in detail and many guides I can not find ant documentation relevant to these discoveries/”features”. Coincidentally I did just watch an Ed Gregory You Tube video (below) that exploits this “feature” of photos in the sub directories/folders showing up in the directory above.
I’m never a fan of fixed workflows, so you don’t have to follow his approach meticulously just be inspired and know you can use sub folders/directories to house various working and exported versions of the photos but still see all the photos grouped together in the parent folder/directory.
Here is what I adopted on my last trip that seems to work seamlessly for me. I still use picasa to load and do the preliminary culling of my photos and I load the photo into daily folders with the name format YYYY-MM-DD this means that they automatically get sorted into chronological order. Using picasa is way faster still compared to lightroom and because I still shot RAW+jpeg I can cull the RAW/Jpeg pair at the same time (you don’t see the jpeg file in lightroom). I can als “”touch up”, crop, email and post the jpeg to the web immediately is I want (eg email photos to the family). When I’m ready to post process I just point lightoom to import from this gallery. Doesn’t take long and lightroom has happily loaded the requited details into her catalogue and ready to be useful. This is when I rate my photos and I’m trying out the star rating idea present in Jeff Harman’s PhotoTaco podcast (Culling like a Pro) below.
The idea is to only use three stars, set lightroom to auto advance, and then just hit the 1 2 or 3 key on you keyboard. This works in both the library and develop modules but works best on library if you also want to swap between thumbnail and full screen view of just a few images. The important thing is to go through your entire days shots. Each time you rate a photo you will moved onto the next. With a little concentration on the image and one hand over the relevant keys you can become very fast at this. One Star is for the set up and background shots you want to keep but not process further Two Stars is for any average shot, they maybe nice but are not the best in the days shots Three Stars are for those shots with great potential that warrant a bit more post processing. You will undoubtedly find that the two stars make up the majority of your folder but that’s life. Any non stared images should be deleted now (but I normally get rid of those in picasa when I load the photos). If like me you do a daily backup now is the time to do it.
Next I set the filter in lightroom on rating to plus 3 stars and I only have a few images to consider. Often I will also demote a few NQR (not quiet right) photos to further trim down what I need to do. Suddenly 2 hours post processing drudgery become 20 minutes of fun!
The final piece of magic that these discoveries lead to was using the subfolders to hold working and then exported versions, would allow me to see all the photos from one day in one place. I’m not sure if final should be a sub directory of Work (where I do my post processing) or a folder at the same level, Keeping my Final work separate and easily found is the important aspect here. I definitely need to have the option of separating the image size and finish (ie post processing sharpening) in he exported versions. I just have two sizes (small for the WEB or Full resolution for possible printing. My scrapbook mess is now obsolete! (not sure yet if I will try to back that diversity into this new structure, I suspect that will be too much work). There is some duplication of files, but they are at least stored more logically close to the original images. I also returned to using the colour labels to help understand the type of images within the daily (Parent) Directory/Folder. Yellow for HDR , Green for multi image panorama stitching or collage, Purple for family snaps, Red for images posted on the web.
I don’t want you to follow my process exactly but be inspired to simplify the way you organize your photos and/or reduce the time taken or tedium to give more time to be creative.
Last weekend snapfish had a good discount on making photobooks. I’ve been using the small 20 by 20cm size as suitable to pull together small collections that are personally meaningful (eg a series of a previous 365 project). The culling of my flickr photo was still fresh in my mind so I figured it was time to prepare a book about my more popular photos on flickr (not necessarily my favourites) Most of them had been in Explore, flickr’s very useful way to display the top 500 photos on any day using an algorithm they call “Interestingness”. From my perspective the difficulty was know what has or has not been included (other than lots of views and likes). Anyway I went to prepare the booklet and realized I had culled a lot of the photos, probably about 15) that had made it into Explore (oh well such is life) they weren’t so interesting to me. I was able to prepare most of the book in record time directly downloading photos to snapfish from flickr albums with pnly a few uploads from my archive. I called the book “Confessions of a flickr freeloader” (since I have always had a free account and the book is being printed right now.
My Linux/Mint Fileserver has already died three times in the past few weeks, The last time terminally, well I'd already swapped out two hard discs, which both crashed, didn't fancy wasting a third. So the much-altered old HP, aka Obsidan, has been consigned to the hard waste collection.
Graveyard of Hardware killed by Window10 Updates
Ok back to the Stora, but that's a hard luck story as well. It works but none of my current PCs, and other devices can run the software (incomnpatible drivers stop installation) or even access it via a browser, because Adobe flash is required, which even Adobe no longer support and have removed it from downloads. I had to use my Linux netbook to reconnect (it had old version of the stora software) and "recover" the data from the stora onto already overloaded external USB drives.
Rather than panic I'm going to limp along with a monthly backup based on two copies of data but an old fashion SON - FATHER - GRANDFATHER set of Archives of keepers (files & photos I believe are worth archiving. This involves serious CULLING.
I'm getting close to filling my 5TB disk on which I store my mastercopy of my photo library. There are almost half a millions files, a lot are jpeg & RAW pairs and there are movies as well. This actually only covers my 2010 to 2021, The 1999 to 2009 is on a differeent 1,5TB disk, Then there are 6 2TB off-site backup copies in 2 sets of 3 external usb harddrives, that I rotate every 2 months. Its becoming a bit of a production. Also i'm now faced with the isses to determine what is the most sensible way to get extra space.
1. Probably the most likley, is I'll take two of the external disks from my second offsite disks and add a third local photo library disks (I do have one USB port left) and make just one offsite set of 4 2TB disks. The surplus 2TB can become a rotating backup of the last 2 or 3 months. OK this will give me "some" headroom for at least the first part of next year.
2. Sit down and do some serious "CULLing" of things I am never likely to reconsider. This is that really scary thing a lot of photographers or even frantic smartphone snappers, will have to face at some time.
Why has this come about because I have and use photo mechanic and (usually) spend a bit of time when I "ingest" (load the photos from the camera card onto the computer) my photos where I in theory on load the "keepers"? The out of focus, poor composition, unfortunate expression and straight bad images always get deleted straight away.
The problem is I have come to like and use techniques that have multipled the photos I take. Particularly with the fun features on my little olympus cameras (HDR & Focus bracketting, Panoramic stitching, Burst mode and PRO capture). Also the new favoutite and automated intervalometer for stop motion. Ok I blame them, but perhaps I have become a little less dilligent and skip through these sets as I import them, not being strict enough on what gets deleted.
OK could I find and use modern software (specifically AI based system) to help me re-tackle the horrible task of reviewing and further deleting my photos. Seems it could even be an economically attractive option as well if I could get ride of perhaps 40% of my files, that could translate into 3-4 years before I have to outlay on extra disk capacity. Not sure what say two 4-5TB external harddrive (or the equivalent cloud storage) might cost but lets estimate around $150 each or $300 now. If I could find something for $100 that looks economiclly attractive.
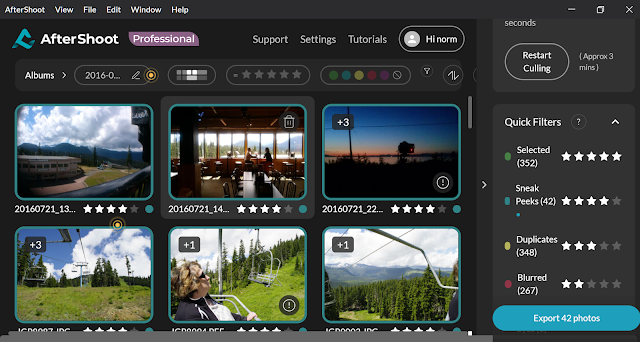
What started this was an "offer" for AfterShot at $9.99 ( and thats probably USD$) but in my mind that seemed perfectfor my budget and I download the "free trial". It did a few good things, like sneak preview grouping that used AI to find those images most like the ones shared on instagram and like services and was very strict with focus, Howeer a lot of its features like eyeclosed andface detect stuff didn't help me a lot also I was getting almost as many possible duplicates as I had photos (ie jpeg & raw pairs were reporting as two duplicates) and in most cases it was flagging the jpeg as the file to keep. Then I realised that the $9.99 was just per month and the discount was jut for a year if you paid up front after that it was $14.99 per month. Buying the extra disk now would be a much better option. I can see a wedding or group photographer is likley to save a lot of time. However what I am looking for is a cheap space creator.
I do own another programs called Corel AfterShotPro, which is a light weight RAW Editor I still use it occasionally mainly on my little HP Spectre when away from home. So one aftershot is probably enough. It does allow me to label/keyword, rank, colour code, and flag as Pick or reject but manually not via and automatic AI assisted approach.
I've become quiet a fan of Perfect Photo as an ad-in to Lightroom, it plays nicely with the Adobe Lightroom environment and it brings layers and masking, The new version 9 (there is a trial version available) is out now and promises a fast smooth browser experience (ie you don't have to wait for ages while lightroom does her thing) if you want to do a quick review, culling and edits, also the smart photo option which allows you to reuse and change previous edits seems real winners.
Speaking of winners Scott Davenport, an OnOne Instructor and fellow The Patch Community member on google+ is generously giving away 7 copies of the new Perfect Photo Suite 9, all you need to do is sign up to his great email newsletter and blog about his giveaway blog post. Its as easy as this.
My cloud photo archiving experiment is continuing but only one of the original contenders, OneDrive, has survived and still running well. I was looking at a way to automated the update process to it and I have gone back to a very “manu-matic” (part manual, part automatic) method utilizing the powers of PhotoMechanic. There is a story behind that choice so I might explain that now.
A real advantage of the OneDrive approach is being able to control the sharing of specific photos with others in a secure (email private perma-link) connection (Dropbox also does this well). Google on the other hand isn’t secured (their idea of secure is just to have complicated file names, but that file name does have a permanent url, which is always publically accessible) AND I’m sure their approach will soon be, if not already being hacked. This private share feature would make such a service a good place for a family photo resource, that is only shared with the “trusted” family members.
This then got me thinking about making the family photos archive separately, and the more I think of it the better this strategy becomes. The difficulty is how to separate out the photos and more importantly the family just wants one or a few good photos not everything. The solution is good rating and culling. Damn, more work! This can be done with lightroom, On1, Aftershot Pro, Darktable using star & colour tab ratings. Providing I have this software automatically writes out. xmp sidecar files, I can make and change these rating at any time. These programs all monitor the .xmp rankings (Pick flag are an exception which none of the software seems to want to exchange, and I don’t use them anyway) As I am reviewing or processing my photos I consciously mark those photos with the purple colour tab (pressing <Alt>5 in most software, but not lightroom). However I like to recheck my ratings and colours using PhotoMechanic’s contact sheet display view perhaps once a week, I review each days contact sheet (PhotoMechanics Term for the folder/thumbnail view) and I can then filter to see only one star and above rated. I can also check the colour tags and metadata updates if required. and recheck the ratings (eg change * to ** etc.). Next I remove the purple tagged family photos (they will go into a separate archive (see below) and finally I “save as” the selected group to my OneDrive folder on my computer. I am only saving finished jpeg files and have adopted the practice of resizing the photos to 2400 pixels on the longest dimension and jpeg quality to high. This approach to reduces the file size but in future being able to print approx 10” by 8”. Finally it wpould be possible still be able to upscale because I have not utilized the .jpeg lossy compression to reduce size.
There was a secondary benefit from reaching back to a manu-matic step, after uploading my better photos into the cloud archive, without family photos included. I could switch the filtering to only include family photos (the purple colour tag and 2 starts of greater) and upload those to my trials of a private flickr family group and revised dropbox family folder. More is likely to unfold with this second type of cloud archive, so say tuned for updated.
Having given up on choosing just one photo manager/post processing system I have been happier just using the software that seems most appropriate at the time (I often call this my many mistress project) One of the steps that I do want make sure is not tedious is what happens when I first load my photos and review them. This is one area that Lightroom has left me feeling there is a better way, other than running away to get a coffee and getting distracted. Infact my short trial of Photo Mechanic, opened me to the possibility that there was a better way. I also had become comfortable with doing a lot of this preview and culling in Picasa, which is much faster to load photos and very easy to use. The problem was that ranking and other organizational issues where just wasted on Lightroom
Enter AfterShot Pro, which is a much appreciated Christmas gift. At first it appeared to be duplicating a lot of Lightroom functionality. The really attractive part of this new mistress was the fact that you could just look at photos without having to import them all into its library. It does take a very short moment or two to build a thumbnail (on the fly) but its as easy as moving to the directory where the photos have been loaded (I still use picasa for this) using the navigation (browse) panel on the left of the screen. Choosing the appropriate view, must admit I swap around a bit but I prefer the Multi-Image View (as shown above). The basic edit features are always there on the right (no changing modules as in Lightroom). I’ve already mentioned the little magnifier tools I still think its a gem. The fact that I can save my ranking and metadata to xmp files that Lightroom can pick up later is one reason I have started to do most of my previewing in AfterShot. Like Lightroom (and Picasa) AfterShot Pro is a “non destructive” editor, the original photo remains unaltered and you can store its adjustments in an xmp file, the problem is this post processing isn’t compatible with Lightroom’s processing. I’ll probably write more on this later.
An unedited RAW image on a calibrated screen, can be a very boring thing. It often takes a fair few steps (ie not just Auto White Balance or Auto Tone in Lightroom) to see the potential of an image might have for further tweaking and post processing. Which brings me to another real gem I have discovered in AfterShot Pro. It now has the Perfectly Clear plug-in, built into the basic edit panel. This a an “image enhancer” (their term to differentiate themself from other “creative filter” plug-ins) by anthentech, which you can be still purchase separately as a desktop application or downloaded as a smart phone app. The details of their “science” make good reading, but they had me hooked when I saw the quote “Your “Enhancement” Software Takes the Camera Distortions and Makes Them Worse”. The proof though is in the pudding and I have always tried to me honest and fair in my evaluation of AUTO anything style claims. They usually fall short of the mark for me. However I love perfectly clear as I scroll though my photos because with one click I can see the potential of a raw image. It gives me a target to strive for in Lightroom later without having to invest a lot of time tweaking an image and not be able to transfer this to Lightroom. I will probably still try to do better with some manual tweaking later but I haven’t invested a lot of time, and if I’m in a hurry to email a proof or just upload an image to illustrate a blog post that one click is pretty much all I need to do. Perfectly Clear does work with jpeg as well, but it may not have as much potential to work with as the equivalent RAW file.
This is a good example of my new approach to handling a (big) batches of photos without wasting time and waiting for (slow) software. (ie bringing the fun back into photography). Taken from the camera card with Photo Mechanic (180 images, 90 pairs of jpeg+raw), adding metadata, select and rating the best (under 3 minutes) then pumping 40 raw files out to photolemur 3.0 to see what is possible (another 2 minutes for that to happen, time to make an espresso) Then I sat down (5 minutes later) and choose half a dozen photos to work on. All I had to do with this one was crop the photolemur output. Voilà.
Then I used Photo Mechanic Upload tools to send this cropped image to both flickr and twitter (in less than 2 additional minutes)
For a couple of photos I will go back and take them into On1 Photo RAW and three sets of 5 images each I will take into AuroraHDR 2019. Even though I’m not under any time constraint taking the chore aspect out of culling ranking and caring for my photos before I can even start the fun of enhancing things, give to time to reflect and hopefully lift my creativity
My daily photo today tries to explain my idea of photoflow being more important to the creative and originals, who need to know ways to do the craft. Not a step by step procedure within a rigid workflow (which tends to have all the output looking the same) but alas makes difficult to learn software at least a little attractive. I still like to idea explained to me by Misho Baranovic, a great local mobile photographer, the workflow is in fact simple just SHOT, EDIT & SHARE [the edit bit being optional]
I have written quiet a bit about workspaces, photoflow and workflow, and my views are getting stronger. It is important to understand the steps, what tools are available and how to use them. There may well be an apprenticeship period where you learn by copying and following strict recipes. However there will be a time when you need to open your creative wings and fly over new territory, if you have mastered your media you will have a wonderful journey.
Of course there are other organizational aspects, like culling, flagging, keywording, backups that are also important to the long term management of any photo collection, but they need not get in the way of creativity, or taking a daily photo.
I must admit yesterday was a day of Joy at how fast and easy it was to do all things photographic from uploading and culling my photos, to processing them with a big screen TV monitor attached in a lightroom that flys again (thanks to an SSD drive). Lets hope Windows 10 on my little HP Spectre doesn’t updated its self to death again.
The aspect I noticed the biggest difference in was the time taken was in my unnecessarily elaborate panoramic postings to Instagram. I’m splitting the images into three square images from a 3:1 aspect ratio, so that when when viewed as a 3 across grid you see the larger picture. (I like thinking outside the frame, You probably see that in a lot I do). Because I can post directly into Instagram from the HP Spectre, (the Instagram app must consider it a Tablet) the method didn’t take so long just some cropping in Picasa and export the files to my Film Roll (bloody apple-esceness terminology everywhere) and upload them from there. Just takes a few minutes at most.
However when the HP Spectre was away I had to use my android phone to do the upload to Instagram. At first it didn’t seem such a big deal, I have the LG PC Suite which can transfer files, music and photos to the Phone via WiFi. The trouble was the android upload was slow and involved jumping out of Instagram to find the next picture, yet it was workable just slow. Then I discovered Insta Grid which can do the split into 3by1 3by2 up to 3by5 grids, seemed perfect BUT it doesn’t automatically do the upload to Instagram. It does help you by guiding which sub-photo to upload next, BUT I found Instagram on the phone would often stall on loading an image part way through the sequence, very frustrating, not only that the process from having chosen the photo and down loading it to the phone to completed uploaded was now often taking 20 minutes. The long and short of all this was I had created something interesting but it was long winded and tedious to do from my phone.
This is undoubtedly the area where there has been the most coming and going, change and rethinking. For a long while I kept two separate laptops, one for my consulting work (originally what is now my studio laptop) and a another one (originally an XP, which is still running but seldom used) for my photographic work. I now have a newer laptop (well its 3 years old already).
Carrying two laptops when I travels was just a bit of a luxury, so I either got by using a small netbook and/or I put any specialist tools I needed on a USB Key using the portable apps format if it was a “work” trip. This actually sever me well enough but meant I had to leave the heavy lifting (detailed post processing stuff) until I got back home. My main goto portable programs on this Darkroom USB key are RawTherapee, The Gimp and XnView. AutoStitch and Picturenaut also work perfectly well off my USB drive. This stuff has moved to a larger USB and the green lanyard has changed to a more heavy duty orange version but it still lives in my camera bag, along with a USB SD card reader. So if I didn’t have a laptop with me I could use the netbook or find a library or cyber cafe and I could review the Camera’s card contents at a larger size (providing the computer I was using had two USB ports) and I could perhaps process a stitched panorama, HDR or a RAW refinement, if time permitted I don’t use the Key to hold photos, except for perhaps some post processed image I just created. I had a test version of picasa on there for a while but it had to store its main directory on the PC so it wasn’t really portable, and this began the move to using XnView more extensively. I have recently put the portable version of chrome onto the key as well. There are a number of times when this simple USB key proved invaluable letting me perform something that would have been impossible on the average airline lounge or cyber cafe grunt computer. Slowly different software began appearing and disappearing of my main laptop (mainly to better handle RAW files). Usually for a specific reason, like I need to edit diagrams and photos for my consulting work. Since this laptop is 64 bit I did start to notice some of the performance improvements, particularly in processing video and lesser but still noticeable improvements in lightroom (development functions particularly). The OnOne’s Perfect Photo suite are 64 bit so this laptop was the best place to set it up and it plays very nicely with lightroom. Whilst perfect photo isn’t really a RAW development system per se, its browser can read my RAW files. However the combination of lightroom (to do the basic RAW refinement steps), followed with a round trip into one of the Perfect Photo add-ins, suits me and gets the job done. I always put picasa on any computer and it looks after my Jpeg work fine, it is still my favoured way to upload photos from my camera. I have found that AfterShot Pro is also great in this inital photo review, rating and culling process.
The only hassle I am finding is the space used having this software on the computer is not an issue, but it is the space eaten by the photos if I leave them on this laptop too long. Saving RAW+Jpeg consumes disk space rapidly! There are also some limitation and cautions about moving processed photos around a network, but that will have to be another post.
I am getting more and more convinced that it is being familiar with your workspace and tools is much more important than following a specific workflow. For a creative, how is not an an artificial deadline, the key is being able to find what you want when you need it. That is what saves time and avoids distractions. In a recent status note on known, about the apparent need to “spring clean” my studio I strayed into the issue of roughly organized but not necessarily neat, I realized this applies to computer workspaces as well.
One of the biggest issues today with computing, information and photography becoming more mobile, is the really fundamental issue of where things are. They could be temporarily stored anywhere, on a phone, on one of several computers you have access to or even on the cloud (aka a web based service). The idea that they might be available from everywhere on everything is appealing but most of the offerings at the moment are not quiet magic just yet. I have found a few services that offer at least some rudimentary sharing across devices, my favourite is drop box its low fuss and automatic, The only draw back it is a free account so space is limited. I still like Box but it is a little more effort to use and find files.
I was warming to One Drive (aka SkyDrives) until a I ran into a security check, it would appeared access to my old skydrive stuff has been “quarantined” or lost. I can only assume this has happened in a recent “security” update in windows (and/or the OneDrive service) but it would have been nice to know it was happening, I’ve reconnected a couple of my computers but can’t seem to get the onedrive directory synched (although one note is synching perfectly and I can read my hotmail). So I thought I’d try connecting my older android (damn no longer compatible) C’est la vie. I won’t go into the details but google drive is in much the same camp for me, and surprising the android app is no longer compatible either. I no longer send photos its way, even though it is supposedly sharing the google+ photos space! So both these services fall short for me and I’m not using them either.
One refreshing trend, is that some Browser style software (like Perfect Photo Browser & AfterShot Pro) let you browse in these cloud location. Even File Manager lets you view them providing you have set up the little apps that create and synch directories on your computer. Providing you cloud places are not to large this is wonderful because you can visually scan what's there. Picasa lets you define how you an scan these drives. Other Software that has databases of images and metadata like Lightroom, have to import the images and this can be a hassle if your cloud place changes a lot.
This is all well and good for smallish numbers of files, a quick scan of thumbnails is normally all that is required to find the group of photos or photo you were after. It start to become unworkable if you have a lot of images on the cloud spread across several services. I had started to fall into that trap but I’m pulling back. Google+ photos attempt with autobackup to bring all your photos and posts onto their web server and adobe’s are not real solutions for me. Each has some nice features but keeping track of photos could be a lot better.
The cloud is a good place to shares and exchange photos, and browsers that let you see then in conjunction with larger photo collection are a step in the right direction, but storage on-line has a fair way to go, at least for me.
The best solution for me at the moment is still to have a logical network drive (I use the letter S: for Scrapbook, actually the directory name is photo Scrapbook) which I link on all the PCs on my network. (I haven’t figured a way to get my phone connected, but I am considered linking part of it at least to Dropbox.). Do have a scrapbook area on each of my traveling laptops, but I regularly synch these and my recent photos from Dropbox back to the share directory. This directory is backed up to my NAS, but I end up heavily culling this area, since my original photos are archived elsewhere. I only keep the better post processing, and special events stuff. I haven’t figured out the best way to archive this stuff (yet!) so the collection is growing.
 This is a really
hard thing for a lot of photographers, maybe even me. The simplest way to cull
photos is actually not take them in the first place. However with digital
cameras it is just too easy to keep pressing the shutter button, well until
your memory card fills. These cards are very affordable (now less in most cases
than a roll of 35mm film). So the temptation is there to "Spray &
Pray".
This is a really
hard thing for a lot of photographers, maybe even me. The simplest way to cull
photos is actually not take them in the first place. However with digital
cameras it is just too easy to keep pressing the shutter button, well until
your memory card fills. These cards are very affordable (now less in most cases
than a roll of 35mm film). So the temptation is there to "Spray &
Pray".

 mention getting some photos of sunrise and sunsets. In other words I was doing a lot and when back on the cruise vessel I was pretty much eating or sleeping which left precious little time to review and cull photos.
 I was also very keen to get the GPS tagging running but ran into a series if unexpected issues. The synchronization of timing sounds simple but because the phones had no mobile signal they kept defaulting to different time zones (not “ship” time) and the camera let me change times (both have dual cloaks) but they too often just reset themselves to the base, my home, time. So figuring out time shift was a confusing and annoyingly repeated problem. A second contributing issue was the tools I had at my disposal to show the photos on a map (ie Photo mechanic, Picasa, lightroom and google earth all require and on-line connection) This meant even when I did merge the wayfiles and photos I could not check the location on a map. Recognizing this could lead to a lot of frustration I just gave up.


 One Star is for the set up and background shots you want to keep but not process further


%20beo.jpg)







 An unedited RAW image on a calibrated screen, can be a very boring thing. It often takes a fair few steps (ie not just Auto White Balance or Auto Tone in Lightroom) to see the potential of an image might have for further tweaking and post processing. Which brings me to another real gem I have discovered in AfterShot Pro. It now has the Perfectly Clear plug-in, built into the basic edit panel. This a an “image enhancer” (their term to differentiate themself from other “creative filter” plug-ins) by


