Showing posts with label culling. Show all posts

Saturday, August 20, 2022

That Didn't Last Long

My Linux/Mint Fileserver has already died three times in the past few weeks, The last time terminally, well I'd already swapped out two hard discs, which both crashed, didn't fancy wasting a third. So the much-altered old HP, aka Obsidan, has been consigned to the hard waste collection. 

Graveyard of Hardware killed by Window10 Updates

Ok back to the Stora, but that's a hard luck story as well. It works but none of my current PCs, and other devices can run the software (incomnpatible drivers stop installation) or even access it via a browser, because Adobe flash is required, which even Adobe no longer support and have removed it from downloads. I had to use my Linux netbook to reconnect (it had old version of the stora software) and "recover" the data from the stora onto already overloaded external USB drives.

Rather than panic I'm going to limp along with a monthly backup based on two copies of data but an old fashion SON - FATHER - GRANDFATHER set of Archives of keepers (files & photos I believe are worth archiving. This involves serious CULLING.

Saturday, December 25, 2021

"CULL"ing the four letter world that photographers don't want to speak

I'm getting close to filling my 5TB disk on which I store my mastercopy of my photo library. There are almost half a millions files, a lot are jpeg & RAW pairs and there are movies as well. This actually only covers my 2010 to 2021, The 1999 to 2009 is on a differeent 1,5TB disk, Then there are 6 2TB off-site backup copies in 2 sets of 3 external usb harddrives, that I rotate every 2 months. Its becoming a bit of a production. Also i'm now faced with the isses to determine what is the most sensible way to get extra space.

1. Probably the most likley, is I'll take two of the external disks from my second offsite disks and add a third local photo library disks (I do have one USB port left) and make just one offsite set of 4 2TB disks. The surplus 2TB can become a rotating backup of the last 2 or 3 months. OK this will give me "some" headroom for at least the first part of next year.

2. Sit down and do some serious "CULLing" of things I am never likely to reconsider. This is that really scary thing a lot of photographers or even frantic smartphone snappers, will have to face at some time. 

Why has this come about because I have and use photo mechanic and (usually) spend a bit of time when I "ingest" (load the photos from the camera card onto the computer) my photos where I in theory on load the "keepers"? The out of focus, poor composition, unfortunate expression and straight bad images always get deleted straight away.

The problem is I have come to like and use techniques that have multipled the photos I take. Particularly with the fun features on my little olympus cameras (HDR & Focus bracketting, Panoramic stitching, Burst mode and PRO capture). Also the new favoutite and automated intervalometer for stop motion. Ok I blame them, but perhaps I have become a little less dilligent and skip through these sets as I import them, not being strict enough on what gets deleted.

OK could I find and use modern software (specifically AI based system) to help me re-tackle the horrible task of reviewing and further deleting my photos. Seems it could even be an economically attractive option as well if I could get ride of perhaps 40% of my files, that could translate into 3-4 years before I have to outlay on extra disk capacity. Not sure what say two 4-5TB external harddrive (or the equivalent cloud storage) might cost but lets estimate around $150 each or $300 now. If I could find something for $100 that looks economiclly attractive.

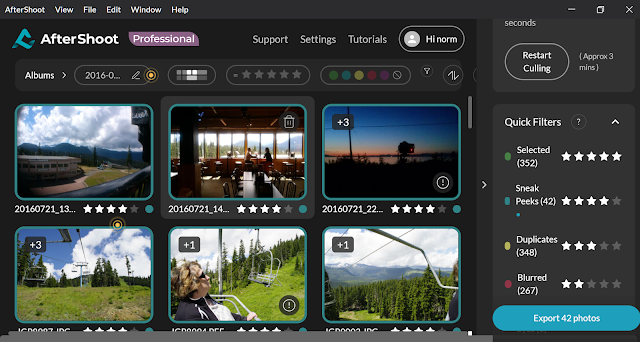
What started this was an "offer" for AfterShot at $9.99 ( and thats probably USD$) but in my mind that seemed perfectfor my budget and I download the "free trial". It did a few good things, like  sneak preview grouping that used AI to find those images most like the ones shared on instagram and like services and was very strict with focus, Howeer a lot of its features like eyeclosed andface detect stuff didn't help me a lot also I was getting almost as many possible duplicates as I had photos (ie jpeg & raw pairs were reporting as two duplicates) and in most cases it was flagging the jpeg as the file to keep. Then I realised that the $9.99 was just per month and the discount was jut for a year if you paid up front after that it was $14.99 per month. Buying the extra disk now would be a much better option. I can see a wedding or group photographer is likley to save a lot of time. However what I am looking for is a cheap space creator. 


I do own another programs called  Corel AfterShotPro, which is a light weight RAW Editor I still use it occasionally mainly on my little HP Spectre when away from home. So one aftershot is probably enough. It does allow me to label/keyword, rank, colour code, and flag as Pick or reject but manually not via and automatic AI assisted approach.


Sunday, March 10, 2019

Revisiting & Extending my Photographic Punctuation Marks

Its been a while since I wrote about the idea of including pictorial punctuation marks in my camera’s photostream. It much handier (pun intended) than taking notes or trusting memory. As I’m taking more and more group image sets this is a very easy way to find and group like images just in the thumbnail view (eg PhotoMechanic as I load the photos where I can colour code them accordingly or in OnOne Photo RAW where I like to group Stitched Panoramas, HDR and Focus Stacked sets in their own sub–directories). This avoids a lot of wasted time churning thorough a mountain of similar images, and keeps things a little better organised.

Think of these first the hand signals as visual brackets


Panoramic Sequence, and direction of shooting. I still don’t use this all the time, because a panoramic series is usually pretty self explanatory. When I have used this I will add this marker photo before the panoramic sequence is shot. I further identify the stitched panorama series with a Green Colour Class


 HDR Bracketed Sequence, I use this to indicate I am taking 3 or 5 a photo sequence. This is another punctuation marker that I normally use to precede a sequence. I usually don’t bother put this in front of every HDR set in a continuous series (such as combined HDR and Stitch Panorama because it is relatively easy to find the groupings). I then use the Yellow Colour Class to easily identify the HDR sequences.


Focus Staking. or other multi-bracket techniques. This is a new marker because it can be very difficult to discern the beginning and/or end of focus bracketed sequences when more that two or three shots are involved. I have therefore adopted the approach of adding this at the end of each sequence. I use the Blue Colour Class to identify this type of bracketing.


I like to think of the next hand sigalns as simple punctuation marks  ; (=battery) . (=end)  ? (=cut)  ! (=good)

Battery Change, still my way of recording when I changes my battery, looking back through your photos and finding the previous battery change photo, then just subtracting the new photo number from the previous gives you the battery life in terms of number of shot per battery charge. On the Pentax DSLRs this can be weeks to months worth of shooting but on the mirrorless Olympus this is generally days to a week. Doing this let me work out I get around 750 photos from a single battery charge from my new Olympus OMD EM10iii, which is about double the claimed 330 shots.


Full Stop, End is a marker to end one series or starts another. I used this often for a variety of breaks or just simple visual markers to aid looking through a large collection.


Cut, not something I use much, but I have used this simple bit of sign language to remind myself that the previous photos should be deleted. I never just flag photos to be deleted I immediately delete them as soon as they are loaded onto my computer, I also delete this marker.


Good, another new punctuation mark just to remind me that close to this marker is a photo I liked at the time, maybe good light, composition or just that perfect moment.

Whilst I normally take both Jpeg & RAW, I usually delete the larger RAW version of any punctuation photos, as I never intend to post process them.

Tuesday, August 29, 2017

Photo Mechanic Unplugged

There are certain disadvantages to learning new software away from the net, especially when the help system is on-line. Quickly realizing that I downloaded the Flat version of the help system as a pdf. It not exactly the same but I was able to find and answer to most queries. The next and probably the biggest draw back was I was out most of the days either travelling around on the boat’s tender, visiting remote island, or scrambling over rocks to visit cave painting site, walking along remote beaches or out spotting birds, crocodiles, whales, sharks, turtles and not to Example Photomechanic full screenmention getting some photos of sunrise and sunsets. In other words I was doing a lot and when back on the cruise vessel I was pretty much eating or sleeping which left precious little time to review and cull photos.

Still I had three cameras to upload (aka ingest in photo mechanic jargon). My favourite pentax, my old faithfully canon rebel, which I tended to use for wet beach landing and rock scrambling outing, just in case it got dropped, wet etc (which it didn’t) and finally the camera in my mobile phone. I must admit I could not get Photomechanic to ingest directly from my phone (a HTC UPlay) either with a cable or via wifi. There are generally only a few photos so copy copying them via a USB cable was fine. Actually I had two smartphones, even though there was no phone signal most of the trip. The oldest was used just simply as a GPS to collect wayfiles, I’d set it in the morning and put it in my camera bag (or backpack), The new phone I used used both with My Tracks to save a wayfiles and also with the default camera and location set to include geocode in the EXIF header, mainly for checking purposes. GPS logging is a pretty heavy battery drain om the phones so they often ran out of puff. So I went over to different morning and afternoon shifts on each phone for GPS tracking. I usually managed to upload every thing at least every second or third day and made a point of also running a backup to one of two external drives each time anything new was loaded, all simple to set up in Photomechanic.
Example Photomechanic Contact Sheet of ingested photos
Photo mechanic did make culling a lot quicker, but I couldn’t find an auto-advance setting (such as lightrooms) as I rated photos, I kept using my favourite 1, 2 Or 3 stars. However I could not use the press X for flag images to reject. These star rating are written to a .xmp sidecar files, so all the rating where useful in lightroom and AfterShotPro. Photomosaic tagging system works a bit different so I actually just used the keyboard delete key instead of a shartcut (it does also mean also doing a confirm delete each time). I will also admit that I had trouble doing selective transfer of files into lightroom if it was running. I tried both drag and drop and setting up lightroom as the external editor. However both attempts to work on the images in lightroom starts the import from disk function but without and files selected and as I had already culled I could just click on select all (and go have a coffee).

Whilst Photo mechanic process is fast, the step of just copying the photo files to the computer is actually not as fast as a straight system copy file, or Picasa or Aftershot Pro imports. They all loaded all the photos faster than the limited comparity Photomechanic testing I did. However what photo mechanic lets you do was start working on the first files loaded straight away, so you could begin your rating and culling quickly and didn’t have to wait for all the photos to be copied or loaded before beginning. This is a big deal if you have a lot of images to load (I was averaging 800 a day but had a 2,000 day in there). You can easily halve the time to load and rate your photos.

Other than the ingesting process and culling I didn’t really get to exercise photo mechanic a lot. I also have beta version of Luminar for windows on my PC but was not successful in opening an image directly from photo mechanic into Luminar, again I did have access to the on-line help for Luminar. The transfer to edit in AfterShot Pro worked beautifully but there is so much overlap in what the browser mode in AfterShop and Photomechanic do I probably wouldn’t be using them together.

Example PhotoMechanic GPS dialogueI was also very keen to get the GPS tagging running but ran into a series if unexpected issues. The synchronization of timing sounds simple but because the phones had no mobile signal they kept defaulting to different time zones (not “ship” time) and the camera let me change times (both have dual cloaks) but they too often just reset themselves to the base, my home, time. So figuring out time shift was a confusing and annoyingly repeated problem. A second contributing issue was the tools I had at my disposal to show the photos on a map (ie Photo mechanic, Picasa, lightroom and google earth all require and on-line connection) This meant even when I did merge the wayfiles and photos I could not check the location on a map. Recognizing this could lead to a lot of frustration I just gave up.

In the process of getting off the boat in Darwin the screen of my beloved little HP Spectre got cracked (no idea how) and the touch screen and pen functions have stopped working. So this has put an end to my investigation for the moment.

Saturday, February 08, 2014

Culling Photos

This is a really hard thing for a lot of photographers, maybe even me. The simplest way to cull photos is actually not take them in the first place. However with digital cameras it is just too easy to keep pressing the shutter button, well until your memory card fills. These cards are very affordable (now less in most cases than a roll of 35mm film). So the temptation is there to "Spray & Pray".

I don't think there is a perfect way to sort and organise photos. It is a very personal thing in reality. However I don’t really like being forced into a specific "workflow" that must be religiously followed (are you listening lightroom?). Trying to rate images immediately by "chimping" (looking at the LCD screen on the back of the camera), not only wastes time you could be taking photographs, the ambient light will probably make the image hard to view and evaluate properly. I know in my bones that as you first load and review your photos (whether that is from your phone onto a web service or from a DSLR onto your computer), that the right time to do the culling is as you first view your images.  Trust your first impressions and gut feel they are probably right.

Here is my list of what should be discarded immediately
  • Very poorly exposed (see caveat below)
  • Subject out of focus (the degree of sharpness is a personal thing because post processing sharpening has come along way)
  • Subject is awkwardly cut off
  • The photo is not flattering or shows potential for embarrassment (no definitely don't post it on instagram delete it now!)
  • There is a set of very close photos/images (unless that are really good just keep one, it may be the first rather than the last!)

To be honest you can "rescue"  a lot of poorly exposed photos, particularly if you have the RAW original, but if the image doesn't "grab you" to begin with, you will just end up with a boring yet better exposed image. You may as well discard it.

At the same time you are culling you should also flag those images that have potential for post processing. I have found I much prefer doing this stage in Picasa or Corel Aftershot Pro. In Picasa I delete both the jpeg & RAW files immediately and flag the photos with potential with a star (Picasa only has a one star rating). In AfterShot Pro I don't bother importing the images into its library/catalogue but I do use their flags, which are the same as lightroom's also I'm finding after shot's compare view (like lightroom's survey mode) nice to use (picasa can compare two images nicely but after that its complex) and also after shot's little magnifier is a real gem. The nice thing with after shot is you can save the metadata and ratings done at this stage to an XMP sidecar file and these settings will be loaded in lightroom later. The big advantage of this approach is speed (if you have a full 4GB card) I can pretty much guarantee you will be able to the load the photos from the card, do the culling and rating  in Picasa and/or AfterShot Pro before lightroom has even finished importing the photos off the card.