Showing posts with label backups. Show all posts

Friday, July 15, 2022

Bye, Bye... ... Stora

My little Netgear Stora, has been serving me well for nearly two decades. Primarily for most of its life it was connected to my LAN as a NAS, backing up my work computers and laptops but mirroring my key working directory whenever those computers were connected to my LAN. It worked so well I only had to use it to recover files on two occasions (both either hard disk or computer update crash). Ok last year after a lot of trouble with windows updates on my studio computer and little portable spectra refused to connect to the Stora at start up. It became tedious to work out if things were running ok and I turned the Stora off and have experimented with file & folder synchronization software (still not sure whether automatic or manual synch suit me better, but it does in theory get me close to mirroring my working files.

During the Stora's life the disk space was expanded from a 250GB single drive up to two 1TB disks, mirrored internally. In the early days it also gave family members their own shared space (discontented because it was seldom used). Then was my photo backup area until I started taking RAW format photos and movies and I soon overflowed space available.

I'm actually choosing to go back to having a traditional files server, (locked away in my old comms room). I have a couple of candidate computers that windows 10 updates have killed, well as far as Microsoft is concerned. I want it to be on 24/7 but secure. I also want this computer to have a DVD reader, perhaps even tape or Zip drive (to allow different media backups and/or reading old technologies). Finally, the ability to have two or more external drives connected (ie be able to copy whole archive disks setup). The downside is this will take up a lot more space than the little black box

Despite having used Ubuntu for some time on my little air gapped archive computer, which I have only been using roughly at six-month intervals and thus I hadn't time to become friends with Ubuntu. I've moved to using Linux Mint (it seems a lot cleaner and simpler for the stuff I want ie. little or no learning curve).

So I'm probably going backwards in technology but I trust I will be keeping things simple and reliable in the old fashion dependable sense.

Saturday, December 25, 2021

"CULL"ing the four letter world that photographers don't want to speak

I'm getting close to filling my 5TB disk on which I store my mastercopy of my photo library. There are almost half a millions files, a lot are jpeg & RAW pairs and there are movies as well. This actually only covers my 2010 to 2021, The 1999 to 2009 is on a differeent 1,5TB disk, Then there are 6 2TB off-site backup copies in 2 sets of 3 external usb harddrives, that I rotate every 2 months. Its becoming a bit of a production. Also i'm now faced with the isses to determine what is the most sensible way to get extra space.

1. Probably the most likley, is I'll take two of the external disks from my second offsite disks and add a third local photo library disks (I do have one USB port left) and make just one offsite set of 4 2TB disks. The surplus 2TB can become a rotating backup of the last 2 or 3 months. OK this will give me "some" headroom for at least the first part of next year.

2. Sit down and do some serious "CULLing" of things I am never likely to reconsider. This is that really scary thing a lot of photographers or even frantic smartphone snappers, will have to face at some time. 

Why has this come about because I have and use photo mechanic and (usually) spend a bit of time when I "ingest" (load the photos from the camera card onto the computer) my photos where I in theory on load the "keepers"? The out of focus, poor composition, unfortunate expression and straight bad images always get deleted straight away.

The problem is I have come to like and use techniques that have multipled the photos I take. Particularly with the fun features on my little olympus cameras (HDR & Focus bracketting, Panoramic stitching, Burst mode and PRO capture). Also the new favoutite and automated intervalometer for stop motion. Ok I blame them, but perhaps I have become a little less dilligent and skip through these sets as I import them, not being strict enough on what gets deleted.

OK could I find and use modern software (specifically AI based system) to help me re-tackle the horrible task of reviewing and further deleting my photos. Seems it could even be an economically attractive option as well if I could get ride of perhaps 40% of my files, that could translate into 3-4 years before I have to outlay on extra disk capacity. Not sure what say two 4-5TB external harddrive (or the equivalent cloud storage) might cost but lets estimate around $150 each or $300 now. If I could find something for $100 that looks economiclly attractive.

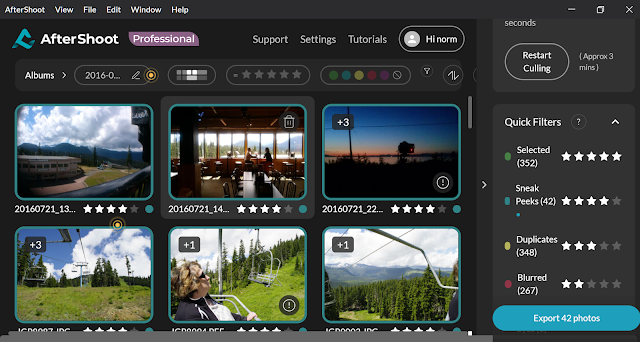
What started this was an "offer" for AfterShot at $9.99 ( and thats probably USD$) but in my mind that seemed perfectfor my budget and I download the "free trial". It did a few good things, like  sneak preview grouping that used AI to find those images most like the ones shared on instagram and like services and was very strict with focus, Howeer a lot of its features like eyeclosed andface detect stuff didn't help me a lot also I was getting almost as many possible duplicates as I had photos (ie jpeg & raw pairs were reporting as two duplicates) and in most cases it was flagging the jpeg as the file to keep. Then I realised that the $9.99 was just per month and the discount was jut for a year if you paid up front after that it was $14.99 per month. Buying the extra disk now would be a much better option. I can see a wedding or group photographer is likley to save a lot of time. However what I am looking for is a cheap space creator. 


I do own another programs called  Corel AfterShotPro, which is a light weight RAW Editor I still use it occasionally mainly on my little HP Spectre when away from home. So one aftershot is probably enough. It does allow me to label/keyword, rank, colour code, and flag as Pick or reject but manually not via and automatic AI assisted approach.


Saturday, August 30, 2014

Taming duplicates

I have had the exclude duplicates item ticked on my picasa imports by default, for the longest time. This helps avoid a lot of duplicates turning up because some photos where left on a card or a phonephoto was uploaded via wifi more than once or via different services, However because I now have my photos flow across several computers and software packages it is surprising just how many duplicates do turn up. So I have also been using a neat little utility program from digital volcano called duplicate cleaner, which is design for all file types but does work very well with media files like photos, video and music. The biggest feature of this cleaner is that it can recognise the same file contents, even if the name is changed. If the file is a jpeg and has been post processed it will be considered as different. Also if the jpeg has been rescaled it will also be considered different. This is fine I probably want to keep these,

During and particularly as I reach the end of the month I move my photos from the collection points (laptop computers) onto a backup drive and it is at this point that it is most useful to run the duplicate cleaner (if you have a lot of files it can take a while …so go get a coffee). After this I then copy the backed up files to the archive drive and make my DVD/CD backup set of the archive (this is my one remaining traditional backup, everything else is now on portable hard drives). I don’t delete the photos on the collection computers until I have finished the backup –> duplicate clean –> Archive cycle. The very end of the month is the right time to do this.

Thursday, April 03, 2014

When to clear your SD card

I have been using SD cards for a long while and have had little trouble (except for one card where the connectors peeled off the card in the camera, damaging the reader, I don’t use the cheap brands anymore), I have misplaced a few cards and deliberately dissected an old one. They have all given me good service and I have migrated to using the fastest ones I mainly still use 4Gb & 8Gb (giga bytes) in size (that's plenty of shots). I generally use Picasa to unload the cards on a computer and  I have always been happy to let Picasa delete the photos off the card (it does seem to do some form of verification after loading the files before it deletes anything from the card.) I have used lightroom (way too slow for me) and photo mechanic a few times with similar settings, and no problemsFullscreen capture 4042014 104258 AMOne of my fastest cards has started to “forget” to deleted the previous uploaded photos. Which is not a real problems in picasa I just make sure I have the exclude duplicates button checked. Anything I have already loaded show up with a red cross on a white circle. So I have my little 1-2-3 checklist for any picasa import. 1. Excluded Duplicated, 2 – Delete only copied photos 3 – Import all. Works fine and it is now just a habit.

The majority of on-line sites and experts seem to recommend that you never clear your card till after you are sure the files are uploaded and safely backed up to a second place. Seemed overkill to me because as long as you have not taken new photographs you can usually recover deleted files from your card with suitable recovery tools. You should always review what you have just uploaded, and that will highlight if anything is missing. I know some people have months worth of photos on large capacity cards, which could make it hard to spot missing images. I prefer to off-load my cards as soon a practical (ie each day, or session).

The pesky little undelete was easily solved by deleting the files on my card on the camera before any new sessions. On my Pentax I just need to press the delete button twice, and then Ok to confirm when looking at any image, to delete all the photos on the card. On the Canon its a bit more complex because you have to delete the pictures individually, so there I have chosen to reformat the card. All easy enough. Then I discover on two occasions that the card was locked, the little plastic tab has moved down. That was the cause of the “forgotten” to delete issues the card was being pushed down a little as I inserted it in the card reader. So I have retired that card from active service.

This weeks digital story podcast, has an interesting segment on how digital memory cards work and it reminded me of this. Derrick’s suggestion is to reformat the card to suit the camera and I had actually noticed that I felt my Canon was getting a little sluggish in burst mode but after I had reformatted the card it did appear faster, So I think his advice is good. If you swap cameras it may pay you to reformat the card so the directory structure suits it.

So my suggestion here is not to slavishly follow my workflow or anyone else’s, but figure out what is safe and works for you, and make it a habit to follow those steps, not a chore.

Friday, December 20, 2013

Another One Bites the Dust


IMGP2662I like the queen song but not when it applies to my external hard drives. My third Western Digital drive in a row has failed. Apple’s ITunes is definitely not to blame this time. Although there was some audio and video clips on the drive when it failed. It died in a very similar fashion to the other Western Digital drives, it got slower and slower, and slower but this time it failed completely before I could find space and retrieve its contents. Reports of this painful slowness of Western Digital drives seems to be very common among the various user forums on the net and even the Western Digital's own user support (where it remains unanswered!).

A Hard Lesson

I was not using the drive for any specific archives, so lost files can in theory be recovered. I was using the drive as a large scratch working area and convenient transfer place between computers, so many files passed through it.Specifically I held a lot of videos in various stages of editing and review on this scratch drive. I was mirroring this to my Netgear Stora (NAS style network disks) and had assumed that this would ensure a decent backup of the drive. I had not realised what might happen to the “mirror” as the disk began to slowly die. It seems that the mirroring was timing out while looking at files and must have assumed that the files had been deleted, so they where also deleted from my mirror. Some older directories were ok but anything I had recently worked on, just had the skeleton of empty folders on the “mirror” backup. In other words it was a copy of the apparently almost dead disk, not my actual files on the disk. So there is a hard lesson here, mirror” disks are a convenient form of automated backup but they should not be relied on.

Monday, December 09, 2013

Too Trusting, Lightroom in a high Maintenance Mistress

I’m guessing it had to happen. I had indexed a few photos that where temporarily on my stora (a network NAS drive) and inadvertently left lightroom running. Over night my system evidently updated itself (and or the stora or internet router was reset) so that the computer had restarted and the stora had a found itself a new dynamic IP address. Other open programs like excel and the chrome browser had been reopened but lightroom had failed to open, and attempting to reopen it lead to a message that most of the folders in my catalogue could not be found.. As I started to look around many files had the previews obviously messed up and fragmented or the wrong image as the thumbnail preview I was also getting messages that a number of files where possibly damaged (yet in external checks they didn’t appear to be so). I had seen this before, so I was too worried. Then I realised a lot of ranking and most collections were missing. No problem I thought I had seen that backing up catalogue message many times, but in retrospect I had never checked my backup and probably was not backing up often enough, even though I had a number of backups stretching back a long time.

Open-mouthed smileThe Good news is that lightroom doesn’t edit your original files so everything is intact, including the files of the stora.

Sad smileHowever the changes I made in lightroom, ranking and flagging are now largely gone.

Sad smileThe various collections I had created were also just skeleton versions of their former selves.
The backup catalogue did have my recent data so I can’t explain why so much is missing. I do understand that the links to the items on the stora are now broken but the master copy of my photos are on the same external drive and the links seem fine just record of my the previous work is not there. It is possible that something has been unravelling without my noticing it and the overnight restart has just bought it to my attention?

Fortunately a few months ago now while investigating how to exchange my processing in lightroom across computers (not an easy task). Lightroom is selfishly a one user one computer style of gal. I had set lightroom to Automatically write changes to XMP, this save edits, ranking and metadata into an xmp side car file written beside each image. This way any files edited or “managed” on a laptop would get the same edits and ranking when the directories containing them where copied to my master collection and imported into the master lightroom catalogue (or any other lightroom catalogue). Otherwise the outlook is bleak because I just don’t know how much work has been lost and trying to recover it is a task I don’t even want to contemplate
.
Confused smileOne bit of true irony was that as I looked at the restarted computer, Adobe Flash dialogue box was on the top window saying an update was ready to load and with the offer to also load a trial of lightroom 5.2! I certainly hope this crude attempt at bloatware was not what caused my computer to reboot!

I know this probably has nothing to do with my hassles within creative cloud, or the hacking of adobe, but this is adobe’s third strike. I have to admit lightroom has always been a high maintenance mistress within my photo world and despite the good times we may have to work out other less restrictive but reliable ways to manage and process Raw formats.

Tuesday, April 09, 2013

ABC of my photo flow

I have been quietly reviewing several aspect of my digital photography, including the physical aspects my photo management, what I do and what I have to carry as I travel around (a couple of trips are coming up). So I thought I might share some of this here.My ABC Photo Flow

A for Aquire

This is the step where I first take the photo and then transfer it to some other storage device (typically a laptop or net book computer) . I have two options here either by removing the card from the camera, or connecting a cable. Wireless or Net based transfer could be used here as well but I'm lagging behind the times a little in that regard.
 

B for Backup

This is the step I think a lot of photographers over look but it may be the most important. At the same time (or very soon after) you transfer your images from the card or camera you should also make a backup copy (doing this automatically is best). At my office I have a Netgear Stora (a duplicate drive raid system) that is set to automatically backup everything from the local user drives on my network. So loading photos into my picture folder, for example, automatically creates two copies on the stora. When travelling I usually have a small USB backpack style hard drive and I manually copy any photos uploaded to it. Whilst I have gone from a single copy on my camera/SD cards to two copes on harddrives, travelling is a higher risk time for this style of storage, so just in case I carry a couple of empty USB keys in my camera bag to make sure I have additional backups of any "keepers". These backups copies are short term and can be cleaned out once the photo sets go into archive collections.


C for Collection

My Primary Copy/Collection, the long term access and storage location, the true archives, are updated regularly usually monthly, but sometimes after special trips or events. I have an permanently running external hard drive connected to my LAN and which contains a master PhotoARCH folder, this is shared between my all my computers, and under that folder are subfolders for each year, then subfolders for each month and finally sub folder for each day.  I have found archiving by date is the easiest way to organized my new digital photos. At the same time I update the archive I also make external copies to optical media (eg DVDs). In the past I made two copies of the DVDs and stored one off site. Recently I did some sums and it is now actually cheaper (a set of 50 DVDs for $24 means the long term cost of storage is around $0.11/MB whereas a 3TB drive for $120 means storage is $0.04/MB) to use a large external hard drive just loaded with your photos and sitting on the shelf, compared with the same storage sitting on DVDs taking up the whole shelf (3TB is equal to approximately 670 DVDs). So now I have two external drives for my archives, one on-line (just on my network) all the time and the other on my shelf. I still make a DVD set to store off-site each month.
If you are a fan of the 3-2-1 approach to backup you will notice that this system incorporates those principles (3 copies, two media and some physical separation between the copies.) I prefer to call it my A-B-C.


Friday, June 15, 2012

Useful Camera Bag Extras

IMG_4282 I am trying hard to keep the ancillary contents of my new Lowpro backpack to a minimum, to give extra room for cameras and lenses. Sounds easy but modern digital camera come with a range of extras, some vital others less so. This is a collection of things I always carry. Most importantly I have spare batteries. I also have a few spare SD cards, not a surprise. I have found keeping a small USB universal card reader very handy. I usually have two 4GB USB keys on hand, one blank the other has a number of photo oriented portable apps and utilities. which are great if the only computer around is a cyber cafe. One big hassle is always cables, you seldom need them but then they are always tangled. I found this mess bag with a zip is a great way to keep my contents tidy and generally tangle free. The other important item is a small portable backpack style hard drive, with a 500GB capacity to keep backups updated (each day). At the end of the month I archive from it and clean it up to start a fresh for the next month.

I have an HTC android phone, which has become not only a camera in its own right but also a very useful support accessory. In particular it is the GPS source when I wish to geotag my photos but it also has a number of useful photography oriented apps. It lives in my pocket.

Not shown is my laptop, which does live in the Lowpro backpack as well, and all the charges and power supplies which I don’t carry around in the backpack but fit in my case when I travel.

Sunday, April 17, 2011

My comfort 3 step travel dance

IMGP5723Sad smileI have again been suffering a bit of disobedience from my laptop, refusing to wake up. It has become terminally slow a waking up if it wakes at all. I assume it is a Vista thing. Something I’m not really stressed about, because it means I don’t have to check on email etc. However it does take me outside my comfort zone of taking photos and managing them as I travel. It would seem I have become very confortable with “the Picasa 3 step”, and without my laptop (and thus my version of my Picasa database) that dance is a little difficult.
I must admit I have been a bit skeptical of the elaborate digital photo workflows, generally originating from the USA. I suspect much of their origin lies in the complexity to understand photoshop and apple centric expectations (ie there are way too many mouse clicks man!). If you like those workflows use them but understanding what you want to do and doing that quickly and efficiently is the real aim. Still there is a lot to be said for being so familiar with the flow that it is a habit that lives in you comfort zone and does not feel like a chore.
SmileSo here is my comfort zone Picasa 3 steps, when travelling
1 Import imageinto Picasa. This is simplicity itself, I just slide in my SD card and get Picasa running, and then press the import button up at the top of the screen, or as I prefer the short cut keys <Ctrl><m>.

2 Weed & Star, I like to scan through my photos and look at them for the first time on a bigger screen (my laptop is not a “calibratimageed” screen but I am used to it). I usually star, or use the short cut keys <Ctrl><8>, any really good images as soon as I see them. I also get rid of the “total duds”, the unfocused, overexposed, the accidental photos of my feet, duplicates and the just straight “bad”. The short cut to delete forever is <Ctrl><Del>.There might be one of two marginally blurred or underexposed that I decide to keep but I am learning to more be brutal in the weeding.
I once upon a time used to do my “tagging” at this time but it can be too time consuming and hinders the like/dislike selection process. I also avoid doing a lot of image tweaking (exposure, white balance, colour saturation, red eye, cropping) because this also eats up time and diverts attention away from image selection/ranking and is better done on my larger desktop screen that is calibrated.
A really quick way to see an image full screen is to hover the mouse point over a thumbnail image, then with your other hand press and hold <Ctrl><Alt>. The image will instantly be full screen and releasing the <Ctrl><Alt> keys will restore the normal thumbnail display.
image3. Backup to my backpack disc. Sometimes I use the Picasa backup, it can be found under tools on the drop down menus, which has the advantage of Picasa then knowing what and what has not been backed up, but just copying the latest directories, via drag and drop out in windows, works just as well.
Open-mouthed smileWhilst on things Picasa, there is a pleasant surprise for Picasa Web Album users, Google have rejigged its quotas for free accounts, Photos less than 800x600 pixels and videos less than 15 minutes in duration no longer count towards your 1GB quota. As I deliberately keep my blog images small (It makes the blog display faster and also tiny images are a little less desirable for people to steal) I went from about 60% to 28% of my quota without having to do anything.

Friday, September 24, 2010

Getting serious about storage

I must admit I was struggling a bit setting up my new NAS (Network Accessible Storage Device) with RAID Capabilities. Primarily I needed it for my business as it provides shared data storage between several computers (and laptops), gives me FTP capabilities and at the same time gives me automatic disk mirroring  (everything is stored at least twice so if any single disk fails I always have a backup) Do I sound over cautious? No its the sort of thing any good IT department should have already set up for any business these days.

The Good

The Surprise for me came in the media capabilities of the hardware I had selected, a Netgear Stora. It is media collection savvy and plugs into your internet router, mine is also a Netgear router with wireless capabilities, via an ethernet cable. So it Is always there and sharable amongst anything you connect to your home network. Since this is the kind of router base networks most homes will already have if they use ADSL broadband access to the internet. The Stora could be a perfect home media server, for streaming video, recorded TV shows,& Music and sharing digital photo albums. If you have your TV connected via a Windows Media Center, you will be able to access stora extrasall the media on the Stora, direct to/from your TV screen! It also has a few nice net-side features (with good security) to share things back onto the internet, this is available as a premium connection service costing approx. $20/year.
I still prefer my western digital MyBook as a place to store (and managed) the archive of my growing digital photo collection. However the Stora really simplifies and automates my routine backup.

The Bad

imageMy only real criticism is that it came with very scant installation documentation (most of what was in the box was in chinesse). A lot of the useful documentation is supposed comes on the install disk and/or via the net. However my PDF viewer (adobe reader 9) just shows the part of the header you see above and nothing else! The red user manual link just refreshing that page!  So I was pretty much in the dark and the installation took more like 10 hours rather than the 12 minutes the quick guide suggested.  Following the instruction of the screen I just keep coming back the same point asking me to check three things (all done) and the only option was to try again, wait several minutes then get asked to check the same three things. BTW the magic, I discovered through frustration and not mentioned anywhere that i can see in the installation guides and manuals, was to reboot the computer after one install, then start the install again. I also eventually found a version of the Stora manual in a .pdf format I could download and read (link here). This is all unnecessary frustration rather than any serious short coming.

& The Ugly

storaLooking through the Stora User Forums there seems to be another really big catch 22 issues for home users. Even when they got the Stora installed and they can see the drive via its IP address but can not find out how to see it as mapped drive letter on their computer. This bit I did solve and it is easy.  It It is important to run the setup on each of your computers on your home network, and you need to run step 2, install Desktop Application, even though it is marked  [optional}. This installs the Stora Agent on your task bar which allows you to log into the stora and gives you three default drive letters (X: Y: & Z:) that act just like local hard disks.
Installation & Setup Instructions as a video
After I’d finished and everything was working I found this useful video on YouTube.
Protected by Copyscape DMCA Takedown Notice Search Tool

Thursday, June 03, 2010

Almost Origami

Shooting RAW images and using a higher megapixel camera, means I have ended up having a large and rapidly increasing collection of “backup” disks. Also I tend to buy the “Barrel of Disks” Barrel of disksstacked on the spindle variety (they are cheaper than the individually boxed version)

I have already discovered that using the spindle and drum as a storage is a big no no! The Disks are stacked one on each other and the recorded surface can become quickly scratched as the drum is repeatedly handled.

So I have lots of “precious” disks without a secure home. For a while I was using old floppy diskette envelopes. These envelopes worked just fine and are very compact to store in a common storage boxes (yes even shoe boxes). Example of my Origami Disk cover Page LayoutThen I got the idea of making my own origami envelopes. A google search will find 100s of origami folding designs for CD or DVD covers , including this amazing spiral one. However I have something much simpler and easy to do. First you need to get a blank page on your favourite word processor. Then using Tables or its draw tool, create a square box 12.5cm by 12.5cm. Align it horizontally in the center of the page but slightly below the center vertically. As long as the page is big enough it doesn’t matter if it is A4, 8” by 11.5” or quarto, it is the size of the square that matches the size of a CD/DVD that is important. You can type a label in the box and have fun with the wordprocessor’s features if you want. Print this. Then follow the pictures below. Fold along the vertical edges of your box first. Turn the sheet over and fold these two sides back on the the back. Then fold the lower flap ontop of this. Next slide in your CD or DVD and finally fold down the top flap. If you press down on you folds you do not need to stick or tape anything down. The envelope will hold its shape nicely, and it is nice and thin to store. If you wish to use recycled (previously printed) scrap paper it is very important to have a blank side for the inside of the envelope, to minimize ink contamination inside the envelope (this is particularly important if you are using laser printer or copier scrap). A final warning, not all copy papers, and especially recycled papers are acid free, which is required for long archival life of your precious photos.

Label both your DVD and the cover Fold Along the vertical edges of you box first Turn the page over and fold the flap back Fold up the bottom flap and slide in your DVD Flod back the top flap, and press down the edgesFinsihed DVD envelope ready to store

Thanks to my wife who took these photos of the process

Thursday, October 01, 2009

Backup Photos while you Travel

Modern digital cameras with their large megapixel size can be a hassle for travellers. Unlike a film camera, where you just buy more film as you go, and get them processed when you get home.With a digital camera what do you do when your memory card fills up?
Before I begin remember Backup, ensuring you have a second copy of image incase the original is deleted, is different to Archiving, achieving dependable long term storage of an image.
Buy more memory cards? Well they are getting almost as cheap as film, once you pay for its processing. For example a cheapest 4GB SD card I can find at the moment (in Australia) cost around $20. Many older camera can only take 1GB SD cards, which cost around $12. The table below will give you a rough guide to how many photos in jpeg format, fit on various card sizes given the camera's megapixel size.
Megapixel
128MB
256MB
512MB
1GB
2GB
4GB
2
134
268
552
1119
2245
4494
3
120
240
490
996
2000
4000
4
60
119
245
497
999
1998
5
48
95
195
395
800
1595
6
44
88
180
366
735
1471
7
39
78
161
327
657
1314
8
35
69
143
290
582
1164
10
26
53
109
221
444
887
12
20
40
83
169
339
678

Write CDs at the local photo booth. Most modern photo kiosks, especially in areas frequented by backpackers, offer a service to write a CD from files on your memory card. Often this is very cheap if you get a few photos printed. Rather than carry the CD around, why not post it to yourself (using a protective cardboard CD pouch).
Backpack drive, these are external disk drives, normally just temporarily connected to you computer(swapping between your home PC, laptop or notebook) via a USB connector. If you make sure this is relatively empty when you start you will have plenty of capacity for your trip.Today very large capacity 300 to 500GB are quiet affordable. It may be wise to invest a little more in a shock resistant model with its own travel case, as it will also be travelling with you.
USB Card Reader, even if you don't carry your own computer, having a suitable card reader will mean you could use the computers at a cyber cafe (but be warned not all of then will let you connect USB devices, sometimes they may charge you!) or those free library internet computers to transfer photos to your packback drive or even Skydrive.
A new type of Multi-media storage device for photographer is appearing, a kind of hybrid photo frame, card reader & backpack storage. At around $600 plus for 40GB at the moment, they are not cheap, eg. ten 4GB will SD cards be less than half the cost. Epsom seem to be leading this market in Australia.
Finally use Jpeg Format (rather than RAW) and consider shooting at a lower pixel size (if your camera allows this).

Page copy protected against web site content infringement by Copyscape

Thursday, October 04, 2007

SkyDrive arrives

sky driveThose traveling, or  multi-computer using types, may be interested in Sky Drive, a new beta release of an on-line storage system from the Microsoft Live project. Whilst the 500 MB of storage is modest, it is the ability to limit access through encryption, to private, share with your family or group or even share publicly to the world, that may appeal. If you have a Hotmail account or a Passport ID sign up and give it a try.  Multi-image sky/cloud panoramic
A 500 MB memory stick is cheap these days and may be better and more flexible way to backup of photos while traveling, yet it doesn't give you the ability to instantly share, with good control over who too, or give protection should you and/or your luggage have an accident, get damaged, stolen, any of a thousand mishaps. Remember the memory stick will be there with you or in your luggage, and probably suffer the same fate. Memory sticks are also notoriously easy to loose.
On-line storage systems give you an instance off-site backup, but if 500 MB is not big enough you could consider the formal on-line backup systems like Mozy (which offers 2GB free) or Carbonite ( with has a 15day free trial), both offer unlimited storage at reasonable monthly fees. However both require a piece of downloaded software to run on your computer, are easy to automate and probably require a decent broadband connection. Sky Drive on the other hand can be accessed from any cybercafe or "free" (and thus slow) wireless hotspot on an ad-hoc "need to use" basis.

Monday, July 02, 2007

How precious are your photos?


I like to backup my photos at the end of each month. when I first started taking photo that meant part filling a CD, now I have my new camera and three 1GB cards plus the 256MB card that came with it. That means I can take pretty much a whole DVD worth of photos at once, so now I usually have closer to a DVD, if not several just to backup one months photos.

Am I being paranoid?

NO being a geologist that takes his computer into the field, and wherever I travel, I know computer and hard drives are not the best place to store your precious digital photos. Sooner rather than later something will happened, maybe a disk crash, maybe a software hiccup, a virus or worm, your computer might be stolen or "someone" just accidentally deleting the whole directory, with a mouse click or two.

BUT
don't just make one copy make TWO and it is strongly recommended that you store one copy at a different location (it doesn't have to be a fire proof bank vault but it should be a secure location, ie maybe not in grandad's shed)

FINALLY there is a big difference between backups and archive

So I think I'll write a few blog post over this month explain all my backup strategies (learned from decades of experience in electronic data collection not just photography)