Showing posts with label portable. Show all posts

Thursday, October 29, 2015

Creative Spaces :: The Plein-air Sketching Kit

the joys of plein-air painting I enjoy painting and sketching outside. Very little of this work gets directly into exhibition pieces but that’s not really my purpose. I find I do remember more and connect with a place more strongly when I have spent a little time sketching.

Over time my “sketching bag” has evolved to include more paints (watercolours and water soluble media) and brushes. If I use pencils they will probably be really soft (eg 4B or 6B) but I have begun to use ink pens more often. I’ve become a real fan of Derwent’s Inktense blocks.  Whilst charcoal is good for the studio, it can’t stand the travel and rough handling so I have found conte is way better.

I currently have two identical smaller re-purposed shoulder carry bags (handout from a tour group) and have them fitted out with similar basics. One is just a little more slimmed down than the other. Things get used up and I make occasional changes of what I consider is essential, particularly the surfaces I am painting/drawing on.The contents of the "Fatter" Sketching Bag & Accompanments Sometime I just have a basic sketch book, other times I might want good quality watercolour paper (ie > 300gsm) I pretty well always have one packed and ready to go. At the moment I have only the one folio to carry better quality media (ie individual watercolour or pastel papers) it also holds a drawing board that can be attached to a camera tripod, (see my tripod easel post), This normally travels with the larger kit which is logical as it has more watercolour paints.

Yes all that stuff does fit in the dark blue bag! Easily!

Wednesday, October 28, 2015

CreativeSpaces :: What is a “fold out” studio?

fold out studioIt’s really nothing fancy, “”fold out” studio is just my name for a portable workspace (and specifically the equipment and media for it). I have had a fair bit of practise in creating such a “portable” studio. One of my favourite places to create is in a place down the coast, a couple of hours drive. To use it I must include all I want in the back of the car (space is generally limited) and I need to be able to hand carry the bits, thus weight has also been a consideration.

I think it is reasonable to assume anywhere that can make a functional studio space is likely to already have a table (or desk), chair (or stool), access to water & power. From the car boot experience I like to have everything fit in a canvas style duffle Contents of my "fold out" Studio Duffle Bagbag or a couple of smaller carry bags. Fitting it all in a duffle bag also means when necessary it can easily become standard luggage for flying (ok not much room left for clothes).  It also needs to fit in the bottom shelf of my studio cupboard.

What I expect to be able to do it is is sketch, paint and also take or process (lots of) photos. I also want to be able to use my basic tool kit of photo management and post processing software (ie I need a computer and preferably access to the internet). I also prefer music (usually jazz) when I’m creating (I have an old IPod nano but I find my phone does just as well and I usually have a selection of music on the Laptop as well). Earbuds/headphones so I don't annoy others

So what goes in the Duffle Bag?
  • Sketching gear, Optionally [Plein-air Sketching Kit, or Portable Sketching Desk]
  • Painting media pencils, watercolour [Pastels,Acrylic]
  • Brush Roll(s)
  • Surfaces, Sketch books, good watercolour paper, Small “test” canvases
  • Light Drawing Board (fits into base width of Duffle Bag)
  • Folding Easel
  • Empty Trays and Containers
  • Old Towels (as Padding, Cleanup &/or Drop Cloth)
  • Power Board (not shown)
Other Items Hand Carried.
  • Android Phone (LG 7L)
  • DSLR Camera (usually my Pentax K20D)
  • Laptop (Toshiba)
  • USB Backpack Harddrive (for backup, extra music)
  • WiFi Modem
  • Battery chargers

Sunday, July 20, 2014

On the Road with more than One Mistress

Hardware on the roadThis is undoubtedly the area where there has been the most coming and going, change and rethinking. For a long while I kept two separate laptops, one for my consulting work (originally what is now my studio laptop) and a another one (originally an XP, which is still running but seldom used) for my photographic work. I now have a newer laptop (well its 3 years old already).
Carrying two laptops when I travels was just a bit of a luxury, so I either got by using a small netbook and/or I put any specialist tools I needed on a USB Key using the portable apps format if it was a “work” trip. This actually sever me well enough but meant I had to leave the heavy lifting (detailed post processing stuff) until I got back home. The DARKROOM USB Portable Apps MenuMy main goto portable programs on this Darkroom USB key are RawTherapee, The Gimp and XnView. AutoStitch and Picturenaut also work perfectly well off my USB drive. This stuff has moved to a larger USB and the green lanyard has changed to a more heavy duty orange version but it still lives in my camera bag, along with a USB SD card reader. So if I didn’t have a laptop with me I could use the netbook or find a library or cyber cafe and I could review the Camera’s card contents at a larger size (providing the computer I was using had two USB ports) and I could perhaps process a stitched panorama, HDR or a RAW refinement, if time permitted I don’t use the Key to hold photos, except for perhaps some post processed image I just created. I had a test version of picasa on there for a while but it had to store its main directory on the PC so it wasn’t really portable, and this began the move to using XnView more extensively. I have recently put the portable version of chrome onto the key as well. There are a number of times when this simple USB key proved invaluable letting me perform something that would have been impossible on the average airline lounge or cyber cafe grunt computer.
The many Many mistress on ICESlowly different software began appearing and disappearing of my main laptop (mainly to better handle RAW files). Usually for a specific reason, like I need to edit diagrams and photos for my consulting work. Since this laptop is 64 bit I did start to notice some of the performance improvements, particularly in processing video and lesser but still noticeable improvements in lightroom (development functions particularly). The OnOne’s Perfect Photo suite are 64 bit so this laptop was the best place to set it up and it plays very nicely with lightroom. Whilst perfect photo isn’t really a RAW development system per se, its browser can read my RAW files. However the combination of lightroom (to do the basic RAW refinement steps), followed with a round trip into one of the Perfect Photo add-ins, suits me and gets the job done. I always put picasa on any computer and it looks after my Jpeg work fine, it is still my favoured way to upload photos from my camera.  I have found that AfterShot Pro is also great in this inital photo review, rating and culling process.
The only hassle I am finding is the space used having this software on the computer is not an issue, but it is the space eaten by the photos if I leave them on this laptop too long. Saving RAW+Jpeg consumes disk space rapidly! There are also some limitation and cautions about moving processed photos around a network, but that will have to be another post.

Friday, June 15, 2012

Useful Camera Bag Extras

IMG_4282 I am trying hard to keep the ancillary contents of my new Lowpro backpack to a minimum, to give extra room for cameras and lenses. Sounds easy but modern digital camera come with a range of extras, some vital others less so. This is a collection of things I always carry. Most importantly I have spare batteries. I also have a few spare SD cards, not a surprise. I have found keeping a small USB universal card reader very handy. I usually have two 4GB USB keys on hand, one blank the other has a number of photo oriented portable apps and utilities. which are great if the only computer around is a cyber cafe. One big hassle is always cables, you seldom need them but then they are always tangled. I found this mess bag with a zip is a great way to keep my contents tidy and generally tangle free. The other important item is a small portable backpack style hard drive, with a 500GB capacity to keep backups updated (each day). At the end of the month I archive from it and clean it up to start a fresh for the next month.

I have an HTC android phone, which has become not only a camera in its own right but also a very useful support accessory. In particular it is the GPS source when I wish to geotag my photos but it also has a number of useful photography oriented apps. It lives in my pocket.

Not shown is my laptop, which does live in the Lowpro backpack as well, and all the charges and power supplies which I don’t carry around in the backpack but fit in my case when I travel.

Tuesday, October 11, 2011

Towards a light portable (watercolour) easel

Whilst this is not exactly a photographic topic, I am using my camera tripod(s). I have made an easel attachment for a tripod before, alas it is a heavy thing  The simple tilted table design of David Hurrell inspired me to revisit the idea of have my drawing board being able to attach to my camera tripod. I actually have two, one is lighter weight and fits in my case when travelling, and is small enough to carry all day. The second is heavier and sturdier and tends to live closer to home or my car, but is a really great tripod, with movie style damped panning.

Easel Mark I
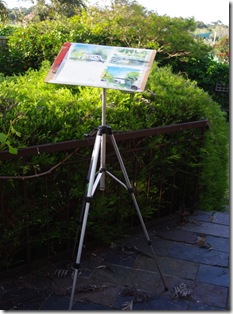
IMGP8933This is simply a copy of David’s idea. All you need is a suitable sized nut, that fits your tripod adaptors screw. The nut I used cost just 6 cents. I glued this onto the back of a piece of 3mm thick craft wood that I use as a portable drawing board. Voila! Instant easel.

I soon discovered I need a couple of craft wood pads (also 3mm and slightly thicker that the bolt) also glued on beside the nut to let me firmly attach the adaptor to the board. Without these on the board tended to slew a round a little not matter how tight I screwed it down. Also most such adaptors have a small spring loaded pin below the screw thread. So I drilled a small hole to match this location on my lower pad. (Both my tripods have small detachable adaptors that screw onto your camera then there is a quick release mechanism that attaches this to the tripod head)

The result is great I now have a light weight easel that is easy to carry and quick to set up

IMGP8931 IMGP8934

Easel Mark II

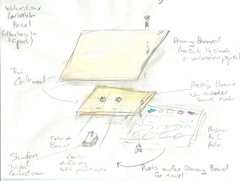
scan0002 The next step was dreaming of a way to attached my palette and dipping water jar on the side. I even got as far as sketching up a a “super” drawing board with and old paint palette pivoted underneath, so it could swing out as you painted. Unfortunately I spotted one serious design flaw before I tried to make it.  I had made up a wider drawing board I sometimes used on windy days which held both my sketch book and portable paint palette with normal bulldog clips. The problem I had with this was gravity, as I IMGP8928tilted the board  I ran the risk of any liquid in the paint palette running out (and potentially across my painting). This was  relatively easily fixed on my handheld board by using the hinged nature of the portable palette and putting a bit blob of blu-tack under the lower palette tray to keep it roughly horizontal and just doing my wash mixes in this lower tray.
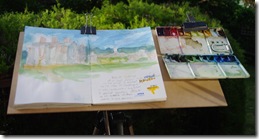
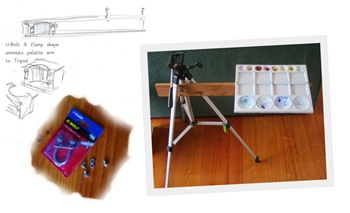
The solution really requires the palette (and anything else) to bePortable Easle independent of the drawing/painting surface. realising that meant I look for an independent way to attach these to the tripod, Most tripods that can have their heads raise and lowered have a crank mechanism that runs inside a tube at the top of the tripod. A small U-bolt (normally sold as a way to attach things like TV antenna to a pipe, or as a method to secure off a loop in wire rope) can easily be used here to attach a simple arm on which the palette can be mounted. My prototype used a spare bit of wood that in retrospect is a little heavy. However the new multi-function easel works like a charm. By the way the U-bolt at approx $4.00 is a little more expensive than the nut.
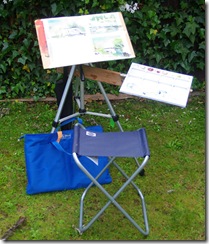
IMGP8944 So where to now.? I think the next obvious improvement is to make the arm out of extruded aluminium, making sure that it also fits with my tripod carry bag. Also I will change the conventional nuts to wing nuts (which are much easier to tighter by hand).

On my prototype i have already found a conventional picture hook is a great way to attached a small jar of water (not shown) and a Velcro hooks strip on the arm and corresponding Velcro loop dots on small containers, is a neat flexible way to hold other small jars or containers within easy reach.

I also have a small folding stool that is easy to attach to my camera/art backpack. So Everything is nicely portable and a delight to use.