Thursday, March 26, 2020

Indoor #photoassignment :: Chasing a Rainbow of colours


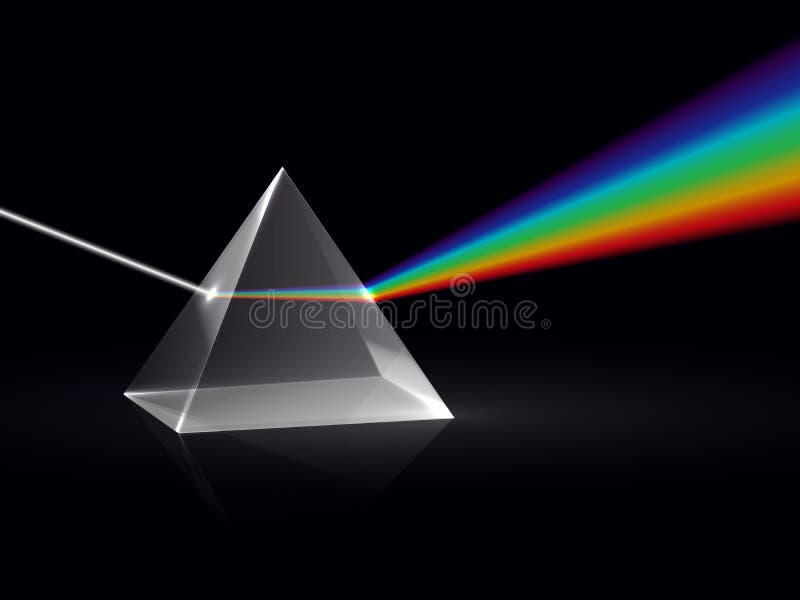
This is a week-long assignment for those confined inside (ie roughly half your self-isolation period). Issac Newton suggested there were seven colours in the spectrum/rainbow of colours he could split daylight into using a glass prism.

They are Red, Orange, Yellow, Green, Blue (a lighter blue a bit closer to cyan) Indigo (a darker blue) & VioletEach day select one colour and find a place or object around your home that is full of that colour. (Hint you might be doing a lot of close ups). The colour need not be vivid it could be a paler or pastel shade it just needs to convey the essence of that colour.

A  lot of modern renditions of the rainbow only show 6 colours. Which colour have they left out?

If you don't have a glass prism handy and want to show the kids how light can be broken into a rainbow of colours. Find an old  CD, DVD or BluRay disk and look at the underside, it has a defraction grating built in which acts like the prism for the laser reading the disk. You will see at least two strong rainbow lines radiating from the center.  The number of line you see will depend on the number of strong light sources in the room. Again how many colour can you see?

Wednesday, March 25, 2020

Hmm Don't Do It


Our Prime Minister warned about panic buying/stockpiling, and his message was simple "Don't Do It".
I hope I'm not involved in the lead up to the lastest COVID19 delays. A number of on-line photo finishing services have sent emails explaining they are overwhelmed with orders and will have some difficulty providing everything within their normal turn around. So firstly I must thank them for a bit of advanced notice in these uncertain times.

So if you are doing as I suggested on Sunday and taking photos to put on some form of on-line photo service product, be patient. I'm sure  they will keep their doors open as long as they can comply to local restrictions (and we all know these can change from day to day.)

Secondly, I would avoid any overseas services, with the tightening of borders everywhere, the chance of product being caught in limbo is high. So if you are in Australian look to PhotoBook Australia, Snapfish as decent places to start (BUT check both companies source some specialist products from overseas) many local stores also offer either in-house or local fast turn arounds on photo printing and some special products, eg Ted's Camera, Harvey Norman, Office works, Big W and Kmart. There are possibly other obvious places I've overlooked and most offer on-line uploads but may required prepayment and/or store pickup, again check (shopping centers are open now but again could be closed at short notice)

I had thought of putting links to these companies websites but they will be so easy to find I encourage you to do that yourself, also look for special offers or deals, they might save you some cash, and in these times that's a good thing.

Tuesday, March 24, 2020

Making a Photo Essay


This idea really comes from Brookes Jessen (his Lenswork publications and podcasts are worth a listen) as different ways develop to share and show your photographs. Also you can probably get more interest from others when there is a story or common theme that links things together.

My current photo essay project
 is "Underfoot"
 So what is a photo essay? I'm not the arbiter of the term but what I am going to discuss is a collection of photos that tell a story or theme (in a visual way). It can be produced as a series of prints, a short small book, a slide show or better still a downloadable PDF for sharing via email or the web. This is an ideal photo project to undertake while you are in a period social distancing, quarantine or lockdown

What do you have to do to create a Photo Essay
  1. Think of a theme and plan out some photo ideas (you can change your mind as you progress).
  2. Take the photos (a smartphone is fine, I'll be using a small mirrorless camera, but compact cameras and DSLRs will be just as good)
  3. Organize and select those that best tell the story or represent the subject. (this might be a gallery app on the photo, built-in photo software on a PC or mac or up to a specialist digital photo package)
  4. Use Software or an App that lets to arrange the photos, and publish them (into a common distributable format eg. PDF, slide show or video)

Simple really.

As an example have a look at a couple of my recent photo essays. I've used Photo Mechanic & On1 to manage and edit my photos and the app Canva to format and export the PDF. I'll be posting a bit more on the last two points in the next days and weeks

Monday, March 23, 2020

Indoor #photoassignment :: Chasing Light


This assignment may suit if your social isolation or quarantine means you are confined to home. Keep your camera or smartphone handy and check out the light and/or atmosphere around the home. Find a place and time you like best. You will probably have to take a few images. Later in the day or after dinner sit down and choose just one photo.

You are allowed to come back tomorrow at roughly the same time and "stage" a second attempt (eg remove distractions. closer crop etc).

Sunday, March 22, 2020

Small #PhotoAssignment :: Making A T-shirt


I decided my today's photo assignment would be to make a tshirt (or in more general terms it could be any photo product, mug, calendars, mousemat, phone covers, tote bag... etc  that are available through any on-line service). I have a redbubble account and they do good stuff including tshirts (possibly a little on the pricy side).

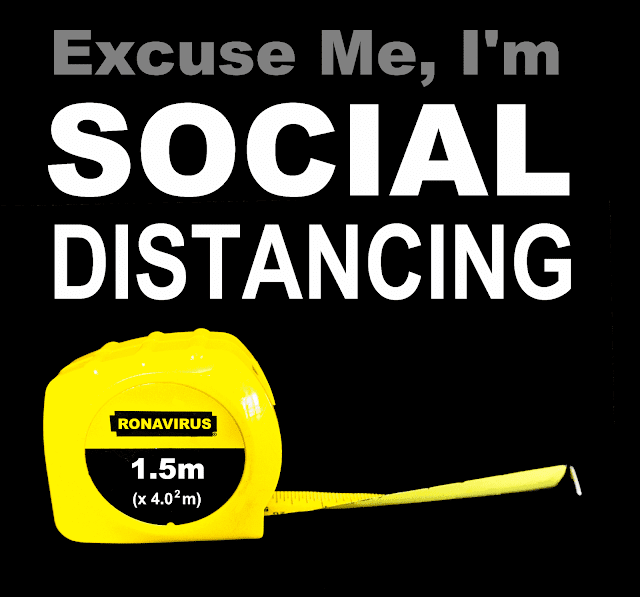
Anyway at 9:30am I mapped out a rough idea and took a couple of photos of a tape measure against my black coat. My idea was based on the Australian Government have issued clear guidelines as to what social distancing means (1.5m away from others and indoors each person requires 4 square meters of space). Very succinct and clear. So a few words and changing the text on the tape measure was all I needed to do.


I'm at my beach place and only have my little HP spectre which only has photography software loaded so I had to use ON1 and Paint,net to do the more computer graphics parts, which they did well.

Then it was onto my mobile modem and uploading to the redbubble website and choosing the items I think it might be suitable to print on. It was up and publically available by 11:30am.

Moral of the story :: It was a fun way to exercise my creativity for a couple of hours. So todays photo assignment is for you to make a photo product that someone in your family or friend might appreciate and get it created by an on-line service.

Also you can buy theTshirt if you like.

Saturday, March 21, 2020

Underfoot


I started my first photo essay project of the pandemic social distance phase following my own suggestion Yesterday. I'm collecting photos looking down at what underfoot when I'm out walking with my camera.


Of course, I am taking other photos as well but over this coming week, for now I'm just taking photos and keeping them in a separate album. At this stage its probably advisable to not cull anything until you have a clear idea of what you are expecting to capture. Being able to compare a variety of images (even some less than perfect ones) should help you on your way to a much more personally satisfying project.


Friday, March 20, 2020

Stay Healthy and Keep Fit


I'm starting my photo journey
 at the front door
Forget toilet paper and food in packets, concentrate on fresh food, fruit vegetables, and good quality protein. Eat well (prepared at home) and exercise. If you can get out take your camera out in the fresh air (it's getting less polluted by the day) but stay away from crowds. Not everyone has access to a large open parkland like me but just walking around the block or down to the local shops (high street) is exercise.  It is also a great opportunity to take photos. Start with snapshot to the path you take (perhaps looking down at the path) and key landmarks along the way. When you get home wash your hands with soap and water and give your camera a wipe down with a microfiber cloth (don’t use a spray or sanitizer on your camera, just wash the cloth after use) then put the camera away.

No need to show anyone the photos, but later that day or night review them and think what could I have done to get a better picture (Hint most often it will be to do with composition and framing, then perhaps tonal balance). Sharing your photos can come soon enough, but treat your first day as practice.

This mission is inspired by Rich Salmon’s recent book “Photo Therapy Motivation and Wisdom” here is the advice he offers on this topic given before the COVID-19  crisis.

“Exercise as much as you can and try to eat smart. The healthier you are, the better you feel and the more energy you will have when you are out photographing. Download a fitness tracker or utilize the step counter on your smartphone. Also, cut back on the carbs.”

Thursday, March 19, 2020

Coping with Social Isolation

Social distancing doesn’t mean you should stop photography.

In fact taking a little time for photography each day could be really good for your health (Body, Mind and especially Soul). Thus I have started this little series of blog post that has ideas for mini photo assignments while Self Isolating. Today's assignment will suit you if you're totally locked down or in quarantine.

The COVID-10 pandemic is set to become a very significant world event and remembering what you and your family had to do will undoubtedly become one of the more significant events in your lifetime. So it is a perfect time to start your view of what is happening as a visual record of those little things happening in your daily life. They could be the same as usual or new, that particular way you have had to adapt.

Don’t go overboard and photograph everything and post it to social media. Take a much more contemplative view.  Have the camera ready at a location you can find quickly and take a photo easily or alternative always be ready with the camera on your smartphone. If you are finally sitting down and enjoying a coffee consider getting up and photographing the cup your favourite chair the sun streaming through the window even the time. What about the family playing cards (even if they are not all enjoying it try to capture that). Aim for 5 or fewer pictures each day but make the effort to put them aside into an album that gradually grows. Look to include those little moments of joy and frustration as well as the daily grind.  When the lockdown or quarantine is over make a slide show for the TV, or a photo essay to print or even consider making a book of your lockdown to show your grandkids.

Today I'm blogging.


"what I'm doing right now," was the original catchphrase for twitter, and sounds relevant for today. Unfortunately, twitter, in particular, has fallen to a very untrustworthy common denominator now in a race to the fake news bottom. So stay away from social media just concentrate on creating memories for your future self and family

AN IMPORTANT CHANGE OF MIND ON USING SOCIAL MEDIA


In the last paragraph I wrote yesterday I implied it was best to stay off social media and I still think that might be a good way to avoid the mass hysteria and misinformation. However social media is a good way to stay connected to your friends and family while in isolation. So Yes definitely use social media BUT be safe there as well be careful who you trust and avoid passing on unsubstantiated rumors if you can. I still suggest not posting every photo you take, just yet.

Tuesday, March 17, 2020

Social Isolation and the Photowalker

The cancellation or postponement of large Photowalks need not be an end to your photography, in fact, social distancing and working from home could give you the opportunity to practice more. Firstly allocate some time each day, it could be a short art 15-30 minutes. Now go for a walk with your camera. It might take a refocusing of your mindset, thinking more locally even around the home or garden. If your town isn’t totally shut down and your feeling well take the opportunity to get outside.

I’m lucky I live close to a large natural park in the middle of suburbia and I walk in there two or three times a week, there is always something to photograph. See my Year in Jells Park album on Flickr. It need not be a park, it could be local road signs, letterboxes or interesting street trees. Your imagination can be let free, with a digital camera there is little penalty if you decide to throw everything away and start again. The key is to really look around before you take the picture, so you are not taking the obvious snapshots but photographs that interest you.

If you’re in a total lock-down or confided to a 14 day self-quarantine, or suffering Flu like symptoms and need to self isolate, look for favourite spots in your home or garden, places that catch a special light. Start looking I’m sure you will find them. 

Perhaps do a series on your favourite chair.


Friday, March 06, 2020

The Risks of more Megapixel, pin sharp fast Lenses and Pixel-peeping

The Risk of more megapixel, pin sharp fast lenses and pixel peeping is producing boring photo, putting pressure on storage, taking longer to process and not forgetting more expensive gear to start.

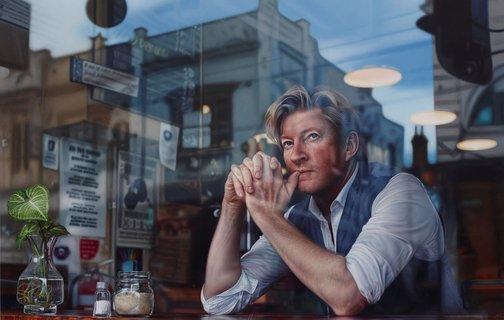
Photorealist painting from last years Archibal Prize

It is the same as for Photorealistic paintings, the work is technically outstanding but the Images soon become boring. Often very boring. Frequently the brilliant technical specs get overlook because their is nothing for the viewer to work out and keep their interest. In the art world there is a nice example in last year Archibald prize. The technically well executed and large Hyperrealist painting of David Wenham by Tessa MacKay was pretty much overlooked by the judges. Yet it was popular with the public and won the packing room prize, which is judged by the gallery staff who receive, unpack and hang the entries. In this case the artist has looked at a strong composition of building over the road seen through the glass window and painted reflections of the interior. So there is a fair bit to see but once you notice the detail becomes tedious and it back to being boring

Getting back to photographs, whilst other “purist” photobuffs, you tube watchers and owners of the latest and greatest cameras will enthusiatically discuss bokeh and edge to edge crispness. The average public viewer will look instead at the subject perhaps to composition and/or colour and perhaps interesting patterns or textures then they will move on. Capturing their gaze to look a little longer which usually depend on print size and viewing distance. Further weather you can interest them at that scale

Viewing distance and print size.

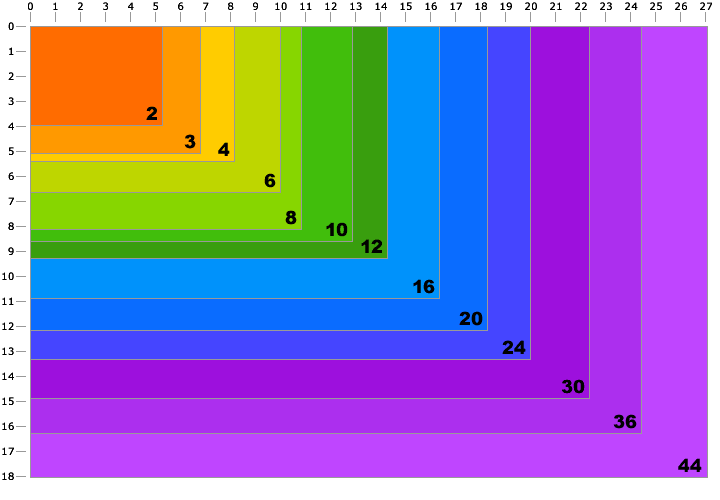
I have written about this previously, and that is a good summary. The issue here is you must concern yourself with the viewers eyesight media for display and type of illumination, print sharpness usually isn’t a real consideration.  There is also a lot written about this on the internet and a lot of it is only partially truthful and/or bias. The chart on the left show the relationship between common sizes (in Inches BTW) and the megapixel count of the image and assumes that you will want to print at 300 ppi (pixels per inch).  Each coloured rectangle then has the number of megapixels required for a given size. You will probably be surprised how few megapixels are required for common sizes. So what happens to all the extra detail capture on a full frame/high megapixel camera? Well they just get averaged together and that detail disappears

Capturing the Viewers attention

  1. On instagram/Facebook were images are displayed on small screens and this is potentially the place you can show your work to the potentially greatest number of people. Both Instagram and Facebook now use algorithmic methods to display your post, and they may very well limit the display to 20 cases and stop there if no one interacts with you post/picture. Thus if you are looking to become famous for your photographs you need to be already famous (ie have a lot of friends that follow and interact with you).  The images displayed  are tiny (and thus not detailed) and are normally held close. Unfortunately the viewer also has the ability to scroll through the images quickly. You might only have half to a couple of seconds to get them to stop and take a long look. This favours bold composition, strong colours and tones. #hashtags and clever titles.
  2. #72/365 My $10 PhotobookSmall prints. Portfolios and Photobook, larger Ipads and Tablets  have and arms length or less view distance and because they can be picked up and handled  they are likely to get the closest scrutiny. Thus they do need the required level of detail (eg 8 megatpixel for  10” by 8”). They should be designed the allow the viewer an extended period to inspect (this might include captions and perhaps a short paragraph of so to provide context.) They are likely to be the very best way to get anyone interested in your photography, having the massive advantage of social media sites on small screens in that they are something tangible and physical.
  3. On a wall (could be in a gallery or your home). This is the reason usually give for large sensors and High megapixel counts, it in theory allows for big prints (often gigantic) but this is probably the most challenging way to promote your work. Firstly large prints can be expensive to create and frame and it is likely to have the smallest number of viewers. Further the potential buyer is likely to consider these larger image as a décor items not art (ie does it make the couch)?

Friday, December 13, 2019

Chasing likes on an algorithm can be the enemy of innovation & creativity.

Today I found a blog post by Dave Morrow "Why Your Photography Business Will Fail & How to Succeed"

The beginning of the article gave me important extra insight into something that has been bothering me for a while now. It nicely summarizes the idea that Big is Power, it follows social media viral hype, looks for short term gain and elevates those with millions of followers, likes, clicks, and shares. Unfortunately this "Big is the goal of the masses. It's their undefined version of success" (I'm quoting Dave) When you add this to an algorithm that focuses on severing up things that might keep you on the screen a little longer you get lost in a bubble of wanna-be celebrity and replicants, things may get to look glossy but artificial (they probably are) and endlessly much the same (eg. @insta_repeat)

Yet the internet and social media should in theory offer the opportunity for the innovators and creatives to show their work to many others. Moreover the capability of desktop computers and even smart phones with apps that link directly to social media sites enable distribution of work in a single click. A creative should be free to experiment and post anything they like.

Why doesn't this happened? It just like shouting into the wind, the original and creative messages usually gets lost and quickly blows way.

There are ways to overcome this and Dave suggest the answer lies in thinking and acting Small. I must agree. Small lets a creative person target works they care about, experiment, become proficient in the craft required to create their work. They should also look to find other like-minded people (through on-line groups, perhaps blogs, #hashtags or even You Tube or Instagram) and correspond with those similar souls through comments, DMs and personal emails. Establishing trust here is all important. Finding an audience that appreciate the originality and creativity is as important as the work itself.

"The creator’s only cost is time, hard work, and a long term belief in their own ideas." (quoting Dave again)

Saturday, December 07, 2019

2:1 :: a Second Photo Essay

2:1 is an aspect ratio which I like, but others seem not to like or even consider.

It not in the standard list of photo output sizes of popular photo editing software, few camera can take it in a single image (without multi-image stitching and or cropping) and its not displayed well in most social media sites.

Yet this format is pleasing to me, it looks normal. We have two eyes after all.

My search for creative expression that is not beholding to the Online Aesthetics of Social media continues…

Visit my photo essay page

Thursday, September 12, 2019

Freedom to be Creative

Social media bring lots of benefits as well as many problems. The thing i have noticed, I actually saw this coming it long ago, is that the restrictive ways photos and posts must be formatted and submitted, definitely limits and fences in creative expression. First we could blame the way the popularity is scored, should I rather say celebrity-like biased feeding frenzy. And don’t get me started on the very biased algorithmic display bubbles. The Online – Social Media Aesthetics we see today suck.

So what to do about it?


Should we #TURNOFFSOCIALMEDIA, we can and in the short term that can be a big relief (unless your hooked). However it means that you end up in a much smaller isolation bubble, aka you cause yourself to be largely overlook. Some presence at least seems to be expected of us these days, for example you might hear “He doesn’t have an Instagram account he can’t possibly be a real photographer", which of course is rubbish.

Even this blog, and blogging in general have become overly constrained by restrictive SEO scores download speeds and bounce rates. Whereas I feel it should be accuracy, reliability of information and ideas, inspiration and originality that should be rewarded instead in is popularity! Enough of the rant. Back to what is worth embracing and why. The big plus of sharing things on the internet is extending your exposure. In theory that should happen if what you share is good and/or informative.


I was getting particularly frustrated on the restrictions and difficulties of posting several pictures using Blogspots web based post tool. (I missed the ease and flexibility of Open Live Writer, but that can no longer upload photos, #FAIL most likely due to google photo changes). So after listening to Brooks Jensen’s Online Aesthetics podcast I decided that making an occasional PDF would be firstly easier to create (using anything, word, Canva etc) and also easy to share. So I have started with a photo essay of the murals in Townsville.

So I began with a simple page for an Instagram story, and guess what you need to format the image as a thin vertical. Whereas  I do a lot of #3by1grid, where I subdivide panoramic images into three square images. Most people wouldn’t realise this since you need to look at my Instagram profile to make sense of these grids. So only a few people in the know will realise what I am doing here. Anyway my Instagram story did get about 25 views.

Thus the search for creative expression that is not beholding to the Online Aesthetics of Social media continues…

Saturday, August 24, 2019

Almost a Digital Nomad

Whilst I used to travel a lot and may have been a digital nomad before the term was invent, i’m not really one anymore yet I still want to be able to edit and manage my photos anywhere I happen to be. HoweverI need a bit more power than smartphones and social media offer. I have a HP Spectre, a 2 in 1 style tablet/laptop and whilst I have travel with it many time before. This trip as first time it was my only computing option. It worked wonderfully.

#234/365 paying homage to my IT team while travelling

I also limited the accessories I carried. Two identical backpack style hard drives for backups (rotated weekly) a wacom bambo stylus/pen. usb c to usb A and hdmi dongles, hdmi cable anf a wireless mouse and  usb c charger (not shown)/ The real magic is in the software, although I have lightroom installed I didn’t touch it once. I mainly used picasa to load my photo from an old SD card reader and Photo Mechanic to quickly review rate,cull and add metadata. I then select my best and dragged those on PhotoLemur (an AI based automated postprocessor from Skylum).This was usually time for a coffee, shower &/or get ready for dinner and generally only 5 minutes after inserting the SD card.

I only use Photo;emur to show what might be possible, although I did find often that I would use photolemur Jpeg as the image to upload to instagram and very occasionally flickr. Usually then I would use either On1 Photoraw (for stitched Panoramas) and Aurora HDR (for Bracketed HDR) and either to postprocess RAW files. If the place I was staying had a suit Big Screen TV with HDMI Port I was able to review and edit my photo larger, easier on my old eyes. I had downloaded a trial version of Skylum 3 but stop using it after 2 days because I was only playing and it didn’t offer me any capability I didn’t already have.

Of course I was dependant of WIfI being available to access the internet and sometimes that wifi was a biyt unreliable. I would say I wasn’t totally committed but I did manage to post a photo a day to flickr for my 365 project and keep Instagram clicking over. I was very happy with this very light weight yet powerful IT team in my backpack.

My (Repaired) Camera Bag

I have my much loved ThinkTank Mirroless Mover camera bag back in service (with a repaired zip). It is perfect for my little OMD 10 mkiii Olympus mirroless camera plus two extra  lenses. (I also acquired a forth lens along the way which also fitted in easily). It was never overcrowded and very light compared with carrying my older Pentax DSLR and just one lens.

#218/365 Whats in My Camera Bag

The big bonus for me is I have enough room to carry an A3 sketch book (or two) and also my mini Cotman sketchers palette and a couple of pens and water brushes giving me the ability to sketch anytime I was out with my camera, which was always. Even if I just sat down for a coffee or waiting for a lunch order, I could sketch.

As I was only carrying one camera body I made sure I had my smartphone and the old but reliable pink FujiPix compact camera as backups (not required). Again I can report that I used everything I took (see my Flickr posts)

The small tripod is really small and just ok for my light Olympus, importantly it fits in my suitcase, as does the various chargers and cables on the pink microfiber cloth. I didn’t normally carry them around.

My slimmed down Art Kit

I thought I should recommence semi-regular blogging with a couple of short posts about the creative tools I took on my recent travels. Traveling out of a suitcase does put a big restriction on what you can reasonably include. Further on other trips I have carried items I never used.

#217/365 My Plein Air & Travel Art Kit

This time I wanted everything to fit into the little red Pocket Backpack (it looks like a soft purse but expands out in a simple backpack. I had considered long and hard and decided to take a very sketch oriented set of tools (two palettes of watercolours, inktense blocks and pencils my watercolour brush roll, a roll of sketching pens & pencils and a variety of papers) and a small drawing board (see if you can find it). Whilst travelling on planes this fitted nicely at the base of my case but the rest of the trip was always on hand in the red backpack. I actually had a small extra sketch kit in my camera bag but that can wait till the next post.

I can report back that I used  all of it as some time and because everything as always at hand I used it often. You can see some of my work over at @normhansonart on instagram.

Thursday, August 22, 2019

Hmmmm no post for a month or so …

Some Apology is necessary for me missing so many opportunities to post but I was frankly very frustrated about Open Live Writer no longer letting me post photos (its more probably a Google photo issue). You have to admit posting photos is important in a principally photographic blog. Then I also had the hassle of yet another Microsoft Windows 10 update not really working and the bits that did work cause me havoc on my LAN. Plus a couple of hardware problems. Blogging became a very low priority.

Anyway I’m back refreshed from a trip up north (see @normhansonphoto instagram posts) and patching things together again. Rather than trying to frustrate myself more I might restart slowly with less photo intense posts.

PS thanks for sticking around

Tuesday, June 18, 2019

A Hybrid Approach 2 :: More Standalone HDR

More than anything else it was the need to run Standlone HDR applications, hat forced me not to let one piece of software (AKA lightroom) control what I was doing and how I was doing it. I have been interested in extending the dynamic range that Digital Cameras capture for a long time and had used many early HDR tools that used jpeg files (and got reasonable results). A lot of these tools let users go over the top, with luminous lurid colour and crunchy tones in the sky, as examples. HDR became synonymous with unconstrained over processing and even despised by many self-appointed photo purists. In some case I would agree but I wasn’t scared away and with the widespread development of RAW editing tools many of the tone mapping techniques where incorporated in the tonal adjustments of the RAW photos (which has in general more information on which to establish the best tonal range). The role of HDR and tonemapping has become more subdued and now offers the possibility to easy lift a digital photo to something like you rembered the light when you took the photo. Rather than the hazy, greyish image you loaded from the card. The extreme HDR effects are dying out, well except for Instagram where “funky” colours might still get you extra followers and real estate where evening photos will all the lights on and a wet path and strong colours still helps sell properties

My Current Skylum ToolsOne of the best known champions of tone mapping is Trey Ratcliff, of Stuck in Customs blog and a couple of years ago he got together with the Mac Phub team (now skylum) and bought together the essential and the best tools to build HDR images and bought out the program Aurora HDR. I was a bit late adopting it but I now have the latest edition Aurora HDR 2019 and I love it. You guessed it its another Standalone Program. Well it can also be setup as an addin. In my view it iss easier to use standalone, similar to the NIK software utilities I have the program icon on my desktop and then just drop the images in my HDR EV Bracketed set onto that icon. You then get the Merge setup dialogue screen, where it is possible to control the amount of antighosting, chromatic aberration and aligning the photos with the set.

The latest version of aurora incorporated AI feature in its new Quantaum HDR engine, that pre-processes a number of refinements steps including object recognition. This takes a little while and again not so long you need to go and make a coffee. You will them arrive at the fairly convenrtial main edit screen with some key viewing controls along the top, with a set of edit tool on the left hand side (which can be easily hidden and/or expanded) and a set of “looks” tiled as thumbnails along the bottom. Looks in aurora are like presets in other software that nicely combine several of the tools. In this case I am quite happy to just accept the default adjustments and tone mapping. I am only left to export the HDR file.

If I am intending to do any further edits of make a large print I save the HDR in Tiff format full size, if I’m posting of flickr or social media it will be a Jpeg of reduced size (eg 2400 on the longest side).

Aurora is currently my go-to HDR favourite.

Thursday, June 13, 2019

A Hybrid Approach 1 :: Where to Start?

I’ve decided to try and describe my hybrid approach to using a range of photographic software tools (aka my photographic mistresses). It really began long ago when everyone had lightroom and it was in charge of everything. I was interested in HDR and had to use other software to pull the EV bracketed sets together. One of the first tools to let me use RAW files directly from within lightroom was NIK software. Google had purchased the system and for a short time offered it for free downloads, still as an add in for Lightroom. I actually found all the tools very useful but it was HDR EFex Pro that I used most. As I was slowly moving away from using lightroom I started missing my access to the NIK tools, generally finding alternatives in other software. I even researched trying to use NIK tools as an Add-in for OnOne. Then a few week ago I saw a YouTube video by Robin Whalley of Lenscraft that mentioned using the NIK programs stand alone. Turns out it pretty easy, you just need to create a shortcut  link\icon on your screen to each program within the NIK collection, then just drop the photo (or photos in a HDR set) onto the icon. Suddenly I have the NIK tools back to use when I need them.

So onto the task of straight forward HDR. This begins by selecting the 5 photos of my EV bracketed set and dropping them onto the shortcut link. This bring up a dialogue to work on a copy or the original and after that the main setup dilogue screen, where options such as alignment, ghost removal and fixing chromatic aberration (those purple and green outlines at high contrast edges) can be manipulated. Also the opportunity to choose which is the reference exposure. Next chick Create HDR and this begins the series of processes to combine the exposures according to your setup. It takes a little time but not enough to justify going to make a coffee.

In a familar NIK software style you then get a basic processed photo to view but with a series of tools, icon and sliders on the right to further enhance the image, OR a series of tiles on the right hand side showing various presets to further stylize your photos. In this case I’m happy to just accept the default HDR result and click on save. I have the option to save the result as a Tiff or  jpeg (other formats don’t interest me) and where I would like it stored.  Job done in less time!

Its exactly the same as if I submitted the selected photos in lightroom to the HDR Efex plug-in, via a special export process but quicker and without the hassle of reloading the result back into lightroom. Same result in less time and no need to fire up and wait, and wait… and wait… for lightroom.

Monday, June 10, 2019

Alvin returns as my photographic Life coach


Its more than a year since I sort out my cartoon ultra-ego., Alvin, as a personal trainer to help me reduce my mucking around in photo editing software and social media. Potentially avoid wasting a lot of time.


So how did I do? Social media is definitely cutback (largely because of frustrations rather than conscious effort). My attempts to reduce my burgeoning harem of photographic software mistresses hasn't gone so well. What I have found is a hybrid solution of using the tools that are best suited my projects at the time was far more satisfactory than trying to adopt a strict workflow and a single software application. Having a range of tools suits my creativity, providing I know how to use them, then I don't have too!

PS I seldom use Lightroom (its version 4.4) any more, just occasionally to find an old image.

Friday, May 24, 2019

Panda-monium

The site maintenance shutdown for flick has been well advertised and even has a little good panda contest for the likes of me (free users or peraps a gift for a friend). This is probably the finals steps of the migration of services off the Yahoo’s servers, but seems to have taken a day longer than anticipated. The new owners and the flicker team seem to have put a have put a lot in place to make sure this is a seamless transition, including a Known Issues page They warn a few features might take a little longer to bring back on-line. However its return to be up online again has not gone so well for me. I can not upload my photos either with the newer photo uploader.

Or the Old Manual Photo uploader


This hiatus has punched a whole in my 365 project (post a photo on flickr each day this year) for a second day, but I’m not panicking, I’m patient and I’m sure they will figure it out in time, I also realise PRO member will get higher support, Here is a link to the current status of the scheduled maintence, why not take the opportunity to go out and take a few more photos, perhaps enter their good panda contest.

ALL FIXED I’m able to upload again  GOOD PANDA

Tuesday, May 21, 2019

Suspicious behaviour, and a decline in trust

The news that Adobe was going to put the price up (actually doubling the price) of their basic Creative Cloud Photographic offering, was soon “retracted” as just a marketing A B test. That’s some test!

Then came the news that long time CC subscription holders would have to update and only be able download two of the most recent versions of the adobe apps. The reasons given escape me because I also found them a bit difficult to swallow.

Next a third strike for Adobe!  They were exposed writing to users warning them that using old version of the software (that those user paid good money to “rent” from adobe) would leave them open to a third party legal action. Again I find this unbelievable unjust. Like Adobe is happy to abandon them. What is going on at Adobe, don’t they care what their users think.

So I must admit I was feeling a bit smug that I resisted the subscription model (for purely cost reasons) Even though I still have to occasionally update my software. Many companies try to get that upgrade fee out of you often (eg yearly) I normally resist and upgrade on the second or third iteration and or when new features I would regularly use are rolled out. Generally I download the free trial versions first so I get a good idea of what I need versus could wait a little longer for.

Such an upgrade was the latest version of Corel Video Studio it performed way better with the 4K video from my new little Olympus and I like the multi cam synch capture. Suddenly I was  being annoyed by a nagging pop up messages every day (offering what seamed a reasonable discount). So I caved in and ordered the upgrade at the AUD$51 price. Even before I had finished and had only downloaded the initial setup program, another message popped up offering a slightly higher discount. Bummer, This is not clever marketing this is just annoying.

I do like the Corel Video Studio 2019 Pro by the way. It is a good upgrade.

What the heck are your heavily automated market teams up to software suppliers? Do you understand why you are loosing our trust?

Sunday, April 28, 2019

More Experiments in Camera Motion

Sharky James of the PetaPixel podcast has teamed up with FujiFilm to create a series of weekly photo assigmnents. Last week’s theme was “Share your streaks of creativity”, in other words, movement and blur/slow shutter. A classic theme to look at moving the camera during the exposure. Something I have tried before and enjoyed. I decided to be a bit more investigative this time and try out a range of movements.

 Note that I never really need an excuse to experiment with potential photographic techniques.

JiggleSwipe to the right
Pan Right Pan Down
Rotate ClockwiseZoom Out
All of these show some merit, but I think I like the jiggle the best (its just part of a grape vine)

Wednesday, April 10, 2019

Flickr & Pixsy

Flickr partners with Pixsy to fight image theft

Flickr has teamed up with Pixsy to help protect images on Flickr. Pixsy is a service that will scan your photos. then using reverse image search and some Ai as well will periodically review and report on any other locations around the web your image is being used. Some are legit but other can require take down notices and possibly seeking damages or payment for licencing images (these are more legally complex and really focussed on US based copyright registration).BTW pixsy does get paid unless you do.

I think something like this is well overdue and will add some teeth to Flickr’s licencing (its the only social media outlet I know that still display the licencing details with the detail photo display). There are still  creative commons options as well as full copyright. Importantly Pixsy can send legally binding takedown notices.

If you are new to flickr you might find it wise to turn off the download options to discourage “inadvertent steeling” of your photos . Alternatively you may also wish to change your privacy for Friends &/or Family.

This Pixsy service is only being offered to FlickrPro subscribers, and really does value add if you want to use flickr as a place to share your work to a wider audience but are worried about image theft. I’m going to stay with my free account because I already signed up to a free versions of pixsy monitoring connected to my flickr account quite a while ago and you can still independently do this but there are limits.

Tuesday, April 02, 2019

On becoming A Lens Based Artist

#92/365 On Becoming a Lens Based Artist


Being a nice way to say I like to use photography creatively, and I'm not afraid of post processing

Monday, April 01, 2019

Projects & Bodies of Work

I’m well over gear reviews, mirrorless versus DSLRs and megapixel counts etc that has preoccupied so many photography bloggers and photography oriented You Tube Vloggers of late. It was refreshing to watch Julieanne Kost, remember that lady that talked you through some of the deeper areas of Lightroom  around a decade ago, on this week in photo (itself too often gear obsessed). She is still an Adobe Lightroom Evangelist by the way.

Julieanne would like to call herself “A Lens based Artist” rather than a photographer to avoid arguments with the purists. I really identify with this description, I feel it applies to me as well. She also covers her love of projects and the important reasons why she must outline the outcome as a body of work. Its a creative look at many aspect of photography and really worth a view.

Also see her Color of Place project, and perhaps follow @jkost on instagram

Colors of Kyoto

Wednesday, March 27, 2019

The Empire (of Dust)

It didn't take me long to break my own #TURNOFFSOCIALMEDIA campaign. I had the fortune to get tickets to Rone's Lastest Exhibition/Installation at Burnham Beeches. Its amazing, so I just had to upload a photo of the flooded Library via WiFi from my Olympus camera to my phone and then onto Instagram. All so easy and I've fallen off the wagon already