To help you break the focus on leading lines and rule of thirds and other compositionaspects oversaold to photographers and free your mind for a little creativity. Pick up your camera and take a walk (might just be around the house or your back yard.
Look for strong colours. Maybe they might be complimentary colours (that bounce off each other, The red and blue pegs) or analugous (similar in hue, the sky and blue peg)
In Victoria we still have stricter Stay At Home conditions than other Australian states. However we have always been able to go outside and exercise and Jells Park is very popular, too much so. Thus I enjoy walking along the tracks less traveled. This was largely flooded a few days ago, so definitely has less folk on it today. Nature is doing very well without us, by the way.
The flock of Cockatoos was at the end of my street. I pretty well find great things to photograph everyday, even if I only take a photo very 10-20 meters or so.
Most importantly it was fun to play with stop motion again, not so sure about bloggers handling of the video.
This time I am paying homage to a surrealist artist, Rene Magritte, whose man in the bowler hat was made popular again in the remake of The Thomas Crown Affair. I believe his canvas on the easel that disappears into the scene behind is called The Human Condition. The idea of being able to see through the current situation to the world outside appeals to me during the COVID-19 social isolation period.
To make this picture I took a couple of photos, one with a canvas and one with no canvas. I have a nifty remote control for my little Olympus so you can't see me triggering the shot with my right hand by my side. Rather than try to do a blended image I used the cloning and context sensitive retouch tools in On1 instead, to cover the window frame and easel where the picture would been.
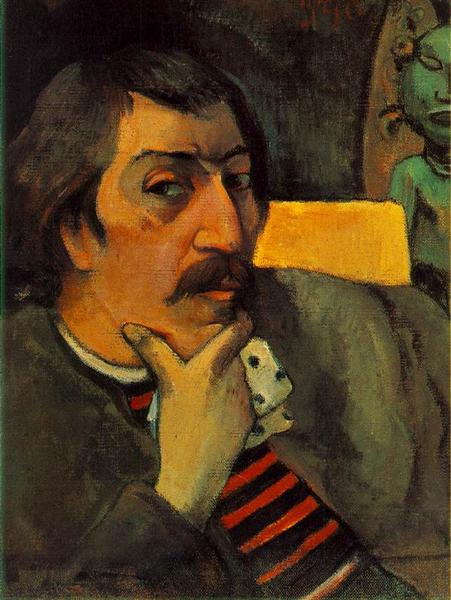
I know yet another self portrait, but this pays homage the the Post Impressionist Artist Gaugain and his "Self Portrait with Idol". I was trying to capture the mood and lighting rather than strict copy of the pose, and that required a fair bit of turning on and off the lights (all standard lights in my home) and shift the mask from New Guinea around a bit.
I don't have any dark walls so I had to live with the lighter background, which makes the mask standout a bit. more ominous and his cowrie shell eye stand out. I also did some double processing of my image in On1. First I took the RAW file and darkened it somewhat and lifted the contrast a little.Finally using a warm cinematic colour grading look (CG12 for the ON1 folk). I then saved this as a Tiff file (to keep the dynamic range). I reloaded that and added a vignette and a subtle canvas texture overlay before exporting to the final Jpeg.
Definitely not a master piece but fun to do. I guess this #StayAtHome project has morphed from surrealist portrait into #artinspired self-portraits, such is life during a "lockdown".
Today's photo is another heavily post processed contribution, in fact it is using the one-click style filters that I generally dislike. However... ... you'll never know if you don't give it a go... This image (I'm not going to say it is still a photo) was completely created on my phone. Starting with a way to close selfie, then I used an app called Porta to generate the watercolour style feel with faded edges.
I'm not sure how the blood shot eye effect arose but it suits the apprehensive and ethereal mood. (My eye isn't blood shot at all).
I started photographing my (almost) daily walks about 6 week ago, Over COVID-19 restriction allow us yo "exercise" close by for an hour. In particular I was closely observing what was under my feet. The original intent being to create a photo easy of my walks but from a very different perspective. Well the project is still ongoing and I don't see any need to finish it to soon, I think we have a few more weeks of "lockdown". I enjoy the walks and always carry my camera.
The wet weather has created a lot of puddles and wonderful reflections and with some floating Autumn leaves. I am reminded of a couple of the lithographs that where displayed in The M C Escher X Nendo exhibition at the NGV last year.
This was an accidental selfie. I was in my favourite spot for the afternoon light beside TheWindow. I stopped to finish my coffee, right in the shadow of the door frame, and didn't realize I set off the self-timer on my camera from my phone. The actual photo was lame but I decided to try it out in Google Deep Dream Generator, using a "modern art" style pattern.
I think the results are somewhere avant garde 1920ish.
No this is not an advert for an operating system or the next smart phone. It is the last, at least for a while, it my #StayAtHomePhotowalking series on TheWindow.
The cameras in smart
phones have improved greatly over the last decade. They only have tiny lenses
and thus their apparent depth of field appears very wide (almost everything in
the image will be clear). They also can be taken very close to the subject (ie
minimum focusing distance might just be a few centimetres. Their downside is
they are not so good in low light and if you are really close you are likely to
cast a shadow over the subject.
You could of course use a magnifying glass between the phone and the subject, but there is generally a significant downside doing this, the focal distance of the magnifying glass might be 5 to 10cm meaning you must be further back from the object even though the magnifying glass is enlarging the subject, it is the distance of your phone must be reduces the size of the subject in your camera. Pretty much cancelling out the percieved subject size advantage.
I have a nifty
little (and cheap) wide angle lens that clips over the camera lens and being a
wider angle now I can get closer to the subject but now the perspective becomes
extreme (which may or maynot help your image)
Hmm not many pictures of my window ... such is life
When you think there
is nothing more to challenge your photographic desires taking photos of
TheWindow, its time to get closer."The closer you are too the subject, the more detail you see and
the greater the impact of your photograph" ... Rich Sammon. This advice is
not new but now is a perfect time to take the advice seriously.
You actually don't
need a specialist macro lens, although they can simplify the tasks when getting
really close up. You can use any lens really, but there will be a few challenges
to address.
Most lenses have a
minimum distance that they can focus and in general terms the longer the focal
length the greater the minimum focusing distance. This can work against you
when trying to use the magnification capability of a telephoto lens to get a larger
image. With your impressive Telephone Zoom you might have to stand a meter or more away!Whereas with your wide angle lens
you could get with a few centimetres.
The next obstacle is
depth of field which is a bigger topic than I need to address in full here,
where by the longer the focal length of the lens the shorter can be the
width over which the camera is able to achieve sharp focus and to confuse
things the Aperture (which controls the amount of light let through the lens)
also affects the apparent depth of field. Wider Aperture (lower f-stops) narrow
the zone within which the focus seems sharp.
The distance to the
subject also affect perspective. Wider angle lenses (lower focal distance of
the lens) make close objects seem larger. Telephotos (large focal length lens)
make distant objects appear larger and more similar in size to close objects (they
seem to compress space). This difference can be amplified for close up photo.
The final issue that
might prove a challenge is the about of light. Consider that there is only a
fixed amount light coming off a subject so as you use more magnification. The
amount of light landing on a given sized pixel in you sensor gets less. You will
need to either expose longer of move to a wide aperture. Leading to the
possibility of blurring via camera shake or soft focus due to a narrower depth
of field.
I'm deliberately not
telling you how to find the compromise between all these issues. I'd rather you
figured this out yourself. You should have plenty of time to work through your
solution. No need to keep those trial photos this is an exercise in understanding
not make a single great photo. However I found this nice explanation of what depth of
field Is and Isn't on a new YouTube channel called Photography Online. Its
quiet an informative show so perhaps check out some of the earlier episodes as
well.
I got inspired
whilst looking through Man Ray's photos (I was looking for but never found his
Jazz series). He was a Dada &/or Surrealist artist and photographer who came
to fame in Paris in the 1920's & 30's. His most famous image from that time
is probably Ingre's Violin, but he was also a very successful fashion
photographer and filmmaker after the war.
“It
has never been my object to record my dreams, just the determination to realize
them.”
...Man Ray
The object here is
to take a "self portrait" (it doesn't have to include your face, could
be just a shadow, an empty chair, your hands holding a camera, or a coffee
cup!) that tells much more of your story than a standard head-shot selfie. What story do you want to tell? Perhaps it will be about your aspirations, what you have achieved, what you want to do after lockdown is over?
This is an image
from the window I should have taken as part of my windows snapshots and I missed the
opportunity, because I had other things like eating dinner to distract me. Tonight I was ready BUT anormal standing shot it didn't take in the sky. I had to move the camera down almost to
the floor. Which gave a slightly skewed view.If this is done deliberately this is know as a Dutch Tilt and can add
drama, though strong diagonals in the composition.
Lets just leave it
as a happy accident and I like it. However trying to capture the light at dusk at The Window is now struck off my list of times (ie no Golden Hour photos)
The quality of light
varies a lot during the day but the changes to night and artificial light can
be even more dramatic. This is even more obvious in any photographs we take.
The artificial light normally has a different colour temperature and this may show
up as a colour cast. (orange in my example below)
This colour cast can
be fixed by a process normally know as White Balance, which is just a name for
the task of removing that cast and it will vary depending on where you
undertake it. It can be undertaken in digital cameras by the camera as your
take the picture, often as little icon in the menu for daylight, sunny, cloudy,
artificial light etc).
Jpeg direct from camera showing orange colour cast despite AWB
Most modern Digital cameras have an AWD (Automatic White
Balance) setting that the camera best guesses the colour temperature (usually very well). If
you are taking a jpeg image this adjustment is applied to the image, if you
Capture in RAW the adjustment is applied to the preview but the un-altered data
from the sensor is also stored and the white balance is easy to change later.
RAW image post processed with a WB adjustment
Most Photo
Processing software also has white balance tools built in, and it is possible to make the same adjustments to removed colour casts in the post-processing
step (as I have undertaken in my example above). How the adjustment is carried out
varies with each package but most offer a simple approach using a dropper tool
(that is pointed at part of the image that should be a neutral colour) through to
sliders that adjust the colour temperature in degrees Kelvin (how colour
temperature is measured)
You don't have to use this list, its just a start. Set 10 items to find around the House &/or Garden and give everyone at home a phone or camera and a couple of days to find the items.
The red-ist thing/place in
the house
The oldest item in the house
My favourite outfit
My happy place
An old neglected favorite
toy, book, pair of shoes
Something made of wood
Something beautiful
Something that's living
Something that was lost and
recently found
Something smelly
I thought I'd start with the smelly-ist, in my favourite bit of afternoon light. (yes they are my shoes)
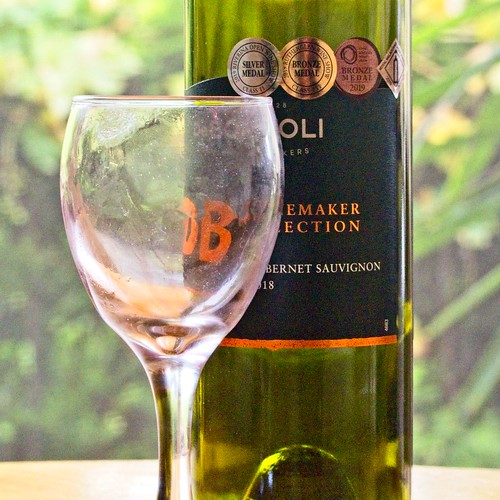
The natural ambient light can be perfect for back lighting close up subjects. This bottle and glass where not cleaned up from a homemade pizza dinner the night before and this simple composition using the soft indirect morning light caught my attention.
Always be on the look out for good lighting opportunities now that you are staying at home.
When you get out to exercise, I trust you are taking your camera, or at least your smartphone, to take the opportunity to also exercise your photographic muscles. There is then the issue should you also disinfect your gear when you get home, The answer especially now is yes, cameras and phones are something that you think nothing of bringing up to your face, for some time and there a couple of other important issues.
Do not share your phone or camera with anyone you meet.
Just putting it back in your camera bag is not enough.
Wash your hands (thoroughly) as soon as you get home (you are more likely to be a source of infectious than your camera).
Avoid using liquids to clean or disinfect any gear. (alcohol wipes may be out but probably unnecessary)
So when you get home take all you gear out of the bag and wipe it down with a microfiber cloth (the type you get from the supermarket as fine, they don't have to be black with a camera manufacturer's name on them. Take the opportunity to clean any lenses you used. It is not necessary to clean your sensor unless you change lens on a windy dusty day,, and that's not recommended anyway. You should wash the microfiber in soapy water, rinse and dry thoroughly before re-using.
Derrick Story goes into a lot more detail in his podcast "How to Disinfect Your Gear." The link goes to his show notes as well the podcast, as he has a some important sources of information there.
Because these are large windows they lend themselves to including much of the outside as well as aome detail of the inside.
The obvious pair to this is looking back inside (I need to wait till the afternoon when the sun was streaming in and giving similar illumination to the light outside).
This a great exercise to begin the Window project with. Just take much the same view of your chosen
window at different times of the day. Perhaps even on different days so you see
the differences between a sunny and overcast days. Don't worry that these
photos just look like simple snapshots, they are not intended to be shared.
Set up
the images side by side, before post processing, and evaluate the levels of natural ambient light. What
is the best time of day and type of day to take photos. Of the window? Or
objects in front of the window. Spend a little time doing this, because now you
will be thinking of the quality of light. a great step towards becoming a
better photographer.
The
internet is flooding with fake news false rumors and straight out wacko
conspiracy theory (the trolls, hackers and other undesirables are also locked in). The big disappointment is that so many folk seem to believe
them and circulate them further, its like a really dodgy chain letter. Here is
Trey Ratcliff (a photographer I do admire, believe in his honesty and upfront
approach) with a his personal evaluation of the situation.
So
how does this relate to the stay at home photowalker?
Firstly you now have
time to be a bit more discerning in what you believe, and you can afford to
dive a little deeper to understand things before hitting that share button.
Secondly a long standing peeve I have with a lot of YouTubers particularlyis they may be biased and restrictive
(follow my work flow exactly, its the best, I am the greatest, buy the latest full frame camera, fastest lens, more megapixel etc) that can be okbut the advice may not suit your way of working and too
often is positively appropriate or incorrect anyway. Thirdly there are a lot of idiots and nasty
people out there on the open net that are just out to offend and put you down,
just ignore them and focus on those you can trust to share your work with (it
might be specific groups or even just individuals)
Find your trusted
news sources (and those you trust on your favourite social media), stay in
contact with your family and friends and ignore the rest.
Ok this looks a lot like a snapshot but I was actually trying to follow the idea of sticking with the "rule of thirds" (I despise it, its not a rule its a myth but in some ways its close to the golden mean). So this more about trying to get a pleasant composition and the three panels do lend themself to a three-way split.
When you take a photo inside you may not be able to get far enough away from a subject and have to use a wider angle view to get everything in the frame. However, what happened is the edges of the resulting images can tend to bend and often curve in. Typically if you are photographing slightly down the verticals may bend out, if your looking up the verticals can bend in. I'm sure you have seen these effects. So you might have a couple of issues to fix. On really wide-angle lens you get what is often called barrel distortion. Things are wider in the middle and bend in at top and bottom. If you are using an exchangeable lens camera a lot of software (like lightroom, On1 & CaptureOne) will have lens correction tabs and tools which will recognize the lens type and focal length then will correct for this barrel distortion. The second item to fix is the converging or diverging verticals, and for this you should use a tool usually called Keystoning, Some cameras now have this ability built-in, the great little app Snapseed (see Tools/Perspective) can do it on your phone and many large software packages can also do it nicely (but not always called keystoning).


 This time I am paying homage to a surrealist artist, Rene Magritte, whose man in the bowler hat was made popular again in the remake of The Thomas Crown Affair. I believe his canvas on the easel that disappears into the scene behind is called The Human Condition. The idea of being able to see through the current situation to the world outside appeals to me during the COVID-19 social isolation period.