Thursday, July 31, 2008
Big landscapes
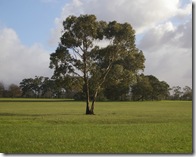
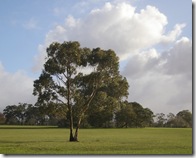
Both images of Jell's Park lake are multi-photo panoramics stiched together with autostich. Note the exposure "banding" because I had the camera on automatic (which meant the light meter re-choose the exposure for each photo). I haven't figured out a simple way to post process this out. Setting the camera to use the same exposure across all the photos in the set is of course the preferred approach. However sometimes you are more intent on framing and just pressing the button, I'm sure you know what I mean!
Wednesday, July 30, 2008
A good online read
There are lots of digital "community" sites all over the net, too many to mention, little lone review. However I reckon the PhotographyBB site may be worth a visit. Whilst they are Canadian based this month downloadable online magazine features some great images of the Australian Outback. The magazines alone are worth investigating and there is plenty of other stuff with of course ads as well (someone needs to support all the work). Unlike many other digital camera review sites they openly provide links in their news sections to manufacturers and distributors press releases, they do not cut & paste this advertorial copy and pretend it is their own.
Thanks to scuba_margie a fellow Australian Photographer!!! on flickr for this link.
Tuesday, July 29, 2008
A lesson in Theft versus Sharing
I think those that blindly cut and paste blog posts (even with a link back to my site, to fullfil the attribution aspect of CC) and use that as content to draw users and get "click through" revenue are just being lazy. It is plagarism pure and simple. At best they are not contributing anything, just wasting bandwidth and everyone's time, at worst they are yet another examples of the rot that is setting in as people try to monetize Web 2.0 (I am starting to translate that particular phrase into sucking the blood out of the true content providers). If you realized you have arrive here after seeing my work in such a site, please understand that you should stop viewing that website and definetly remove any RSS subscription to it.
To find copy & paste plagiarist is not that hard you can type in a characteristic phrase from your blog (especially one that may have contained an unfortunate spelling mistake or typo) to your favourite search engine, or use a service like copyscape (is free)
PS:: Mr Daniel Mendes (with the made up address and probably name as well). CEASE & DESIST :: YOU ARE SPECIFICALLY FORBIDDEN FROM EVER COPYING ANY OF MY WORK AGAIN.
Wandering in the Light by
Norm Hanson is licensed under a
Creative Commons Attribution-Noncommercial-No Derivative Works 2.5 Australia License.
The really dissapointing part of all this is in the fine print, and how much support google are going to provide. Oh that's right they are paying the plagiarists for doing it!
Monday, July 28, 2008
You can't help it
It is just natural that when you are photographing something to set the subject slap-bang in the middle of the picture. The problem is that this will make for a bland, dull, predictable results, the same sort of snap everyone else takes. I have eluded to the importance of composition as the big differentiator of interestingness in photographs. So here are a couple of "tricks" that can help make your photos look professional.
Offset the Center of Interest
This should produce a more dynamic composition instantly. Placing the horizon in a landscape can be a classic example of this. Having the horizon close to the centre divides the image into two balanced parts, albeit a bit static.
The Rule of Thirds
This rule is often presented as gospel and trotted out as the main composition guide in many beginners guide to photography. All you need to do is imagine that the photo is divided into 9 equal panels, by division into thirds horizontally and vertically. Then Placing the subject at the intersections of one of the vertical and horizontal lines.
Don't stress this a good guide but not a rigid rule!
Move in closer
Filling the frame, even at the expense of trimming off some parts of the subject, is a simple way to generate more impact. Sometimes this may mean moving closer, zooming or swapping to a telephoto lens. But be careful in close ups you must remember about depth of field (focus) can be very limited.
So next time as well as taking your standard shots be brave a n experiment with the composition in the view finder, you will be surprised how it will bring variety and interest to your photos.
Sunday, July 27, 2008
The blue eyed Kookaburra
Saturday, July 26, 2008
Recovering lost photos from memory cards
- Photos can be very precious, once lost they can be impossible to replace. So make it a habit to upload them and back them up.
- If the content is important get it done by the professionals, if you are trying to recover kylie's only wedding photos, go and find one of the many services that specialise in recovering files (and perhaps get some one local, ie use the yellow pages not the net), some camera shops now also offer this service.
- Beware of "Blackmail"ware, When you type file recovery in google these days you get a multitude of programs that offer free download but when you have downloaded the 20plusMB and installed it and go to actually use them. they say yes there are recoverable files on the media but you now have to sent BIG Dollars to unlock the recover feature. I don't like programs like this and suggest you keep and eye out and don't even download them if you suspect it is likely to be "blackmail".
- Use freeware by all means, but remember it will probably contain a "NO LIABILITY" clause.
- Never install anything on the media you want to recover files from. It will most probably overwrite on the files you are trying to recover
- Always recover the files to a different media, like a removable USB memory stick, or a suitable temporary location on your hard disk.
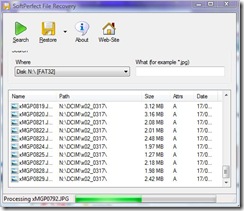
The first program I tried was SoftPerfect's File Recovery. It doesn't required conventional installing so it is ideal to have on a USB toolkit of useful stuff and doesn't hog resources on your computer with unnecessary stuff at start up. Running it is really straight forward you just specify where the recovery is to take place and optionally a filename wildcard to example recover a particular type of file (eg. *.jpg). the software they starts looking for any file it might be able to recover. When this is finished select (highlight) all the files you would like to recover. The Restore icon then becomes active and press it. In the next dialogue it is strong recommended that you recover the files to a different destination. Everything was quick and easy but two of the files. both .jpegs were truncated (ie could not be fully recovered. The two movies were fine. I would give this a 4 out of five start recommendation.
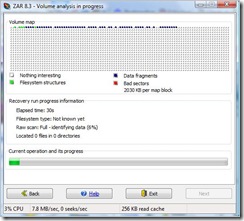
The second program was Zero Assumption Recovery, and it was upfront that it was a trial version. It does need to be installed and is also very easy to use. Just indicate the media to be scanned and a semi-graphic of the media surface is displayed showing the status of what the median contains (as colour coded file types and what may be recovered), because it scans the entire disk it take longer. At this point it did warm me that the demo version had limitations (which didn't apply in this case), But still I don't like programs like this so I have now removed it from my computer (after letting it recover the files of course). This recovered exactly the same files as the first program and exactly the same fragments of the two .jpeg files not recovered first time. So basically there was no difference in the results.
Most importantly my work has not modified anything on the memory card, so I would still be able to take it to a professional for file recovery if I needed to. If you have been recovering files of a damaged (flaky) card, it is probably a good idea to reformat that card before you use it again (which will mark bad areas not to be used)
Friday, July 25, 2008
The Cheeky Cockatoo
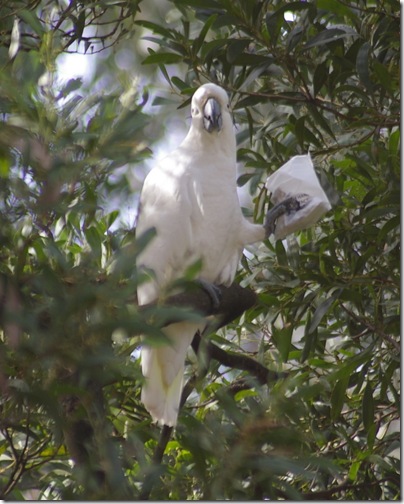
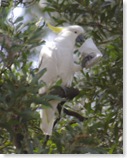
This wild yellow crested cockatoo [Cacatua sulphurea], at the Grants Picnic Ground at Kalista in the Dandenong ranges east of Melbourne, brazenly stole this packet of seed from a visitor. The best part is how deftly he held it in his paw, as he skilfully snacked on the seeds. However is fellow cockatoos soon gathered, trying to get him to share but he wouldn't and it all ended in tears. The poor guy lost his one paw hold and the packet of seed dropped into the forest below, several cockatoos in pursuit.
Thursday, July 24, 2008
Monday, July 21, 2008
The cropping tool
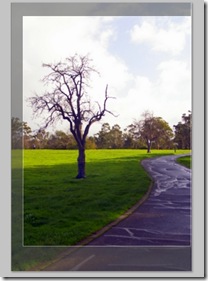
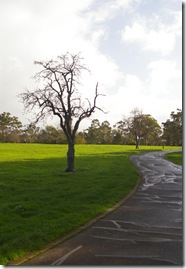
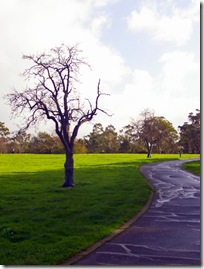
One of the best and easiest to use tools for digital photos is the cropping tools, which cuts a desired section out of an image, trimming off unwanted parts (at the edges). Using Picasa, cropping is easy. In the editing view, click Crop. There are three default sizes(in cm 10 x 15, 13 x 18, and 20 x 25). The fourth option, Manual, is the one I use most, it allow you to click a point in the shot and the drag the mouse pointer to selection the portion that you want to crop. The rest of the photo will go grey. Click Preview to see the crop. If you like it, click Apply; otherwise click Reset and try again.
Why a cropping tool is so good? It allows you to improve the composition of your photo. Most digital cameras now do a wonderful job of exposure and focus, but none as yet include a magic button to make your image interesting. That is in my opinion now the biggest difference between a mediocre photographer and a great one. There is plenty of advice on the web on the basics of good composition. Sometimes you do need to use your judgement and not follow the rules blindly, for example I left the horizon in the middle of my final crop, because there were enough shapes and lines to draw the viewers eye into the image.
Most Photo software, including the software bundled with your camera, and even photo kiosks will have a cropping tool. Many cameras now have built in cropping tool. So go now and try cropping that photo you liked but where disappointed with when it was printed.
Saturday, July 19, 2008
Sunday, July 13, 2008
Saturday, July 12, 2008
my office as art
Friday, July 11, 2008
Going (any)Phone friendly
No I haven't succumbed to all the hype, but I have researched how you make your blog more mobile friendly, one way is to use google reader, but the reader has to do that. A much nicer way for bloggers is to use mofuse, its a kind of mobile friendly wrapping that drops the side bars and other cyber noise and bandwidth consumers. The result is a the basic post with enough navigation via number key shortcuts to make browsing from the phone nice and easy. Best of all the thumbnails of the posted images are nice and legiable. The phone bill will thank you.
PS: In a shameless bit of network cross promotion that show off Alvin wants to bore you with his new IPhone.
Wednesday, July 09, 2008
iphone spam'alanche
However there is one very important thing the iphone hype forgets to mention, like telstra's qriuos hype before it. In Australia mobile phone plans come with ridiculously highly priced and low quoted data rates (so check out the bad news before you get excited) and I totally agree with Stephen Collins, the first telco to offer decent data rates "will own the market"
Iphone could be also be the watershed for digital photography, tens of thousands of photos are already being uploaded each day to flickr from Iphones. The camera specs are nothing flash but as any good photographer knows 90% of the picture quality comes from how the camera user "sees" the picture, not the quality of the camera. Much of what is being photographed and posted is very ordinary, but now there are cameras in the hands of almost eveyone everywhere recording life and things as never before.
Finally if you have 30minutes (& the bandwidth to waste) you can get a full video tour of the 3G iPhone direct from Bob Borches, senior director of Apple to watch online or download to your ipod (or your iphone, ok you haven't got one yet I forgot).