I had a great opportunity yesterday while walking on the wall of the Cardinia Reservoir to test out the reach of my new olympus OMD EM10iii camera, using just two lenses (14-150mm and 75 to 300mm) and a multi-image stitched panorama.
Showing posts with label perspective. Show all posts
Showing posts with label perspective. Show all posts
Monday, September 24, 2018


Wednesday, June 07, 2017
Shooting Big (aka Wide) Landscapes but not Wideangle
I am always had a loved of wide panoramic views. This have been even exaggerated as I travel around on my endless summer project. Australia looks better in wide view. However I am not a fan of the distorted view that extra wide angle lenses give. For example you can get the horizon horizontal and straight if you have it in the center of the photo when you take the exposure, but lifting the horizon up or down will result in a curves horizon in the final image. In a forest the tress on the edge of the photo will bend in. Building will get smaller towards the edges and very triangular above you. These are all features that can be used creatively, its just I don’t really like them and therefore don’t own a specific wide angle lens. (my Tamron 18-200mm zoom give me a decent width to play with)

I still like the wider view, so what do I do. I have always (even going back to film days) just taken a series of overlapping photos and cut and pasted them together. Now with digital tools I use software rather than scissors and glue. There are plenty of tools to do this but I like Microsoft’s ICE and Autostitch the best. They actually have a different look, closer to what you see with two eyes and head movement scanning across the scene rather than classic single point perspective. I’m certain that David Hockney noticed this well before me, in his joiners, grand canyon and bigger picture projects (all made with multiple images/panels) and specifically he does mention the limitation of cameras in his collaborative book Secret Knowledge: Rediscovering the Lost Techniques of the Old Masters with Charles Falco, There are now also lots of smartphone apps that will stitch panoramas on the go using the phones camera, they also show this wider perspective rather than the wide angle distortion of a wide angle lens and single image.

However because the photos are taken in sequence (with inevitable time gaps between) they are prone to a few issues. First and most common issue is someone or something moves (like the man in the 5th. 6th. & 7th. frames), The stitching program will then produced “ghosting” (HDR set also suffer the same issue) in any areas of overlap across the areas of the movement in time. This can be a hassle to fix, and I often don’t or only fix the most obvious ghost. In this case I used OnOne Enhance’s magic (a context sensitive) eraser on the ghost in front of the moving man’s face and the whitish ghost of his hoodie. Some programs give you the option of masking out things not to be stitched (it can be a lot of work with limited success). Another common problem is the difficulty of hand holding and maintaining a level to the sequence as you turn. Wobbles can also lead to ghosting and sometimes bending of the horizon or failing to be able to stitch. This sequence was hand held and I was on a slippery wet rock and it was windy so despite my best efforts the last few frames are a little out of register, and you can see the resulting ghost in the timber slats on the side of the bridge. I decided not to attempt to modify them.
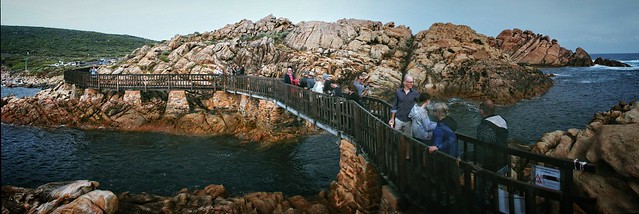 The important outcome is the modified wider view does the magnificent curved walkway justice (It is just a bridge to allow rock fisherman to safely fish in the canal but it is a wonderful construction)
Saturday, May 21, 2016
Aftershot Pro 3 is available & Z Series Plugins are back
Aftershot Pro 3, is already here and prompting itself as providing the world's fastest RAW processing. Aftershot pro 2 in the 64 bit version on my HP Spectre with the SSD drive is certainly already lightening fast. So I’m not sure about the need t
I really loved a couple of the Z Series Community developed plugins, but they where mainly 32 bit versions and didn’t work in the 64 bit version of Aftershot Pro 2. whilst I didn’t complain I missed them especially zPerspector. Well the good news they are back in 64 bit version ready for Aftershot Pro 3 (which I understand is only available in a 64 bit version). However is you have a 64 bit version of Aftershoot Pro greater than or version 2.2 you can install them now. zPerspector is a set of perspective correction tools. It isn’t automatic like Lightrooms upright, but is actually more powerful because it gives the users many up and down and in and out adjustments, rotations and scaling. In this case just a couple of slight adjustments get the horizontal and vertical lines looking more natural

Thursday, February 11, 2016
A different type of straightening

A perspective straighten is very useful manipulation for some situations where you cannot find a enough room to get back from your subject (a window or large painting across the room or a building across the road). With a wide angle you will get diagonals running in several directions. The edges may even be noticeable curved. Lightroom now has a Upright command to do this under the lens correction menu. I assume it is doing a fair bit of distortion transformation mathematics, but it can do a good job providing the distortion isn’t too large (and perhaps it needs to recognise the lens). I have found a marvellous alternative in a plug-in for AfterShot Pro called zPerspector which achieved much the same transformation via a set of four sliders that independently adjust the sides/quadrants of the photos. With a little experiment it is easy enough to fix even extreme diagonals. You can also use the plug-in to create your own extreme perspective.

Thursday, November 06, 2014
Tree Fern Verta-rama

For #thesecretlifeoftrees series.
These tree ferns towered above me and I had to use a stitched panorama approach (using Autostich) but in a vertical sequence. The resulting perspective however leaves the trees curving in on you towards the top of the image, so I used the zPerspector plug in for After shot to straighten things out a little. Original: imageo.withknown.com/2014/tree-fern-verta-rama
Monday, October 13, 2014
ThePatch :: Self Portrait with a Unique Perspective
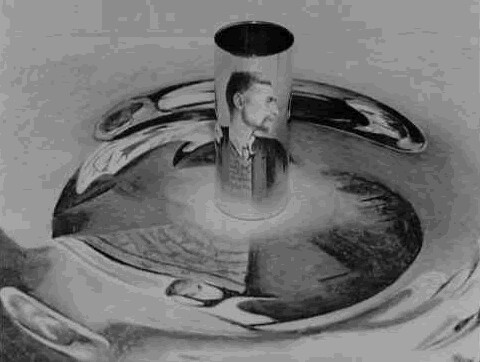 My plan to do all self portraits for this months ThePatach themes, gives me a lot of scope to be more artistically inspired with the curly topic of a unique perspective. I had been experimenting with conical mirror projects for my “handmade” little planets of the Queenscliffe Observatory and immediately thought of MC Escher’s Infinite Reflection. Yes its all done with mirrors, a cylindrical one, and an anamorphic transformation to produce the image the mirror is sitting on. The resulting image you see in the mirror appears to magically floating above the otherwise very distorted drawing on the table.
I started with a very simple front on self-portrait, rather than a profile, as in Escher's drawing. I deliberately keep the background and table simple and pretended to sketch. Then with a minimal tonal tweaking and a basic conversion to a greyscale, I had my starting image to transform. Whilst I wanted colour in the final photo I felt staying in grey tones for the reflection would be truer to Escher's concepts.
Whilst I do have a neat anamorphic transformation utility, called Anomorph Me, I don’t have a cylindrical mirror. What I do have is a stainless steel milk frothing jug and a stainless steel espresso cup. Now a coffee association is much more me anyway. So the first job was to work out roughly the right sizes to make the transformations. I managed to get close on the first attempt. So far so good…
 |  |
 |  |

Sunday, August 24, 2014
PhotoProject :: Straightening Out
“There is nothing wrong with photography, if you don't mind the perspective of a paralysed Cyclops.” - David HockneyI believe what David is highlighting here is that the camera’s view of the world is from a single lens with a specific perspective. We have two eyes and “see” a much richer three dimensional worlds and our vision can be influences by our expectations. For example when we are dwarfed by tall trees we know we are surrounded by
 a strong vertical world. Our camera however see a more curved representation (depending on the zoom) and we will probably notice wide angle views tend to show curves where we expect strong vertical lines. For this reason many architectural photographers go to some extreme length with special cameras and lenses to overcome this perspective distortion. The Tilt/Shift lens being very popular because they do allow control of this distortion. A number of tilt/shift filters are also now becoming popular because they can be used to create the effect of looking at a miniature world.
 In this vertarama, made from three *HDR photos (created by google+ autoawesome) you can see the trees enclosing over me as the camera moves higher. Ok this is pleasing in some respects but I want to show the strong vertically of these pines, so I have Tried out a plug-in for after-shoot pro called zPerspector. There are a number of similar perspective adjustment plug in fro Photoshop, gimp & even paint.net. The all perform varaiable scaling and/or warping to adjust the image. zPerspector has a very easy to pick up approach where you can stretch and pull at each of the corner edges of your photo to thus arrive at the expected view. In my example below I am not trying to get all the trees straight and vertical (because they weren’t really) what I was looking for for trying to reproduce the strength of the trees towering over me as I remember it.
Tuesday, April 15, 2014
On Making a Vertical Panorama


The Kauri tree on the right is over 1,000 years old by the way.
Saturday, July 13, 2013
PhotoProject :: Rethinking Digital Photography for Artist
 There seems to be an even bigger gulf developing between traditional artist, (particularly painters) and photographers.Of course there are numerous exceptions and some contemporary artist have focused on photo realistic art as their special genre. Illustrators are also split with many fully embracing computer graphics with a few still promoting the idea of hand drawn as better. The explosion of “artistic” filters on phone apps and some better known photo software packages has however seemed to aggravate a raw nerve with traditional artists. I’m more perplexed, because I realise that photography and more specifically digital photography is a really great tool for any artist. I don;t mean painting from a photo. I actually think that is a bad move and seldom do it myself. As well as having amassed a large collection of digital photos I have dozens of sketch books, which are usually my first call for reference to any painting. Once you get into sketching it is actually a very pleasurable way to get to know an area or scene. Making a few sketches will in fact lead you to a more critical focus on what you actually photograph. A lot of art is about seeing, seeing the important features and perhaps leaving out the un-important clutter that does not convey the essence of the subject. Painting from a photo tends to promote a slavish focus on details,details that usually look boring and perhaps send a signal of inadequate observation, Whereas a few salient features captured in some “en plein air” sketches are more likely to character of the subject.
Having suggested sketching in the field may be more desirable, there is definitely a place to keep a series of photos of the details of some aspects. Here digital photography is a real winner because there is little cost in taking many photos, to assist as an “aide-mémorie” the downside for anyone artistic is probably managing all these reference images. Hopefully I’ll write more about this later.
A really important aspect not to forget when collecting reference photos is to remember to document your work. Photos of your work in situ (as the photo above) or you creating the art work may become very important in proving the provenance of your work.
Our eyes actually see differently to a camera lens. We have a much greater dynamic range of tones and colours we can perceive that even the most expensive cameras. Most of us have a much broader field of view than typical camera lenses. Whilst a wide angle can do this seeing around corners trick it usually distorted the image and verticals tend to become curved at the edge of the image. This is really most obvious in the traditional “landscape” view. You will never see curved verticals in an “old master” landscape. Perhaps this may relate to a slavish following of the rules of perspective and vanishing points. However a photo does the reduction of three dimensional space onto a flat two dimensional plan automatically. This is a nice way to avoid having to tackle the very technical perspective methods. A neat way around this is to employing David Hockney's solution of “joiners”, A series of conventional photos taken at slightly different orientations can be placed side by side to form a collage. If you step back the “perspective” is closer to what you see when you are there looking at the scene. My view is that digital photography is a perfect tool to help an artist learn to better interpret the visual world. It is not a substitute for seeing but it is certainly an aide to making better and lasting observations. These are only just a few important issues for any artist and I plan to cover more in upcoming post.
Subscribe to:
Posts (Atom)