Thursday, April 18, 2013

Many Mistresses, Master of None, continues…

I’m sure I’m not the only one in this position, and I’m not ashamed to admit it. I have too many mistress in the form of software to help process my photos and I can not choose a favourite. I have photos flowing across several computers and stored in a number of locations (see my ABC photoflow) and this is works fine BUT the real problem is that my photo management software just won’t play nicely with each other or even play nicely across more than one user on one computer. So here is an update to my earlier realisation that I have many mistresses but I’m still master of none!
clip_image001
Perhaps it will make most sense if I focus for now on the physical places my photos are acquired, edited , displayed and saved. I have tried to be fair and have no preconceived ideas of what software (or workflow) to use, I have just concentrated on what works and works easily. I have a Local Area Network, which has both an ADSL router and local WiFi. My photos can exist locally on any of the computers and/or be stored centrally and shared across the network. This all works reliably using standard feature of the Microsoft Windows Environment and the hardware I have.

It is when I come to use software to edit and organize my collections that I start to run into problems. You see I have developed a liking to use different software in different locations, Namely picasa and lightroom. they are both non-destructive systems (so the originals remain untouched and the edits and refinements are stored separately and replayed whenever you share, print or display the photos. Trouble is the way each handle the storage of the processing is very different and they both hate having the files taken from under them. They are both very protective of their collections and only work for one master at one place. They just don’t play well together. The goto software on each computer is shown in bold on my flow chart above (you might want to click on it to see a larger size that will be easier to read).

clip_image003My main desktop computer is called Obsidian (it’s a desktop HP pavilion and also a 64 bit machine) It has a calibrated screen and thus I used to use it to evaluate photos before printing, but I am more confident now and seldom use it just for the screen. My main photo archives hang off this computer on an external hard drive and are shared across my network from there. This is where my many mistresses project began, but lightroom fell into disuse has been moved. Windows Live Photo Gallery, a flickr uploader and geoSetter sit here but are largely unused also

clip_image002My main laptops is called Ice (its cool, a white Toshiba Qosimo and is 64 bit, which does make it quick with lightroom etc.). This computer travels everywhere with me and when on the road it is where I load my photos. Somewhat slowly my photo processing favourites have migrated from Obsidian onto this computer.


clip_image004My studio computer is an older laptop computer called Sandstone II ( another Tosihba which is 32 bit and still stuck on Vista) its deskbound these days but matches the mess of my studio. It has become a bit of a USB hub, promiscuously overloaded with USB plug and play stuff, a second waterproof key board, a Wacom tablet, a USB card reader, a cheap slide scanner, an old HP photosmart printer, and the frequent connection of portable external USB drives or memory keys. Not to mention a data projector, acting as a second screen. Whilst it’s a little slower and a bit short on space, the semi-permanent Wacom tablet and data projector as a second screen make it very comfortable as my goto photo processing place. The studio is pretty much an "interruption free" hide away and this really makes it a better place to work on photos, Lightroom and RAW files are the dominant players here.

clip_image005I occasionally share a small netbook computer with my wife, called Dune (yet another albeit baby Toshiba) which has been very handy when travelling. I only keep the minimum of software (just picasa really) and photos on it and rely on the portable photo Apps on a USB key (it’s the one with the green lanyard and called DARKROOM, which lives in my camera bag). When travelling I usually carry a small Seagate external drive to maintain a backup. I have also used this little netbook for some presentations.
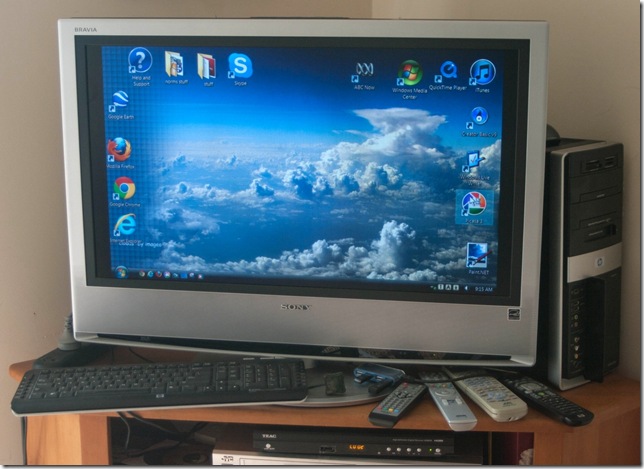


The oldest computer is called Onyx (another HP Pavilion that is still running Vista) but has the original metro style media center running on it and it drives a big screen Sony Bravia TV screen. It is a place I can preview videos and share photos with the family from the comfort of the couch, It is slow and past its use by date but does a perfect job where it is.

I almost forgot to add my android phone here, because I look on it more as a camera than a photo processing device. Yet it is a powerful little camera and competent for editing and sharing at the same time.

So clearly Picasa has become the dominate and well loved assistant to load and manage my photos across the range of computers and places, It is definitely my first choice for processing jpeg images.She is good at loading photos from cameras and any source, She is very helpful for viewing and rating a lot of photos and can organise your photos in a number of ways, by date, by keyword tags, by face recognition and by place (via geotagging). Her photo editing capabilities cover most of the common needs, cropping, contrast and exposure compensation, white balance and straightening. her only shortcoming is in the way she tries to best adjust and renders RAW files. However it is Lightroom to which I trust my best photos (in RAW format) and more creative tweaking. She is very talented and does most things a photographer would ever want, including deeper metadata integration, yet she is very protective and doesn't like sharing her workspace and can be tediously stubborn or slow in some steps.

Now the problem is getting these two to play nicely together and share the computers on the network, without wanting to take control!

Autumn is upon us


Autumn is upon us, originally uploaded by imageo.
Experimenting with Lightroom 5 Beta's new Upright feature, on a natural landscape with the horizon hidden and no strong uprights or horizontals (ie no buildings). It seems to have made sensible decisions, but I'm puzzled what it based those decisions on? Perhaps the shadows and trunks of the trees? The poplar in the left?

Wednesday, April 17, 2013

Smart Previews in Lightroom5 (aka Offline Mode)

Lightroom 5 Libray Mode showing smart previewsThe second thing that grabbed my attention in the Lightroom 5 Beta is what is being termed Smart Previews (aka Offline Mode). Not that you will see much at all, the only hint they exist will be an empty square rather than a square with a question mark when the photo is actually on an external drive that has been removed. If you do have smart previews set up in this situation you can continued to edit and updated the image and metadata (as if the photo was accessible). then next time you connect the missing drive the updates and metadata changes will be synched back into your catalogue. For those that have big phone collections, stored on external hard drives this is a massive thing, and will make life much easier for a travelling photographer (like myself).

Despite all the excitment in the adobe forums,the smart previews it isn’t a panacea for working with large collections in a collaborative environment or even distribution across a LAN, I’ve had a good play around and I really like the feature BUT it is really best described as just Offline Mode, it is still very much single user, single computer oriented.. The smart previews are stored in a separate smart previews. lrdata file  beside your active catalogue, storing smaller version of your originals (not thumbnails) and associated metadata. They also maintain the link back to the original photos. So these previews are not suited to transferring your edit settings and metadata around to other locations (eg moving parts of a library of photos to a another computer or hard drive). What several users have noticed is that working on the smart previews rather than the library of originals on an external drive is a lot faster, and so it should be, its working on smaller files and on the local hard disk.

Dust removal & Advanced Brush Healing Tool in Lightroom5

Adobe Lightrooms Spot cloning Healing ToolIts been a long time since I first mentioned DSLR's dirty little secret, dust on the sensors. Back then (late 2006) I was also looking at the beta that was to become Lightroom and I was severely flamed in the user forum for asking about a brush adjustment. to fix dust spots among other things. The volume of negative comments didn't bother me because at the time I had already "discovered" how to fix the dust spots with a cloning tool. Well I lot has transpired since then and perhaps a little behind its counterparts Lightroom does now have good dust spot removal, shown here. Spot being the important word (it does circular clone or heal), so trying to fix a linear tear or hairline might involve a lot of fiddly cloning. In reality I still prefer to do any dust and other tidying up in Corel Photo Paint. Now I find myself trying out the Lightroom 5 beta and the first thing that grabbed my attention is its Advanced Brush Healing Tool, which could well be the very tool I asked about 8 years ago. The "hardedge" surreal visualize spots view is particularly useful, like my photograph the blue sky trick, at helping you find the dust spots. I think a fair bit of drudgery might have just disappeared. spot removalThis time I dare not ask the obvious question about synchroninzing these fixes across a series of photos (because the dust spots will be in exactly the same place). Phew someone has already asked that, thanks Juergen. Providing you just use the auto selected “source” for the clone or blend (blend is better) you can go ahead and synch the dust spot removal, with other photos, its just that occasionally you will want to shift the auto selected source location in some, hopefully only a few, of the synched copies. By the way you can do this in Lghtroom version 4 as well.

Adobe’s video on YouTube does a nice job of explaining the advanced brush healing features, make sure to pay attention to short cuts and tricks towards the end.

Lightroom 5 Beta is available for download now. Remember, as advised in the video, it is a beta version, so don't work on your existing catalogue, and don't use your original photos!

Tuesday, April 16, 2013

The Old Cottage on the Bend


The old cottage on the Bend, originally uploaded by imageo.

Sharing DSLR Photos on the Net via Low-Fi

You actually don't need a lot of extra hardware, or fancy WiFi Cards to be able to upload your photos from existing DLSRs or compact cameras. If you have a smart phone that uses Mirco SD cards, and perhaps a healthy bandwidth/data upload limit for it. Here is a very simple and inexpensive (providing your on a good data plan), albeit not so high tech, way to do it.

  • Make sure you have an SD adaptor that your mirco SD card slots into (reputable brands are generally sold this way)
  • Use the micro SD card inside its adaptor in your camera (the camera will treat this as an normal SD card)
  • After your have taken the photos, take the SD card & holder from your camera and remove the micro SD card
  • Insert The micro SD card in your Phone.
  • Upload the photo to the Social Web, Flickr, FaceBook, Google+ etc.

Monday, April 15, 2013

Using Lightroom like a Painter

lightroom Develop/Basic tonal sliders
I have become a fan of doing the tonal adjustments “by hand” using Develop/basic Tonal sliders. Rather than the Tone Curves and Presets. This is because this approach matches the way I like to develop a drawing or painting. So here I will take you through my approach to developing a pastel sketch based (loosely) on this photo taken at Mt. Buffalo looking down into the gorge.

Rough CompositionDeveloping the midtonesStaring in the midtones, in this case I have selected a colour paper that is perhaps a bit darker than the mid tone i want to establish. So I am adding a few areas of colour and tone to set up the composition and develop the midtones


adding shadowswith highligjts and darksThese steps are bringing in more of the shadows and then emphasising the highlights. A few darks help settle the image and bring out the feeling of depth in the painting. The final steps are really just adding some extra colour and detail.


Putting in the finishing touchesThe Final Pastel Sketch

The Pastels Themselves

Thursday, April 11, 2013

Trying to keep HDRi real

bracketed sunset HDR seriesTaking the sunset tonight, with the polarizing filter still on the lens, I was conscious that the images on the back of the camera was very dark (underexposed) but the colours of the sunset looked rich, like the actual sunset in the +1 EV image from a bracketed set. So I figured I should do a bit more experiments with HDRi in picturenaut using high bits per channel, which this package can only export as .tiff files, but minimal tone mapping. In this case I used just an effective +1.3 EV exposure adjustment of the whole image.. Again I was not able top read the 32 bit version into lightroom, where as picasa could display it? However the 16 bit per channel files loaded easily into lightroom and responded beautifully to some tweaking of the shadows & black tones and slight clarity and luminosity increases. These adjustments did unfortunately highlight the digital noise, which is typical of low light exposures, but this was easily corrected with the lightroom 4’s development/detail sliders.The combine file is no longer a RAW format but it does hold and extended dynamic range that the basic lightroom development controls can adjust, and I feel this approach does it naturally, not in the lurid surreal formats so often blamed on the HDRi technique itself, but are actually related to some preset concepts of the tone mapping options in common HDR packages. So Instead of “finishing” your HDR work in picturenaut, photomatrix or other HDR software, instead try saving the combined image at a higher bits per channel and do the final tonal adjustments in lightroom (or photoshop)
Sequence: {IMGP0673.JPG: TV=0.002857, AV=6.7, Bias=-1.0} {IMGP0674.JPG: TV=0.004000, AV=6.7, Bias=-0.5} {IMGP0675.JPG: TV=0.004000, AV=6.7, Bias=0.0} {IMGP0676.JPG: TV=0.005556, AV=6.7, Bias=0.5} {IMGP0677.JPG: TV=0.008000, AV=5.6, Bias=1.0}

Late Afternoon Visitors

Wednesday, April 10, 2013

PhotoFriday :: @ Rest


For PhotoFriday‘s topic at rest

More about WiFi and photo uploading

Most keen photographers know about Eye-Fi cards, I haven’t got one but I understand they do the job, are perhaps a bit slow and need extra software and drivers on the receiving computer. Then there is the cost which is between 3 to 8 times the equivalent memory SD card and there are some issues of compatibility. Now there is a competitor, Toshiba has announced a new FlashAir wireless LAN SD card. It works somewhat differently to the standard Eye-Fi approach, when the camera is tuned on it becomes a WiFi hotspot and all you need to download photos (or any files) is a browser. So you can access the photos from a wide range of devices, including smartphones. Looks like it will be a similar price to Eye-Fi for the FlashAir cards here in Australia, This Engadget review view explains more.

Tuesday, April 09, 2013

Taming the Tangle

One issue that has bugged me for a long while is the tangle of cables and cords, in my computer Common styles of USB connectorsand camera bags. Preparing the photo to illustrate my previous blog post highlighted just how many USB cables I depend on, and that doesn't include power transformers and battery chargers! So here are few interim suggestions.


Reducing the number of cables

This is a lot easier said than done. However there are only limited number of styles of USB cables. Instead of carrying three or four that are identical, you should carry only one (or two). Also carry the shortest version when there are multiple cables. When it comes to battery charger and power packs they are probably all different My three camera battery chargers can share just one short power leadsize and not interchangeable, but the power cords to them may be shareable. They are unlikely to all be needed at the same time. Typically in Australia they are either 2 or 3 pins and one cable might connect to several. Between my wife and I we need to carry three different battery charges when travelling but they fortunately they all share the same two pin power connection so I only need to carry one extra short power cable.

Where a device can be charged via a USB connection, you will save having to carry yet another transformer, and either charge it off your computer of carry a small USB charging adaptor.

Some duplication may be desirable. There is nothing worse than not being able to charge your phone or connect your camera because the cable is playing up. I found a great universal USB cable set, which was inexpensive and has several "heads" that fit an longer USB extension cable. I pack this in my luggage rather than take up space in my camera bag. I also carry a second inexpensive USB charging plug here.


Staying tangle free

Having your cable in a scrunched up mess is courting disaster, not to mention a lot of time spent untangling. Whilst there are a number of clever cable windup gadgets around, I have found, from bitter experience, that the smaller spring loaded ones are more likely to damage the cable or make its performance flaky. My cables are stored in a mesh zip bag and cloth pocketsThis is because most data cables now are complex in their inner design with fine web shielding etc, small or tight kinks will cause stretched connections or broken strands. It is the end connectors that at particularly venerable to coming loose or breaking off when cable is tightly bent at the junction.

I find winding the cables as open loops  that suit their natural flexure, thinner cables can be kept in smaller loops. Then storing these in cloth pockets or mesh zip bags (as in my photo) really helps keep things organized as well as avoiding damage.

ABC of my photo flow

I have been quietly reviewing several aspect of my digital photography, including the physical aspects my photo management, what I do and what I have to carry as I travel around (a couple of trips are coming up). So I thought I might share some of this here.My ABC Photo Flow

A for Aquire

This is the step where I first take the photo and then transfer it to some other storage device (typically a laptop or net book computer) . I have two options here either by removing the card from the camera, or connecting a cable. Wireless or Net based transfer could be used here as well but I'm lagging behind the times a little in that regard.
 

B for Backup

This is the step I think a lot of photographers over look but it may be the most important. At the same time (or very soon after) you transfer your images from the card or camera you should also make a backup copy (doing this automatically is best). At my office I have a Netgear Stora (a duplicate drive raid system) that is set to automatically backup everything from the local user drives on my network. So loading photos into my picture folder, for example, automatically creates two copies on the stora. When travelling I usually have a small USB backpack style hard drive and I manually copy any photos uploaded to it. Whilst I have gone from a single copy on my camera/SD cards to two copes on harddrives, travelling is a higher risk time for this style of storage, so just in case I carry a couple of empty USB keys in my camera bag to make sure I have additional backups of any "keepers". These backups copies are short term and can be cleaned out once the photo sets go into archive collections.


C for Collection

My Primary Copy/Collection, the long term access and storage location, the true archives, are updated regularly usually monthly, but sometimes after special trips or events. I have an permanently running external hard drive connected to my LAN and which contains a master PhotoARCH folder, this is shared between my all my computers, and under that folder are subfolders for each year, then subfolders for each month and finally sub folder for each day.  I have found archiving by date is the easiest way to organized my new digital photos. At the same time I update the archive I also make external copies to optical media (eg DVDs). In the past I made two copies of the DVDs and stored one off site. Recently I did some sums and it is now actually cheaper (a set of 50 DVDs for $24 means the long term cost of storage is around $0.11/MB whereas a 3TB drive for $120 means storage is $0.04/MB) to use a large external hard drive just loaded with your photos and sitting on the shelf, compared with the same storage sitting on DVDs taking up the whole shelf (3TB is equal to approximately 670 DVDs). So now I have two external drives for my archives, one on-line (just on my network) all the time and the other on my shelf. I still make a DVD set to store off-site each month.
If you are a fan of the 3-2-1 approach to backup you will notice that this system incorporates those principles (3 copies, two media and some physical separation between the copies.) I prefer to call it my A-B-C.


Monday, April 08, 2013

PhotoProject :: What would JMW Turner do?

J M W Turner was a English water-colourist, while he is highly venerated today that wasn't always the case. It is Turner's use of atmospheric colour & drama that sets his work apart. He also had a brilliant eye for composition.

So in this photoproject I am wondering What would Turner do? I'm starting with an ordinary photo of the sunrise, a strong lighting theme Turner liked and painted often. My photo is the last in a panning series where I was following a seagull, albeit a little too far away, but the clouds seem to have potential while the image is actually a bit heavy and dark.


Composition

Turner's work are beautifully composed, and landscape photographers particularly should study his works. He had a knack was placing his main subjects and points of interest right on those imaginary lines that split the axis of the shape into two, in the ratio 1 to 1.61803398875, better know as the golden ratio.The other important aspect of his composition was the balance. Both in terms of positive and negative shapes and detail versus just ephemeral atmospheric suggestion.

lightroom develop moduleLightroom does have some nice cropping guide overlays and the golden ratio is there right in the middle of the list. It looks a little like the rule of thirds but the lines are closer to the centre. You can use the O key to cycle through the various overlays. Here I am cropping to not only get the bird is on the intersection of the golden ration lines, but the emerging sun is also on one of the lines (the right hand side)


ColourThe Fighting Téméraire

Lets look at Turner’s colour scheme. In his famous painting The Fighting Téméraire, Turner has used a dominantly a cool blues and greys pallette, with a small amount of rich warm colours to capture the setting sun and its reflection. Tonal Hoistogram from The Fighting TéméraireIf you load a copy of his painting into lightroom you would see have a well balanced histogram of tone, with the cools dominating the shadows and warms dominating the highlights.


Match Palette dialogueCorel painter essentials has a nice little match palette feature, which is as simple as identifying the image you want to “borrow” the colours scheme from. After adjusting the colour palette to match Turner’s which in this case mainly involved brightening. imageI saved a copy of my modified photo and once again looked at it in Lightroom. Turner was renowned for using strong colour and particularly his yellows, Gamboge, Quercitron and Indian Yellow, So I’ve lifted the luminance slider on orange/yellow a fraction and eased back on red/purples. This is my Final Photograph (larger image below) as Turner might have wanted to take it. Thinking about what Turner might do has helped transform this from an ordinary and heavy photo (upper left image) to something fresher. Since I also had the image in Corel painter I figured I’d let its autopaint feature make a watercolour of the same image, and that was a bit of a disappointment not Turner-ish at all but i tend not to like auto-painting anyway.
original photo    Corel painer essentials - auto watercolour

IMGP9709-8 turnerish photo-11

Click on the images above to view them as larger versions.

Sunday, April 07, 2013

Post Processing in the Age of Coffee & Free WiFi

IMG_1005-8The time taken from image capture to world wide sharing can now measured in seconds, and the most amazing part is that this is likely to be free, or only at a small cost. You may have to buy a coffee to get the WiFi free.The hardware to do this is pretty common now as well. Smartphones with camera and Ipads are in so many people's hands and a common sight on cafe tables. There are also Eye-Fi cards for DSLR and some camera manufactures are adding android processors to some models (eg Polaroid, Samsung & Nikon but these are definitely not low cost yet!). However transferring the photos is just part of the story for a lot of digital photography addicts, who really want to do at least a little post processing. Fortunately here the story is also cheaper (if not free) and faster.

A Multitude of Apps

I know the apple-verse is overwhelmed with solutions here, but I’m dragging my feet joining the party. Clearly instagram is the most popular but the apple store is awash with photographic apps. I’m more familiar with the android market, and google play also have plenty to choose from. If up have an android phone I suggest you check out Aviary, Snapseed, Pixlr Express, and/or Photoshop Express all free to download. I also love HDR Camera+, which does the processing and sharing “inphone” (no computer or other software required)

My USB Digital Darkroom

I have been carry around a universal card reader and USB key with some photo portable apps in my camera bag or a while now and they have been real life savers on several occasions. These do need a cyber cafe;s computer or your laptop to connect into but you can get very close tom if not as good as, photoshop and lightroom level work with portable apps like Gimp Portable & Raw Therapee Portable just from an application that doesn’t need to be installed!

On-line Photo Editors

There are now many places that let you perform decent post processing on full size images from a web browser, so you probably want to have your netbook or laptop connected. I personally like Aviary for Google Drive (a chrome app) but Pixlr is damn good as well.

There is really no reason why you can’t take a great photo, then collect your thoughts over a coffee while you tweak it into being a true masterpiece and have it published on-line before you leave the cafe. However please use this new power wisely don’t choke the available bandwidth with copycat blandness or fill the social end of cyberspace with banality and imitative junk.

Friday, April 05, 2013

HDRi in16 bits

the stump bracketted set
This is a bracketed set of a stump that had interesting morning lighting. The normal exposure was fine but I thought this was a good set to try out doing the tone mapping in Lightroom on a 16 bit or 32 bit image after doing the HDR merge in Picturenaut. I tried creating a few versions in Picturenaut. Firstly Lightroom would not recognize the colour profile in the 32bit images (not sure why) but loaded the 16bit images perfectly. However if I exported the base merged image the results where not even close to the results I got if I did some preliminary tone mapping in Picturenaut. The image below is a standard adaptive logarithm tone map that has been tweaked a little in Lightroom. If you look at the tone histogram you can see how well the light distribution has been handled by the extended dynamic range.I just think the photo is now a lot closer to what I remember seeing.THE STUMP1

Wednesday, April 03, 2013

The nips are getting bigger

I have been taking digital photos in earnest since mid 2003 when I got my Olympus. It is interesting to look back on the numbers of photos I have taken and how much space I need to store them.
Year
Number of Files
Disk Space required
2003
5,947
3.8GB
2004
21,066
12.3GB
2005
19,074
10,5GB
2006
22,359
32.3GB
2007
24,412
53.5GB
2008
22,527
48.4GB
2009
17,897
77.5GB
2010
19,307
95.6GB
2011
23,573
151.6GB
2012
25,534
307.0GB
 
 
What is happeningWinDirStats graphic of the size of my archived photos is I'm not really taking many more
photos what I am doing is storing significantly larger files, specifically Raw files and Videos. The jumps in file size do equate to new cameras and/or change in practice (like shooting both jpeg & RAW but perhaps fewer bracketed sets). This is what the space looks like when visualized with WinDirStats. The darker blue are jpeg, the light blue .pef and red .cr2 are RAW formats, the  green .mov files. My collection is definitely becoming more colourful.
 
So I'm while I am pretty confident I will be pressing the shutter 20 to 25 thousands times this year. Also I hope the file size trend doesn't continue. Will I stop shooting and saving both RAW and jpeg? Certainly not! More videos? Possibly. A newer camera? Unlikely! Perhaps it is time to accept the nips are getting bigger and consider an additional external drive!

Tuesday, April 02, 2013

Extreme DOF @fter Pan


Extreme DOF @fter pan, originally uploaded by imageo.

For some time I have realised that using anti-shake and auto focus while panning after birds in flight was counter productive. Most often I missed the great shot as the lens drives back and forth trying to focus or worse it would find something well in the background, behind the action and I have a blurred bird.  So I’ve been brave and stopped down a bit (eg f8 of higher, to get a bit of latitude in depth of field, DOF) and manual focussed in the middle distance where I expected the bird to fly. Then I set the camera into multi-shoot and follow the birds flight in a conventional smooth pan with my finger held down. Depending on the light I usually get a better sequence with just a little motion blur in the background (see below). However the photo above is the last shot in the sequence just as the sea gull is flying out of my depth field range and the distant background, well up the beach, is out of focus. Giving it a pleasingly ambiguous “into the unknown feel

IMG_0707-10IMG_0706-9IMG_0705-8

Monday, April 01, 2013

RAWing @ Picasa

load photosI prefer to load all my photographs, jpeg, RAW and movies into picasa because it is much faster and easier than waiting around for lightroom. I also prefer to read the SD Card, rather than use a cable to connect to the camera, but this is just a matter of preference. I just leave the import folder at picasa default (date taken, in YYYY-MM-DD format so that an alphabetical sort puts them in date order). I have also experimented with the Windows live photo gallery to do the copy and it is pretty quick and easy as well, but it never grabbed me as better than picasa. In particular I got lost when it tried to guide me to download drivers for RAW format, like my pentax .pef and cannon .cr2  both of which I had already installed the drivers for? Picasa wasn’t perfect here but they provided RAW support some time ago. I got to see the RAW files much sooner than in lightroom but the renderings were sometimes well away from the paired jpeg and what the cannon, pentax utilities did or even what lightroom might do. I don’t really like the picasa rendering on most RAW files and prefer just to see the jpeg version, as the camera took it!
imageMy solution has been to “ignore” the RAW files in picasa, which is very easy to do via Tools/Option/File Types, and just untick the box. However I actually like to make sure that I have actually imported everything (occasionally the import leaves the RAW files or movies on the SD card, not sure why). Also I find it best to delete the bad photos (both jpeg and RAW versions) immediately on my first pass view of the photos as they are uploaded. So I am usually toggling this setting on and off. In other words I like to see picasa load the RAW files but I don’t really look at them or do any serious editing of my RAW files in picasa. That is a job for lightroom, where I just to do a File/import photos and videos from the folder that picasa has loaded the new files into. All this might sound like double handling but it is still faster than loading directly into lightroom, (I can’t figure out why) and I get to cull the duds as a bonus.