Showing posts with label painter. Show all posts

Monday, July 04, 2016

ArtInspired :: Seeing a photo via a painter’s eyes

“I see things in terms of paint, all else is irrelevant.”

… Fred Williams

Following on from my experiments with textures, I went and had a relook at the Fred William’s works currently on display at the NGV Ian Potter Centre (there are currently 5 but they are spread around, One in the Luminous Australian Watercolour exhibit, two in the 20th Century Australian Gallery and my two favourites in the Joseph Brown Collection).

Fred’s landscape inspired abstracts work so well at a large scale, at a distance they are compellingly interesting, very characteristic of the bush areas he used as inspiration, particularly in colour and textures. Close up they are very confidently painted splodges and squiggles on a rich ground, essentially abstract.


I have deliberately begun with two simple images of the scrub and gumtree truck taken in Jells Park plus and image of the same place taken without a lens and deliberately under exposed.

_IGP7027 original photo_IGP7025-original photo_IGP7028 Photo taken with lens removed

tree0001 copy


These form my “sketches”, to which I added another simple sketch of some line work. It is important that these are the way I might make marks. However it is not a realistic sketch more an exploration of composition and line. After the success of using dreamscope and layering back into the work I again generated a couple of deep dream interpretations of the photos above. Firstly just using some of the standard filters provided.


Using the dreamscope sketch filter Len-Less image using the dreamscope Picasso filter (he obvioulsy avoided dark hgreens)

The magic started to happen when I used my line work sketch as a custom filter. So the deep dream process in dreamscope was looking for the style of lines I might have used and emphasising them.

Using my line work as dreamscope filter Using my line work as dreamscope filter

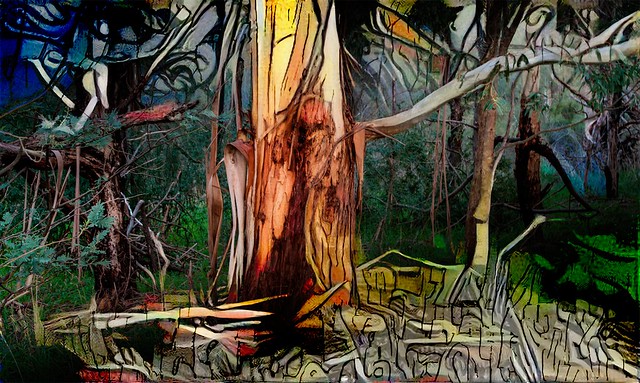
I’m still not sure how to tackle his rich selectively coloured backgrounds. In Enchanted Forest 1, (below) I tried using the the len-less image after it was interpreted via a Picasso filter, Its certainly a colourful result, but perhaps too colourful and not really characteristic of the Jell Park scrub but I trust you find still a pleasing interpretation.

_IGP7027 Enchanted Forest 1

I noticed that the sketch dreamscape of the tree truck did have the limited range of colours I was after, perhaps a bit more vivid than Fred’s treatment, yet his colours are undeniably rich. So I have used that image to bleed through the background and a descent into my line work style at the bottom of the image.  Enchanted Forest 2 (below)#184_IGP7025-Enchanted Forest 2
Wednesday, January 06, 2016

Clone Painting Comes of Age

I took advantage of a discount offer and bought myself Corel Painter Essential 5. I’ve had corel Painter Lite since I first bought Aftershot Pro and I love it. It’s easy to use, offers lots of great brushes and has layers. However there was a lot of flak from previous Painter essential 4 users they wanted Clone painting (aka Auto painting where the computer created a painterly effect from your photo) Yes I did tolerate that but it sort of lacked thought in how the marks where made. A bit sterile but the colour palettes and variable stokes did add some charm.Painter essentials 5 is still fairly automatic but the marks are true to the brush and surfaces being used and the “feel” of painting considerably stronger. Bringing creativity to those keen to find it. I’m also trying out the mobile version on the android phone. Watch my tumblr blog for results

Thursday, August 07, 2014

Dipping a Paint Brush into a Photo & Beyond

I have been reading a book called Beyond Digital Photography, Transforming Photos into Fine Art with Photoshop and Painter by Cher Thereinen-Pendarvis and Donal Jolley  It fits in nicely with a lot of my ideas (and challenges) of dipping a paint brush into a photo.

The really dramatic jolt of deeper understanding I got was that it is written for the artists (the creatives, which includes any photographer, perhaps without formal art school training, but a keen eye and a desire to create better images). The difference is it does not run through each option and nuisances of every tool (there are plenty of guide books that take that approach if that’s more your desired approach, but learning will be a lot slower that way), or an over-encompassing workflow.A humble start dipping a paint brush into a photo It begins by talking about the works space, both physical and in software and covers the use of wacom tablets and output resolution right up front. This is goods advice “Know your tools and objectives”. Each chapter begins with a discussion of which equipment is used up front and the various tools used are presented in terms of desired outcome.Then there are a series of chapters based around different media (wet & dry) and approaches(gesture, emphasizing the subject, abstract art, compositing and collage). Rather than describe each chapter in detail I suggest you go buy it, or borrow it from the library. Here are a few more excerpts for those interested in a little more detail.