Monday, May 31, 2010

Working on Raw Colour

Original JPEG from CameraVia PicasaVia Raw Therapee 

Whilst I haven’t blogged about RAW format lately. Its not that I haven’t been taking lots of RAW photos. Its more that I haven’t a really  found productive way to handle processing my RAW photos. I have a pentax camera and their default RAW format is PEF version of RAW is currently ignored by picasa at the upload phase. Thats ok I can read the card a second time in the Pentax Browser. However that inevitably involves a lot of tweaking and slider adjustments for each photo individually. Then I discovered if I copied these PEF files into a folder that picasa is monitoring the file is visualized, with a set of automatic “adjustments”, just what those adjustments are and how to turn them off is a mystery. The good news is picasa doesn’t modify the file at all. I Have noticed that in lower light the jpeg from the Camera and the Picasa interpreted RAW version are often quiet different. If the image showed promise I’d usually end up fiddling in the Pentax Browser and end up with something different again. When using RAW I usually focus most on getting realistic colours from the images greater colourspace depth.

I’d heard good things about RAW Therapee but only got around to downloading it today.There is a lot of good stuff to discuss. more for later posts, but what I immediately loved was its default process, such as white balance and brightness and that are easily modified and customized profiles easily stored. You see a preview and can still adjust it further is required. If you like the preview you can save it as a JPEG, TIFF & PNG File. If you use picasa you’ll have the original jpeg, the picasa version and the RAW therapee version all side by side (like above) so you can compare and export the version you want.

Saturday, May 29, 2010

Removing A Colour Cast

BEFORE pizzas with orange yellow colour cast

Having been inspired by a couple of pizza recipes on MasterChef, the results were worth a photo but alas under the halogen downlights (2,700–3,300 K) there was a strong orange colour cast. These downlights have a much lower colour temperature (those K numbers) than daylight (5,500–6,000 K). You can of course use the white balance setting in your camera and set it to artificial or tungsten.colour bias However I was hungry and just took the photos as they were. Not to worry most photo editing software will have the ability to make an adjustment for such colour bias as a post process. In picasa there is the nifty Neutral Colour Picker tool under the tuning tab. Click on the little eye Pizza Biancadropper and them click on something in your images that you want to be white or a neutral grey tone. There is part of a cook book on the left hand side so I use that, and instantly the colour bias is removed although I also used both the fill light and highlight sliders to lighten the image a bit. An appetizing pizza bianca recorded for posterity!

AFTER : Neutral color picker adjustment in picasa, now more appetizing?

Friday, May 28, 2010

ARranged ART


The final tonemapped HDRI image
This collage is a tapestry of the many bracketed photos sets used to test of my current HDRI tools. I used picturenaut in the end.. For no particular reason I arranged some stones on the weathered deck as my subject, still the collected images themselves have arranged themselves into a deeper pattern.

For PhotoFriday's topic Arranged

Wednesday, May 19, 2010

Tripper Map App

If you like and use flickr, why not have a look through their APP Garden, Its a place you'll find home grown applications created by Flickr members (like you!) using the Flickr API. The garden continues to flourish so go forth and frolic amongst the apps! Like Iphone apps there is a lot to waste your time on but there are some great creations and it worth an occasional wander around.

If you follow my geotagging threads you will know I don’t really like Yahoo maps and prefer to work off google earth. Well Mark Zemen (a kiwi traveller) has produce a wonderful app called Trippermap, which basically lets you geotag in flickr using google earth. Yet it does a lot more. including showing your trips in flash maps for your website or blog (see example below and the small side map & slideshow down under geotagging on the right) or browse you photos from with google earth. This is a really great tool for travellers.

Sunday, May 16, 2010

Cropping & Composition

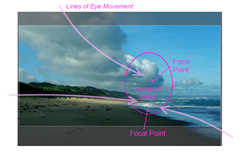
image I was happy with this photo, it did achieve what I had seen. The break in the clouds the pools of light on the beach and the billowing dark clouds above. So I figure it is a good example to demonstrate how cropping can help improve composition and what Features I wanted to enhance. The Center of interest is slightly off-set to the right, something i did deliberately in the viewfinder. It has has two distinct focal points, firstly the dark against light tones in the clouds, above the brightly lit waves below. There were three distinct lines/shapes for the eye to follow already. So I concentrated on was keeping the center of interest close to the vertical line that divides the composition into two thirds and one third (the rule thirds) That just left the option of vertical cropping to more a more panoramic format, keeping the lower focal points in the golden ratio from the top & bottom. The lower cropping also accentuates the strong diagonal of the reflection on the wet sand.
IMGP3454
Protected by Copyscape Unique Content Checker

Saturday, May 08, 2010

The Coast (Hoody Beach)

 autostitched panorama, straightened, cropped & lightened
For Photo Friday’s Challenge the coast
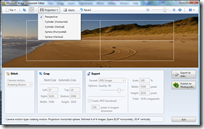
IMGP4882-2 I thought this panorama of the Hooded Plover nesting areas on the Venus Bay beach would give me a great comparison between autostitch and microsoft ICE (Image Composite Editor). I had taken a set of very conventional overlapping photos as I panned along the beach, starting on the right and going to left (this upsets a lot of panorama joiners by the way). Both dutifully stitched the image without complaint. The Autostitched version (below and also straighten & cropped above) is nice and seamless. It also has that “true to what I saw” perspective that wide angle camera shots don’t give. The ICE version wasn’t bad either but it does have a few little jagging joins when you look in detail. I experimented with the perspective projection and  found it gave a imagewonderful deep view of the beach (it is a beautiful long sweeping part of the coast). This is really enhanced if you have a look at this panorama as a photosynth (at the bottom of this post)
Autostitchautostitched panorama
Microsoft ICEJoined with mixrosoft ICE using Perspective Projection
Photosynth created by Microsoft ICE
Sorry only those with microsoft windows will be able to view this synth and get the live 3D modelling effect. [Correction Mac users should be able to view this via silverlight please leave a comment if you find that works]

Monday, May 03, 2010

So much noise

That grainy speckle that often infects digital photos taken in low light, is normally called noise, (maybe it is called dark noise, heat noise or salt & pepper noise). It happens when exposures are longer and/or the ISO setting are higher because adjacent receptors on the sensor are charged up longer or more to become more sensitive. That allows heat or current leaks onto the adjacent receptor which interprets it as more light. There are a whole range of methods and algorithms to detect and try to remove this noise. Many such methods are now being built into cameras. They seek to work out what is an artifact of the noise versus real detail in the photo. Some methods look at variation in brightness or luminance (Lumina) other look are variation in hue (chroma), the little specs usually appear variable colours (see below). I find with my camera the chroma noise reduction leaves a better quality filtered image and removes the “digital camera grain” best. However all noise reduction will lead to a slight loss of detail and quality in the final results, typically a smoothing effect.

BEFORE

Original Photo

AFTER

After Chroma Filter in Noiseware
From my perspective noise reduction is the one remaining obvious thing missing in picasa’s simple photo editing tool kit. Unfortunately the best NR (that's Noise Reduction) Software is still relatively expensive and mainly available only as plug in for Photoshop & Lightroom. Don’t despair, a free download trail of noiseware (either as a plug in or standalone) will give you decent results before you need to fork out big bucks. The above example was created with the Noiseware Community Standalone version (free and no trial period). Good Noise filters are available for Gimp.
There is a lot of hype written on the net about NR tools and most are actually much of a muchness, but without testing it is difficult to appreciate subtle differences. Pro Photography Show gives a decent review of leading NR software by way of a number of downloadable high resolution before & after images so you can see for yourself.

It is wise to have at least one such NR filter method available to help you recover an occasional dark photo or even a whole series from your party when the photographer may not have be concentrating.
Protected by Copyscape Duplicate Content Tool

Sunday, May 02, 2010

Softly Softly

 
Using the Focal B&W filter in Picasa to take attention away from the inevitable truncated leaves and buds on the edge of the photo
Posted by Picasa

Saturday, May 01, 2010

After the rain II

 
Things around my garden have been enjoying the recent rains, and the lighting this morning was perfect.

I still prefer to use manual focus when taking macro (close up) photos of plants, their intricate shadows and patterns can often fool the autofocus into blurring your subject while bringing a leaf or twig off to the side into sharp focus. Autofocus can be particularly difficult when you subject is light (a white flower) and your background dark (in shadow)
Posted by Picasa