Wednesday, January 31, 2007
The old skool merge fiasco
I recently noticed when I tried to access flickr from my new mobile phone that I could not. You can now only do that with a yahoo login (I know I have one but all attempts to get Yahoo to acknowledge it has gone unanswered. Maybe I'm not just forgetful of passwords maybe I have been the victim of identity theft, or more likely it was deleted years ago for inactivity. Anyway I have wasted enough time trying to be nice now I'm just annoyed. So now, to annoy me a little further, I have received an email from FlikrHQ telling me that using the old skool (ie original flikr) email name as an login ID will be phased out on 15th March and you must have to use a yahoo account. Now I really want my old yahoo account back, PLEASE Yahoo gods find or reactivate my old yahoo ID
If like me, this has left you less than impressed there is an official forum thread in flickr to sent your comments, I'm not sure that anything will be done but it may be cheaper than therapy.
Monday, January 29, 2007
Australian Fur Seal Pup
A nearby colony of australian fur seals was recently in the news after many where callously shot by local fisherman. This little/guy was obviously not to concerned by humans swiming ashore at a popular beach to join the sunbakers him/herself.
Saturday, January 27, 2007
Is focal length still relevant?
Focal length is seldom mentioned anymore in the same breath as digital photography, the jargon has moved onto times zoom. Not that this is that clear, you have to understand the difference between optical zoom (the lens being able to change its focal length) and digital zoom (just a part of the image being magnified in the camera, without any improved resolution). Even with digital SLR cameras which have interchangeable lens, most people just buy a zoom lens, so they pay little attention to focal length.
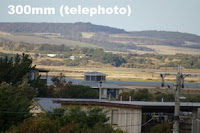
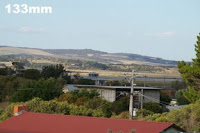
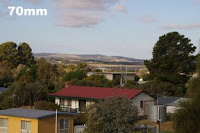
Increasing the focal length of the lens you use (either by changing the lens on a DSLR, or zooming in) narrows the field of view and magnifies the subject (making it look closer). Higher focal length lenses are called telephotos. Decreasing the focal length expands the field of view and the image looks further away. Lower focal length lenses are called wide angle, because of their wider angle of view.
So here is a demonstration of the magnification and field of view obtained with different focal length. To fully appreciate the difference in magnification involve try if you can see the small "turret" on the house in the middle on the first image at the top, in the final image at the bottom. You will need to click on the images to see the larger versions.
Whilst a 50mm lens best matches the perspective and magnification of the human eye on older 35mm film cameras, a focal length of 33mm approximates the normal human vision on a digital camera, which has a smaller CCD sensor area.
If you are interested you can find the focal length used for images in the EXIF data embedded in most Jpeg or RAW file formats these days
Changing the focal length also changes the perspective but that can be the topic of another post.
Friday, January 26, 2007
Getting Ready
The inactivity in this blog has been largely due to my being busy on other things, one of which has been "chasing the comet". The first week the McNaught Comet was visible was totally overcast and/or raining around here, day after day. We did need the rain, so no real complaints. When the fine weather finally did arrive I was immediately hooked, mainly from seeing the great photos from other members of the Australian photographers group. So for the past 5 nights from sunset till after 10pm I have been out looking for the best places to photograph the south western sky. Turns out my place was pretty good.
You'll hear more about some of the interesting things I found out in blogs to come.
Thursday, January 25, 2007
Prepare to be amazed
Have a look at this 360 degree panorama with the amazing SPi-V panorama.
Thursday, January 18, 2007
Light in the digital darkroom
As you may (or may not have noticed) I am probably one of the few digital camera addicts that doesn't have adobe photoshop. I have looked at a few preview copies in the past but always removed them since I already had software that did much the same job (Specifically I've had and liked corel's Photoalbum & corel Paint/Draw and then there is the software that comes with your camera,scanner,printer and the list goes on) Lately I have found myself just using picasa because I prefer to get the exposure right in the camera and its only things like straightening and cropping, that I routinely do on images, not to forget printing, all things picasa does well.
Well I might have to change my mind. Today, after reading terry Lane's column in the Livewire section of the Age Green guide I downloaded the beta version of lightroom, which you can do as well if you are interested, but only till 28th February, when the release version goes on sale. (I presume the beta version will expire then)
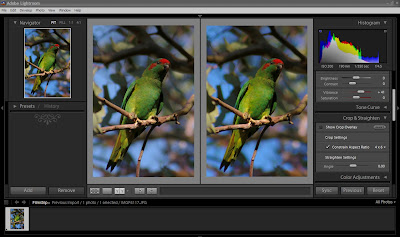
The first thing that struck me is the changes to the user interface, it look different and yet familiar enough to be very intuitive. Panels, containing tools and controls, mostly sliders, are on either side of the screen, They are easy to retract and replace, as is the film strip at the bottom, meaning you can get lots of screen real estate back when you want it. I also like the before and after option for display.
Something that is different but is one of those why haven't they done this before realizations, is the "long press" function. On many mouse actions it temporarily changes/toggles some display setting while the mouse is held down then revert back when the mouse button is released. It is one of those features you need to do and use rather than read about it.
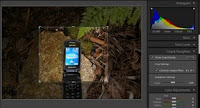
So the first thing I checked was cropping and straightening, which are pretty ordinary and/or tedious to use in a lot of software (especially the expensive ones). Well cropping was great, Once I found the tool (which is down the list a bit in the develop view). It shows the whole image dulled out and just the area you selecting fully rendered,liked the way picasa does this. Which is why picasa had become my preferred cropping tool.
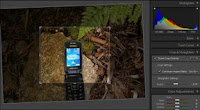
The Straightening was at first disappointing, just rotating the image with no reference marks (I also like picassa grid overlay during straightening, in fact I have come to rely on it). Well if you selecting the cropping view as you straighten the "long press" feature (discussed above) toggles on a grid overlay over the image as you rotate it. Perfect!
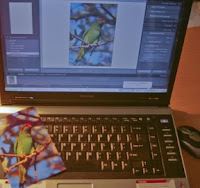
Printing is another bug bear for me, the standard print interfaces in a lot of package either try to do to much (and change the photo colours and tone, without permission) or too little (give very little control of print size, paper type etc.). So the Lighthroom print feature looks a bit light but it does do a good job with my printer (a HP Photosmart)
PS: I have been warned that the lightroom (its called LR apparently by those in the know) may change the features I've discussed above a lot in version 1.0. So it will be a good idea to watch the lightroom labs forum to keep up to date. Thanks sean for this info.
Monday, January 15, 2007
Musk Lorikeet [Glossopsitta pusilla]
must admit I have been trying to get a "good" of these little guys for a few days. They fly really fast and only fly in around dusk. Well this one flew in early and had a good look at me while I photographed him.
Saturday, January 13, 2007
PhotoFriday :: peaceful
Pickles, a former class room pet, enjoying a cool place, out of the heat.
For PhotoFriday :: topic Peaceful
Thursday, January 11, 2007
Wednesday, January 10, 2007
Stitching close up images
Falicfer ask this is a very interesting question in the autostitch group on flicker
Has anyone ever made a successful panorama from macro shots?
Is there a way to achieve good results from it?
Its harder than you think. I figure it is mainly because of parrallax issues that shift the relative position of foreground and background objects making matching very difficult.
1) So my first attempt to find a reasonable solution was to zoom in but take lots of images (and I mean lots) then assemble these.
Even though this is not a true macro subject it is a confind space and I wanted to be able to show all of it at once. The large number of`images meant I did at least get a match across everything, however it is easy to see where some stright lines are jagged and some images still don't match fully. Yet I was happy that I did get a result.
2) When I realised it was mainly the background that was stopping the stitch process when I got close up. I figured I should use depth of field to throw the background out of focus. With a normal lens and close up the depth of field can do this but I decided to try out my telephoto zoom lens "super macro feature". It gives a tighter depth of depth and you get fantastic control over what is put out of focus. The only problem is you can't get closer than about a meter. (around 3 feet) not exactly macro close.
I have a 40cm tall wollemi pine and wanted to take its portrait, so this seem an perfect subject. I stepped back zoomed in and took 7 seperate "macro" photos.
Finally I used autostitch to assemble them and it worked wonderfully.
Well I think it worked well
These images are for use in a new blog I have started called Saving Gwondanaland
Tuesday, January 09, 2007
Musk Lorikeet [Glossopsitta pusilla]
These little guys proved very hard to capture, they are close enough in colouring that they are quickly camoflagued in the flowering gums. The also seem to tag along with flocks of rainbow lorikeets, which are larger and more obvious.
The musk lorikeet apparently can be differentiated from the little lorikeet by the red on its bill (the little lorikeet has a black bill)
Monday, January 08, 2007
Heron in flight
Take it from me, photographing birds in flight is harder than it looks. They tend to fly out of the viewfinder faster than you can follow, or suddenly change direction, like to fly past as the sun has just set and the light is failing or is it they are just teasing you. Anyway I am alweays`pleased when i get an even half decent image.
White Faced Heron [Ardea novaehollandiae]. These two photos could be of the same bird, just taken in different spots.
If you are worried about all the bird pictures I've been taking lately, it is beacuse I can (I have a new new telephoto zoom, a sigma 70-300mm, for my pentax K100D). It is not a supper-zoom but it does give me the opportunity to get in close to birds. I also like submiting my photos to the flickr field guide to birds group. If you are into photographing birds I strongly recommend you join up.
Squabbling geese
Maned Goose, [chenonetta jubata], are actually ducks and sometimes called the Australian wood duck, they are common visitors in large flocks to jells park this time of year, where they graze for hours.
When I am photographing birds I always make a point of setting my camera to multi-shoot (or continuous) mode (normally this is indicated by a series over overlapping squares/frames. This allows a continuous series of photos to be taken as you hold your finger on the shutter, perfect to catch the antics of the squabbling geese.
Sunday, January 07, 2007
Wet weather specialist
Pacific`black duck [Anas superciliosa]
After a week of plus 30C days Melbourne at last has a cool change and a "little" rain, perfect weather for ducks
Wednesday, January 03, 2007
fleeting moments
This series was taken as a very orange moon (thanks to smoke from bush fires, yes they are still burning) rose through some cloud
even more urban birdlife
Flocks of galahs are not uncommon here, but they do seem to be larger than usual and appeear to be feeding on the roots of what little grass is left. I guess the rain at christmas has fattened up those roots
Subscribe to:
Posts (Atom)