Thursday, September 30, 2004

A change of scenery

I've probably been a bit heavy on the editing images side, of digital photography, in the past week, so I'll change track. Digital images are wonderful things, they don't just have to be printed out to be appreciated. In fact I think that the alternate uses of digital images will be the next big thing, simply because people will be creating so many, and cameras in phones might be more important in establishing this trend than digital camera.

Check in from time to time and I'll run through a few of these alternative ways to use digital images. Today I'll just show you one of the simplest and probably the most statisfying places to use your digital images. I'll use a space that is probably looking at you right now. Your computer screen background. (or desktop wallpaper in 'window's jargon). Changing it is one of the easiest ways to personalize your computer.

  1. Most of the upload and management software that comes with cameras these days, comes with a feature which will let you directly paste an image into your desktop wallpaper. I think the best general class name for this type of software is Photo Album, look over under a menu item like Output, Save Picture, or even Fun Stuff & look for a save as desktop wallpaper option.
  2. If you can not find such an option, you can use your favorite net browser (like interent explorer) Did you know you can type in your disk and directory names and look at things on your own computer.Eg (C:\Documents and Settings\Your Name\My Documents\My Pictures\ ). When you have the image you want displayed right click the mouse over the image, and look for a Save As Desktop Wallpapaer (or Background) option in the little pop up menu.
  3. If you are a bit more computer savvy you might prefer to use the control panel, and display properties/desktop setting to change the wallpaper There are a few more options available here such as center, stretch and tile.

My Olympus Camedia Software has a few nice enhancement for making screen wallpaper it allows the overlaying and feathering in of simple patterns or colours in parts of the screen to make reading your icons easier.

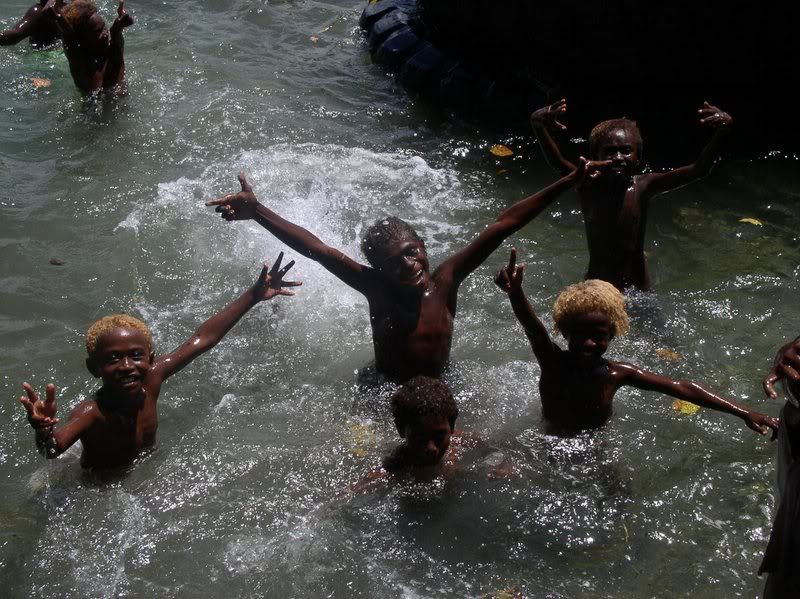
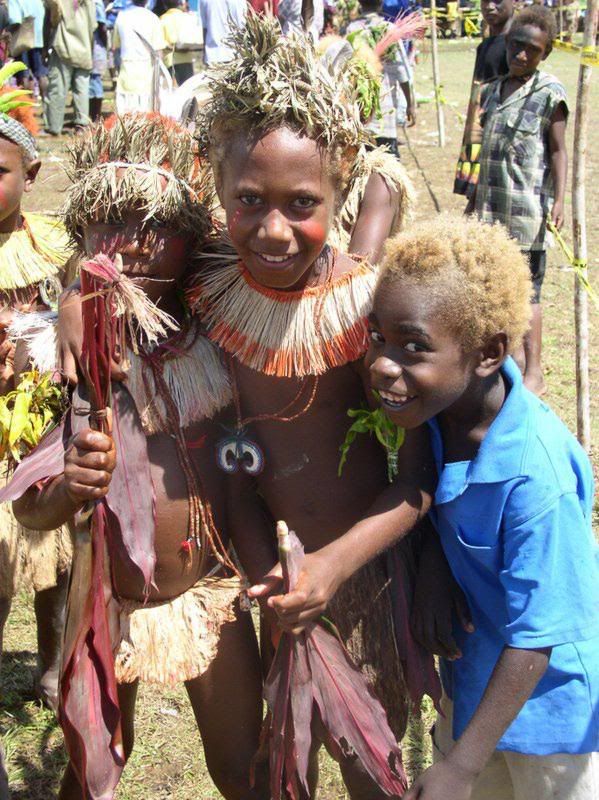
Here are a couple of images of Lihir wallpapers I've made. If you want a bit of a tropical feel in your work space, click on the image below, to see the higher resolution image, then follow step two above, that is right click you mouse on the image.


Click here to see larger image Click here to see larger image

These are couple of personal wallpapers I've made for colleagues here. Dave got a new dual processor, so what better that a close up of the workings for his wallpaper. Jacqui, took this lovely photo of a green lizard, I added some nice green leaves. The creative potential is endless.

Click here to see larger image Click here to see larger image

Tuesday, September 28, 2004

A good opportunity to investigate further

I guess it is now time to shift up to a more serious review of post processing in photo editing software. I happened to take this image of the sunset last night. It is in my view not a good photo, but as it the way of most interesting discoveries it is slightly interesting, in its rich colouring. I had deliberately cranked the exposure bias down to -2 EV in an attempt to capture the colours but the image was way too dark as a result.


I then accidentally had this image also selected as I did a batch resized and auto enhancement of some other unrelated photos. I was surprised and intrigued by the enrichment of colour and intensity that resulted.


Definitely further investigation required!

Into the darkness

Luminosity Histogram

Since my post "Washed out images - a small tonal tweak might help" to the Sharing Digital Photography Worldwide Forum, I've been spending a fair bit of time looking at, and trying to understand luminosity histograms. This one was generated by Adobe Photoshop Elements. This histogram, of the sunset photo above, is the sort of classic multi-modal heavily skewed distribution you encounter in all manner of phenomena in the natural world. In fact it is so heavily left skewed, or is it kurtosed, it might even be considered a log normal journey into darkness. (thats a joke for the statisticians, just in case any are looking in). In english,for the rest of us, it is a very dark photo, with a few interesting and colourful mid tones and a few rare bright spots. Its pretty tonally unbalanced!

So as well as the automatic fixers I've included some tonal balancing acts into my investigations below. You may have to dig down into your software to find the tonal equalization or balancing tools (that is they will probably not be under a top level menu called automatic something).

Clash of the autos

I spent a bit of time looking around in all the software I had on my notebook looking for anything marked automatic that was a "fixer", "correction" or "balance" of any kind. I'm not going to make any judgement though, that is for you to do. I trust my labeling, just wave your mouse over any image to see my label, will give you enough information to figure out which tools were used in each package. Remember you can also click on an image to see a higher resolution version of it.

Thumbnails Plus: Image/Process/General Enhancement Photo Impact: Format/Auto Process/Hue & Saturation

Abobe: Quick Fix/Color/Auto Color Photo Impact: Format/Auto Process/Brightness & Contrast

HP Image Zone Express: Fix/Auto Fix Olympus Camedia: Edit/Filter/Instant Fix

Abobe: Quick Fix/Brightness/Auto Color Corel PhotoBook: Map/Tonal Balance

Corel PhotoAlbum: right click mouse/Auto Correction Abobe: Quick Fix/Brightness/Auto Level


Corel Photo Paint: Image/Adjust/Auto Equalization Thumbnails Plus: Image/Process/Autocolor Balance

A couple of notable surprises were that Jasc Photoshop Pro and HP Photo & Image, the bundle of software that came with my printer, don't actually have anything labeled automatic. They do however have lots of sliders that do lots of adjusting, just not automatically for a novice user.

Monday, September 27, 2004

Man I kisim picksa

The I in pidgin is pronounced EE, so the heading when spoken sounds roughly like "man he kisim picture". But before you start thinking my love of didgital photography has turned a bit unnatural, it really just means "he took the photos"


These are some photos I took at the kids independance day cultural celebrations. Scrolled down and look in the archives if you want to see more. I have made them up into two A1 sized posters, which the company's community relations depratment are having printed up. They actuall look great blown up.

I made the posters with a trial version of Adobe photoshop elements, using the photo collage feature. Elements has a "tear of" How to menu that appears automatically on the bottom left hand side. I found The instruction reasonably clear, it even has "do this step for me buttons" on crucial steps. You'll find setting up the collage under the Fun stuff heading. It was pretty easy and turned out well. I also used the Save/As PDF option rather than print. It produced a massive files, roughly 70MB each poster, but these printed so beautifully I'm not going to worry about the file size.

I'm therefore warming to Adobe Photoshop after my initial dissapointment.

Saturday, September 25, 2004

Some like it wide


This pre-dawn image is not one photo but a composite of 8 photos. They have been spliced together to form a panorama. You will have to click on this image and veiw the higher resolution version to fully appreciate this photo.

This panorama was prepare using the Olympus auto panorama feature. A feature of Camedia Master that is easy to use and does a great job, but it only works if you are using a memory card purchase from Olympus, which seems a bit presumptuous and rude to me.

Most photo editors seem to have a splice or panorama feature. But before you race out and take a zillion panoramas. Their long skinny size makes them a little hard to get printed. Yet once printed, at a large size and framed, they are great taking points with their sweeping perspective.

Red Eyes (and their removal)


I did take a lot of photos for a Quiz night at the local social club and because I had to use flash there are a lot of red eyes.Many photos taken with compact or digital cameras,suffer the sinister phenomena of glowing red eyes. It is actually a reflection of the flash off the retina of the subject. There are a few thing you can do when you take the photo to reduce or overcome the problem. For now I will look at what to do when your flash photo subject has red eyes.

BEFORE


Normally i have shied away from fixing red eye. Most photo editors are the same, their red eye removal technique is tedious to use and dubious in how well they actually fix the problem.

AFTER


Again keeping in the theme of simple and easy edit tools I used HP Image Zone, the slimed down and very free version I download from HP.com Its red eye remove is so simple and best of all it works! Time taken less than a minute, and that includes starting up the program!

Friday, September 24, 2004

Red alert or not (maybe)

I guess by now, you must have heard a bit of the hype about microsoft's JPEG processing vulnerability.

It is only a percieved problem with techniques that might deliberately overload the buffers when a jpeg image is being processed. Unfortunately it could easily become a serious problem while everyone gets a chance to patch their software, because anti-virus and firewall software aren't (yet) designed to protect you against it. It will become a race between the hackers and microsoft/net security community!

So what to do?
Don't Panic

If you use an apple mac or already have service pack 2 of XP, (ie you bought your computer just recently), you are probably fine. If however you are like most of us and you have a PC with any earlier operating system be careful about downloading and processing images on your computer, with standard XP and Ofiice tools, in fact don't unless you really have too. However don't hurry out and upgrade to service pack 2, it will probably cause more problems than it solves.

This is the official microsoft security bulletin. It list all the modules that must be patched.

UPDATE: The internet Tourbus has been around for a while and I subscibe to there email newsletter, the are tracking the issues with patching XP and jpeg vunerability in their normal thorough but fun way. So for an update take a ride on the bus.

Hop On the Internet Tourbus!

So for the time being I'm going to just take photos and not worry about jpeg vunerabilities. I'll be alert but not alarmed!

Breaking the rules


Red Hybiscus

I like understanding the rules, but I also like breaking them. For close ups of flowers you'll see all the advice is to use a neutral or dark backrounds. There is a good reason for this the colours of the flower will look richer and the background won't distract you. Well this hibiscus flower was nice and wet after heavy over-night rain. So I wanted to get the droplets backlit, & I expected the flower to be dark and brewding, instead it is vibrant and happy, because I used an +0.7 EV adjustment, to lighten it.

This picture was only taken an hour ago, and its on the blog already, isn't technology marvelous.

Thursday, September 23, 2004

Colour contrast & intensity


This is a cartoon character I created about a year ago, called Alvin People (I guess only older Australians will get the joke). He is an average, thoroughly modern, guy. Outwardly boring but inwardly intense. I’ve tried to portray him in a very cartoonist way. He is an extra simple shape, symbolizing boring, but savvy in his dress sense, symbolizing intensity and shown by the of vibrant contrast in his clothes. It is a simple visual trick bringing opposite colours together and you increase their apparent intensity. Purple & yellow, red & green, orange & blue, these colour pairs look vibrant together. The same can work in photographs


You’ll be seeing more of Alvin in this blog, assuming you come back, He and his wife Lila, who is more into pastel shades, will be helping out explaining stuff from time to time. Alvin just loves, actually he is totally obsessed by, anything with buttons. Computers, remote controls, mobile phone, Ipods, digital cameras, mobile phones with digital cameras, PDAs, remote controls for digital cameras! He is under serious button stress above, lets hope he just takes a photo of the button rather than pushing it.

More abstract tree compositions


These photos were taken in may, late autumn, in the Dandenong ranges near Melbourne.

Wednesday, September 22, 2004

Editing out the injuries

Looking at the photos of the honeyeater (see post below), I could see he was quiet injured on his leg. Poor little guy. Anyway it has given me a nice photo to enhanced and try out different packages. I had just downloaded the trial version of Adobe photo elements and was keen to test it out.

I decided to just try fixing the overall intensity of the lighting, rotating it so it looks like he is flying and giving him a bit of cosmetic enhancement to remove his bloodied feathers and injured leg, using a cloning tool, and finally to crop out my hand

The results

PSP = Jasco Photo Shop (time taken for edits 2.5 minutes)


CP = Corel Photobook (time taken for edits 3 minutes)


PSE = Adobe Photoshop Elements (time taken for edits 35 minutes)

The time taken for Adobe Photoshop is long because I got stuck at the error message “could not complete your request because the area to clone has not been defined” and looking into it I only found “You must set a sampling point on the active layer before you paint with the clone stamp tool” which still had me wondering what to do. Does it mean I must read the manual or enroll in a basic photoshop course? I would have rather the software said something like press alt and the right click to define the clone area. Am I expecting too much?

A yellow bird escapes and “mis”sing kangal feathers

This poor little honeyeater (it is not a humming bird as I first thought), is a story of lost opportunity, both photographic and cosmetic. One morning, last week, on my way to the mess I heard a fluttering in the hibiscus hedge. I grabbed my camera and investigated, taking picture as I went, as any digital photo addict would. The little guy was clearly caught. In fact there was a red tie around his leg and it was tangled in the stem of the hibiscus.

Now I have him in one hand and the camera in the other. It was too hard to free him. So I put the camera down and untied him. Well he just flew off didn’t wait to have his photo taken…. that’s gratitude for you.

Yesterday I was showing my photos of the skul tumbuna to some of the locals and they picked this photo as the authentic traditional dress for this island. His “mis” necklace is genuine shell money, and would be very expensive. They also identified that his kangal headress should have more yellow feathers. Suddenly I realized I had let them fly free! No wonder he doesn’t look happy.

Tuesday, September 21, 2004

Digital Zoom for Free

I notice that new digital camera increasingly have “10X zoom” and “now with digital zoom” hype in the ads. 10X which I think should actually be 9X, usually means that the camera has a conventional 3 times optical zoom and a further 3 times digital zoom. Digital zoom meaning the camera will let you select on part of that image, to keep and discard the rest. Without wanting to become to controversial, you can actually give yourself 3 to 5 times digital zoom to your existing camera for nothing!

Its easy its called cropping. Providing your image is high enough resolution, and that can be anything above approximately 2 megapixels. All you have to do is use your favourite photo editor and “zoom in” to the part of the picture you want enlarged.


This example is cropped with HP’s Image Zone Express. I used the same free version,I discussed in yesterday’s “to edit or not to edit” blog. I quite like it for cropping, because like adobe’s Photoshop elements, it greys out the part of the image you are “cutting off” and gives a stronger sense of what you are going to be left with. Most other editors I’ve tried just get you to mark the area with a thin line open box. You have to click or hit enter to see the results and then the original image is lost from your view. It is “try before you buy” method of cropping and I prefer it.

I think this little fella is a moth not a butterfly.

Taking a different view

One of the ongoing projects I have been building since I got my digital camera, is a photo collection of trees. Trees make fantastic photos and I don’t think enough photographers have seen that. I’m always looking for different ways to view the subject and have taken a lot just looking straight up into the foliage.


I just like the composition of this one, just an abstract pattern in green, blue & occasional yellow. It’s a type of nut tree, commonly grown on the outer islands of new guinea, I have no idea what it is called. It has an edible fruit/nut, that is if you have nothing better to eat I’m warned, and makes a great dappled shade tree.

Monday, September 20, 2004

To edit or not to edit? What was the question?

Somewhere along the line I’d formed the idea that good photographers did all their exposure magic and composition right in the view finder. That was their art. Tricks and wizardry done afterwards somehow degraded the art of the image.

Well I’ve changed my mind.


This is a moody available moon-lit shoot, looking out over the south pacific. It’s a little dark but that suits the mood. Trouble is, when I took the photo, I had the impression that the balmy evening was a deep velvety blue.

I was trying out HP Image Zone Express, as part of my on-line course, and found a neat color & light filter with buttons that said warmer and cooler. This is the effect after hitting the cooler button a few times, then a little cropping to tidy up the composition.

The result is much closer to what I remembered.

HP Image Zone Express is the software included with HP camera, but there is a slimed down and very free version to download at HP.com. If you are scared by the learning curve of the larger packages, try this one out, it is very simple and very fast. My only concern is the way it tries to take over file management, searching your computer for photos (and my computer now has thousands) and “hiding” the original photos after edits by changing the extension.

Close up Blues

These blue flowers are not here in New Guinea, they are in my mother’s garden. I took them last month, in preparation for creating her a personalized calendar. The Olympus Camedia Master software that came with my camera has a nice set of calendar templates and close ups of flowers look great.


Not all digital cameras come with a macro facility, which just means they can focus in very close. My camera easily handles down to about 20cm and with zoom it actually looks a lot closer. Filling the frame with flowers also gives the impression of being very close without having to be.

Sunday, September 19, 2004

A lighter shade of pale

This is based on a tip I really liked from the HP on-line course I participated in recently.

TIP
Think creatively! Don’t hesitate. Try it. Some of the best photographs ever taken were creative accidents.
…… Marc Mantha (he also moderates a neat photo sharing forum)

surreal flower

This flower is definitely not a perfect photo, and nothing like how it was supposed to turn out, but I do think it has a wonderful alarming and surreal quality. It has not been post processed (other than resizing smaller) or enhanced in any way. I was experimenting with trying to capture the pure white of the flower in contrast with the rich colour of the dusk skyline. Leaving the exposure to the cameras light meter just left me with a dark grey silhouette of the bloom, so I decided to try the slow flash setting, to infill the flower with light.

The slow, or Slow Synchronization flash to be more precise, on my camera allows both a slow shutter speed for correctly exposing a low light background and an infill flash for the subject. Normally in this setting the flash fires at the end, just before the shutter closes. In other cameras this is sometimes called the rear curtain flash setting. You can also set it to fire at the start, as the shutter just opens, which is referred to as a first curtain flash.

Trouble was the wind blew, and I must have also moved a little, as the dusk skyline was being exposed, so the flower had changed position when the flash fired. I’ll just appreciate the beauty of this unique image as it is. I think this effect will be difficult to reproduce again.

Fluttering bye in the rainforest

Yesterday, I only took one photo and that was just in jest, maybe I’m not an addict after all.


This photo was from last Sunday when I took a walk through the rainforest between the beach and cliffs in front of my place. In the late afternoon filtered light there were butterflies flying back and forth. I’m not sure if you have every tried to photography butterflies in the wild. The flutter around and won’t keep still. The delay on the camera in automatic mode , means you only get an empty and/or blurred shoot of where they were 2 second before. If they do stop on a nice juicy flower they close their wings and are nicely camouflaged.


So I had to resort to some digital camera magic to get this picture. My camera has a sequential shooting mode which takes a continuous set of photos at approximately 1.5 frames/sec. The number of photos that I can take seems to depend on the resolution (in HQ mode I seem to get around 8 shoots). The only tricky bit is that focus, exposure and white balance are locked at the first frame.

I had noticed that most bufferflys flap a couple of times before the take off. So I set the camera in sequential shooting mode (it is an icon with three overlapping boxes) and I did the macro focus and light metering as the were tasting the flower nectar, by half depressing the button, then as soon as the pre-flight flapping began I pressed and held the shutter button. I actually got 4-5 good photos with their colourful wings open from about 25 shoots.

Saturday, September 18, 2004

The Lihirian Dixie Chicks

This group of young girls followed me around singing and playing an awesome tune on pieces of bamboo. I assume the pieces were taken from the bamboo band. I guess it was their way of attracting my attention to take their photo. I did and when I showed them this photo in the LCD screen they all ran away giggling.


The Bamboo Bands, originally come from Buka Island just off Bougainville. They set up various length of bamboo, like a sort of xylophone, and two ot three people beat it really energically, with sand shoe souls (or more commonly rubber thongs!). No I’m not kidding. The sound is really loud, totally infectious, a kind of a samba style version of a caribbean steel band with a distinct zydeco pace if not faster.

PS: I have just repaired this link for Photo Friday topic sister(s) (pikinini sista in pigdin).

Kids just have to have fun!

hey mister take our piksa

Include me!