Saturday, June 29, 2013
Friday, June 28, 2013
Photo-chemical smog over the bay
Thursday, June 27, 2013
Monday, June 24, 2013
Clipping Magic
Whilst I know the bigger software groups like Adobe and Corel are trying to provide packages that do everything. I have always been happy with a really good, and usually very simple, utility program that just does the thing I want. Ok like Apps on your phone such utilities can quickly grow into a big menagerie. Yet they usually let you get the job done quietly and efficiently. The same logic really applies to on-line applications. There are more and more becoming available, particularly with google's promotion of chrome. One such application that you need to check out for yourself is called clipping magic, and its still just and Alpha release. I know that Adobe's photoshop and Corel's power clipping can do much the same job but you need a few weeks of learning and a fair bit of skill to use them. Clipping Magic is actually really simple, you just need to draw a bit of green on the "foreground" (the part you want to clip to keep) and red over a few parts of the "background" (the part of the image you want to remove. It really is that simple and at the moment its free to try out.
5 steps to avoid sharing your on-line photos with the world!
There are many services that offer to share our photos on-line, and most, specifically the social media places, make it very easy but have defaults that mean your photos are being shared with anyone with net access. Perhaps you just wanted to share your photos with a few friends of family members. To really scare yourself, try finding some of your own images on-line  using google’s neat reverse image search. To do that just drag and drop a photo you want to check onto the little camera icon on the google’s images search screen.
Ok now your scared! Time to pause and check whether that photo also lets others know where you live. You can find the extra information buried in your on-line photo by copying its URL to metapicz
So how do you fix it so your images and the hidden information they contain are not being shared with everyone in the future? Here are 5 steps you can take.
1) Make sure you know and set appropriately the default sharing setting when you upload photos. Most of the specialist photosharing sites like flickr, google+, photobucket, smugmug etc have a multi-level security/sharing system for just family, friends or then the public. Google+ have the added organizational control of just sharing with your selected circles. Some cloud based photo services like Skydrive, and Drop  Box also have multi-level sharing security and the private side normally involves sending those you wish to share with, a secure link (ie it has an access password/switch built into the link). A big limitation of these systems is in the photo uploaders they provide, which often have public set as their sharing default. So you can unknowingly make your photo available to everyone. So it is in your interest to set the default to private and only set those you intend to share as public on an individual photo basis.
 2) Be careful that you don’t share links to otherwise private photo, by reposting to public sites (like you blog or a social network site like twitter). in those systems that do allow you to share your images on another service such as facebook or twitter, Often they use some variant of OAuth to establish the authority to post on the attached site, unfortunately they seldom inherit the same privacy setting from your original post and the photo is posted as public. Generally if there is no mention of sharing security when you do the authorization there will be none (eg Sharing to twitter from flickr, even if the photo is private on flickr once it is shared to twitter it will be publically viewable on twitter)
3) If you don’t want strangers to find out where you live, work, go to school. Consider turning off the GPS in your phone, or finding the setting in your photo uploader to remove geotags/geolocation data. Flickr has a nice geo fence feature that allows  you to supress showing location if your are close to sensitivity place (eg home, school etc). Lightroom has a setting to remove any geolocation data when posting an image via their Export or Publishing Services. You can also control the types of metadata exported.
4) Remove the photos from google search if necessary. I haven’t been a fan of the google’s official forums because they are often hard to figure out the context of the advice being given and even what the FAQs are actually asking. My impression has been that google staff must not actively moderate their forums or perhaps even read them (maybe I’m being a bit unkind here). However the Picasa Resources site does provide some good discussion on key FAQs about picasa and its advice on How to remove your images from google search gives some good advice on what to do, albeit quite technical advice. The photos don’t have to have been shared via picasa.
5) Don’t use Facebook (and probably Instagram), for any photo you don’t want to share with the world because someone else liking or tagging your photo will start sharing that with all their friends and so on. These access links can spread quickly and soon many folk you don’t know will be able to see and use your photos. Also the facebook TOS (terms of service), means they assume ownership of anything you post. I don’t have a facebook account, and I don’t want to be accused of facebook bashing but I understand in the past it wasn’t so easy or obvious how to remove and permanently delete photos, I gather facebook has yielded to pressure and here is a link to Steve’s Digicam with instruction on deleting facebook photos and albums.
So don’t panic, make sure you understand the sharing security on your favourite photo service and set the defaults appropriately. It is certainly not wrong to share your photos with others. It might just be wise to do little bit of checking right now for any existing images you don’t want shared publically.
Sunday, June 23, 2013
The Super Moon
Friday, June 14, 2013
PhotoProject :: Wet in the City
Thursday, June 13, 2013
Photofriday :: Body of Water
 Bass Straight in Winter, multi image stitched panorama
 For PhotoFriday‘s topic Body of Water
This is a different, more immersive, way to view the stitched images created with ICE & perspective view, the uploaded to photosynth
Saturday, June 08, 2013
Bigger and maybe brighter LCD screen for you camera.

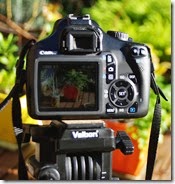
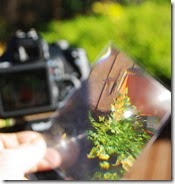
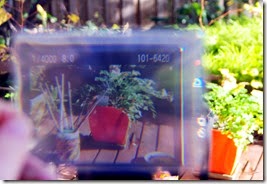
Somewhat by accident I discovered I already have a very cheap and easy to use, bigger LCD Screen on my camera. Ok not exactly on my camera but very easy to add. It was one of those (cheap) flat plastic magnifying lens. They are a type of Fresnel lens, a series of concentric lenses that appear as a single lens at around their focal length. I happened to have one inside a A6 sketch book in the back pocket of my camera bag, I frequently carry a small sketch book there. It isn’t exactly magic, you do need to tilt and twist and adjust the distance from the camera to get a decent view. However it is about twice the size of the screen and through a special property of the Fresnel lenses, which can capture more light at oblique angles (a feature that has made them very popular of lighthouses). There will still be glare and reflection on the lens but the image can be enriched and sharpened with appropriate tilts in the lens. The real draw back is it requires and extra hand, so works nicely with a tripod but your will have to juggle your camera in one hand and the lens in the other in most situation. Still it makes a big difference when you need to review your image in the field.
My A6 sheet lens only cosy $1.50 (from the $2 shop), but plenty of other (more expensive) forms and sizes are available from newsagents and officeworks.
Thursday, June 06, 2013
Finding those forgotten images.
Google has connected up “computer vision” to your google+ photos so you can now use My Photos of … in the search box. This means in theory searching your photos no longer require keywording to help you re-find images. Try it out, it is pretty remarkable but only works on your collection of images on your google+ photo account. However don’t rely on it, it isn’t perfect quiet yet!
Wednesday, June 05, 2013
Tuesday, June 04, 2013
Being Less than Creative in the Cloud
 I must admit I have given adobe's creative cloud a long look, albeit using its introductory offer, but I've decided its not for me. Not because I think it would be too expensive. I think renting software (and computer equipment) is a well established practise and can be a good way to avoid the up front high cost of purchase and for legitimate a business application more tax effective (ie it’s a legitimate business expense rather than an asset that has to be depreciated). In Australia you can "write off" software that cost less than $300 immediately as a business expense but must depreciate more expensive software over two and a half years (or four years), I must admit I don’t understand the different methods. It was more a disappointment with the performance, and particularly a series of frustrations when I was trying to share my work with firstly myself and especially with non creative cloud users.
The first frustration was my expectation that I could use the creative cloud to let me edit one image from several computers in Lightroom. The reality was equally unwieldy as the other work-arounds I had tried, like exporting and importing collections or using xmp files, or "processed" version of dng files. Thqt multi-computer, muti-user Lightroom catalogue remains a pipe dream.
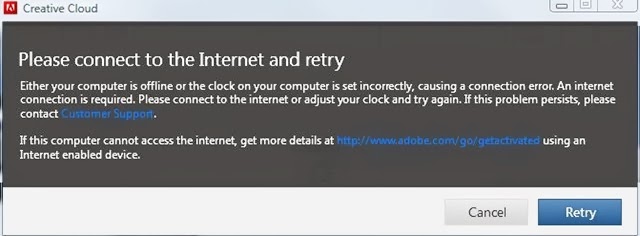
The second annoyance is the long dance creative cloud wants to take to make sure you are on-line. It is certainly possible to use the creative cloud programs off line (once you have downloaded them). However I do travel a fair bit and often to places with very limited internet access (ok I can use a local wifi hot spot on my phone, but that is slow and expensive bandwidth). It is bad enough waiting for windows to boot up, it is painful to have to crawl long for several more minute while loading spinners on pop-up windows struggle to try andbretry to connect you to the net, when there is clearly no need. I really wish the creative cloud knew that cancel meant cancel the first time!
Over the past few weeks there has been a number of on-line service upgrades. One collaborative project I had really wasted a lot of time on in creative clouds, without real success, I was able to set up in a couple of hours in SkyDrive, and then move to DropBox, to better suit my collaborators, by the next morning. It was an eye opener, a good example of simplicity winning out over sophisticated, but complex systems . The important caveat here is I was delivering jpeg files, not trying to jointly editing RAW files.
Finally it all got a bit tedious and I didn't really want to play with the other adobe offerings anyway, because of their learning curves. Whilst the creative cloud does integrate a number of adobe offerings, particularly at the exchange aspects, they still have their own peculiar ways. Out in the field I don't have the time or bandwidth to sit down and wade through even more introductory instructional videos. I suspect that I am not the only one to get frustrated by this.
One aspect the creative cloud handles well is on-line security (at least from my perspective, I think images are less likely to be "stolen" or turned in "orphans" that on the recent on-line service offerings). However this actually created hassles for those I wanted to share with. So bye for now creative cloud.
Monday, June 03, 2013
Waiting for the Aurora
Sunday, June 02, 2013
PhotoFriday :: After the storm

Yesterday was a very clear beginning of winter. After a stormy night the sun straights to break through.
 For PhotoFriday‘s topic Shades of Gray


