Wednesday, June 28, 2017

The ghost in my LAN

I have had a local area network set up for my computers probably running for 15 years or more. There was one computer acting as a file and print server, and a separate NAS drive. Other computers came and went running Windows XP, Vista & Windows 7. The servers changed a couple of times and everything was easy enough to set up and/or upgrade.

Well all that happiness, was until the computer acting as the server was upgrade from Window 7 to Windows 10 (not a pleasant upgrade in itself). To begin it was just the printers which seemed to disappear from the shared status, then they be back but not on all computers. It was frustration overload. Leaving the server running helped but I got convinced the printer drop out was a random event. Interwoven with this flaky behaviour some of the shared network drive disappeared, never to return. I had to re-share the directories involved (mainly on an external drive attached to the server.)

 Having had enough of the printer mystery I purchased a WiFi enabled printer (to avoid having to have it attached to any computer acting to a server). Worked beautifully (for the printing).

A few days later I retired the problematic computer that used to be my server. Suddenly half of the computers on the network could no longer see the shared drives. ….. Arrrrrrgh!!!

Seems I’m not the only one this is happening to and it has become just after some windows 10 updates., and is being described as a “ghost” setting in the network. Unfortunately Microsoft seem pretty determined to not get involve so there is no official fix.

The following approach has worked for me (so far). First make sure all the computers are on the same WORKGROUP. (Some, which had been returned for repair had weird names, and a couple of directories with weird ownerships and sharing). Next disconnect all the network connections and unshare everything on the computers that are doing the sharing (this required a lot of detective work). Finally leave any home group you have set up on ALL computers. Now turn all the computers off...and take a deep breath.

Then start just one computer and create a new home group. It will display a Homegroup password, which you should write down because you need to enter it on all the computers attached to the network (the print password just gave me an error message that it can not print the password, really useful) Re-starting one at a time, you should find an invitation to join the new work group under the network Home group settings. Accept the invitation nominate what you will share and you will be asked for the Homegroup password. After a short wait you should be able to see other computers in your homegroup. Then go through the remaining computers (one at a time) and connect to the home group. Once the home group is up and running on all computers, you can re-share some specific directories and connect as network drive to each computers. It’s a lot of possibly unnecessary work. Hopefully the ghost has gone.

Look @ Me

Look At Me ... Look At Me


A peacock shows off for us

Thursday, June 22, 2017

Playing around with Little Planets in PicsART

There is a yet another trendy filter photo application poping up all over the place called PicsArt. I've downloaded it to my phones (the free version has those annoying ads, thgat tend to take over the screen) and to my computer as a windows play store app (which also has ads but they seem less intrusive just at the bottom of the screen). I got interested because their "Magic" filters looked a lot like neural networks trained to look for the image styling, colouring etc. I'm not certain that is the case and they don't offer the ability to use your own images as a guide/filter. Not to worry they are generally garish and whilst a few have potential, but not enough to encourage me to buy the pro version.

The app however does offer many other image manipulation and sharing features. It seems particularly geared to sharing on social media and selfies in particular (again I'll pass on this). It has decent collage, cut-out and stickers features not to mention a lot of more conventional "one click" filter based photo "enhancements" as well as a range of the basic cropping, tonal and colour sliders. Rather than be to influenced by my old biases go try it for yourself.

What also got my interest was their little planets stereographic transformation, which you can find under edit, then effect (fx), distort and tiny planet. This performs a polar transformation on your photo, mathematically stretching the sky and compressing the base of your image to form a round little planet of your foreground. It does a pretty good job if your horizon is relatively flat and not tilted, but there are sliders to control Zoom (make the planet bigger or smaller, Rotation (twist the planet either clockwise of anti-clockwise) Shift(changes the scaling/matching of the end points) and Blur (blurs a little or a lot at the join). I had a bit of fun making a set that moved from Day to Night on my phone and posting some directly to Instagram.
Sunrise BunburyMorning at Castle RocksIn the Heat of The Day Bunbury
Afternoon at the Mouth of Margret RiverBunbury SunsetEvening on the Swan River, Perth

Wednesday, June 21, 2017

Flickr slips in similarity

imageBack in March flickr introduced a similarity feature into its image search. Its a little hidden, which is my excuse for not finding it sooner, but any image that is part of search (normally using the search feature with the magnifying glass icon) will have three dots (…) in any image you hover over in the displayed search results. Clicking on the dots will bring up the search for similar photos feature.

So what does it do, simple it attempts to find similar photos. What makes it a little different to other offering is it uses Artificial Intelligence to help determine the subject, style, colouring and other attributes using neural networks. This is like google images showing visually similar images but flickr use their own similarity pivot technique (there is a lot of detail to be found in the article linked above). Flickr have also been putting these neural networks to good use adding/suggesting tags for your photos when they are uploaded. Flickr also has a wonderful resource of photos to look through. It isn’t perfect but it is very impressive.

Monday, June 19, 2017

Transferring a Picasa based photo library spread across a couple of computers

There will come a time with any digital collection of photos that they need to be transferred to a new computer, perhaps a different operating system. If everything is well organised in one directory and subfolders, the whole set can be copied to an external USB harddrive and carried to the new computer and the copied onto it. Pretty simple! However if you check  you might be surprised, what has happened to your previous edits, the tagging, star rating and album organization (collections for lightroom only users), they are much more difficult to ensure make that leap across computers. Now add the fact that not all photo collections are perfectly organized and often the photos are spread across several drives of across the local area network. Transferring photos might just become a nightmare!

I rediscovered that picasa is still a wonderful tool to manage your photos (well jpeg libraries to be specific). While google abandoned picasa a few years ago, but you can still download it free from several popular download sites (just make sure the site is trustworth and doesn't come with unwanted blotware and especially viruses, worms or ransomware). In later version (approx. 2015 onwards) the picasa web component was changed to use google photos (and I strongly recommend not using the autobackup to the web feature).  Google wants everyone to use their google photos system on the web, not do anything on your own computer which does not suit me and I assume will not really suit most people.

“For those who have already downloaded it, it will continue to work as it does today. But we will not be developing it further, and there will be no future updates.”   ….google post on picasa user web forum

If you already have Picasa,  you will know it has some good photo editing tools (its a pity snapseed never made it into the collection), is very fast to load photos, incredibly easy to understand and probably still has one of the best facial recognition features. It is not so great at enhancing RAW format photos (it can display and manage them). Further the “copy the photo directory” approach works well for picasa because it has a usually hidden file “picasa.ini” in each directory which stores the processes such as cropping etc. and basic organization, as well a simple start rating on each photo you have editing. When the the entire directory is copied onto the new computer and picasa reloaded it can read this file and render the photo as it was on the old computer. I discovered some time ago that this did not copy the facial recognition organization, but there was a complex workaround involving copying the hidden picasa database. I was pleasantly surprised to find the Tools/Back up picture feature in Picasa 3.9 (the last downloadable version) will also copy this extra information. I was using this backup approach for a different reason, picasa transfer :: Tools/Backup PicturesI knew it would search out the photos from where ever they are stored and put them into one big set (generally on an external USB drive for easy transfer).

The approach is very simple and easy to follow but I figured I should prepare a simple step by step through the process anyway and post here, because I suspect A lot of people will want to do this as they ungrade computers over the next few years. You will need picasa 3.9 to get all the facial recognition transfered (otherwise see that workaround above).  Get an external USB hard disk and plug it in (make a note of the drive letter it is given). Or alternatively you can find somewhere on your local area network with picasa transfer  :: Select a new Backup setlots of space (a NAS drive would be perfect albeit slow) Now Run Picasa on your old computer and using the tools menu find the back up picture option.

This will bring up the backup dialogue panels on the bottom of the screen. picasa transfer :: Select destination of backupThe default is normally set to somewhere on your hard drive, so you will need to  select the New Set option. Then enter the address of the USB drive (or network location). I’ve put a 1 2 3 marks on things you need to address on the first panel to get your back set defined. Firstly give it a name, Secondly select on the Disk-to-disk backup type and using the choose button locate your destination. I had already created a sub-directory on my USB drive F: called transfer. Finally you need to define which files to backup. Picasa was never used to manage movie on this computer so I excluded them (to save space). If your picasa library is full of screen captures and or downloaded web graphics and you only want your picasa transfer :: start the backuporiginal camera files you can try the last option. Otherwise it may be safest to select All file types to backup. On the second panel you can set up selective folders to backup but when transfering computers just click on the select all button. The final step to start the backup is to press the Burn button on the far right hand side (this term comes from the days when you “burnt” CDs, which you still can do by the way) This process can take a while and there are no progress bars but a pop up screen does tell when it is complete.

picasa restore on new computerFinal take the USB drive (after using the safely remove and eject option in your operating system) over to your new computer. If you look in the directory created (transfer in my example) you will see there is a collection of files and sub-directories and one of the files should be PicasaRestore.exe. Click on this to run it.  You can change the location of the restored files but most often the select to restore to original locations is fine for a an inter-computer transfer. Again this can take some time but you can see progress details of the files copied and setup steps and also another pop up when the transfer is complete.

When you start Picasa on the new computer it may take a some time in background to scan through the library and connect up all the faces and some organizational aspects. However you should find that your complete picasa library is fully and safely transferred and available on your new computer.

Thursday, June 15, 2017

What will happen to flickr & Tumblr

This week Version announced they have bought Yahoo! for $4.5 billion and are bringing all their tech companies under the one Umbrella company Oath: 
image

This could be fine, but history of these big tech takeovers is littered with subsequent failures or at least falls from grace. Down in the story you will find that Marissa Mayer has resigned, with a nice golden parachute. However when yahoo originally took over flickr, it went into stagnation and it wasn't until Mayer became CEO and gave "the lets make flickr great again" speach that the current resurgence of flickr and its improved/modernised photostream displays happened. Similarly she championed and used tumblr, another decent social media place, you can read her final post here.

I hope and trust flickr & tumblr will survive the savage staff cuts that are certain to follow and these services are allowed to continue and perhaps even let flourish. Allowing both of them to provide serious competition to the google & facebook juggernauts.

Monday, June 12, 2017

About page (beta) has arrived in my flickr

image The About page has arrived on my Flickr Photostream. It is a lot more “modern” and plenty of opportunity to show photos and links to other social media. So it is generally a biggish improvement on the previous profile page. My only concern is there is now a lot to scroll through on the web interface. How can I use this space responsibly. The Phone app. is still the same by the way.


#237_Into_a_reflected_dream     Click here to see ABOUT ME on flickr

Sunday, June 11, 2017

Google Photos :: Not So Private

I thought I would give google photos another chance (probably it's third) it seemed pretty harmless. While I can see it is attempting to make sense of the mess. It just keeps making the mess bigger. At least the photo it autoloads it makes private, right, until you share them, right. Actually wrong all it does is use a 40 character code to make the photo link difficult to guess, this includes all the old photo from Picasa Web Album that you thought where safely private and only shared via a password.
Effectively there is a massive jungle of photos out there and your photos are sitting there in the wild. It is easy to test out (access a photo in google photos) there will be a long url name to access it (the name is a web link not a jpeg address by the way. Paste that into a file you write to a usb. Take the usb to a foreign computer you have not use and cut and then paste the url in a browser you have not used so It will not know your google ID. There is your photo! Other have noticed this issue.
This is a really big deal, A significant betrayal of my trust.

Whilst I intend to keep using google photos for my shared photos and images (mainly for my blog). I have already turned google photos off on my phone and I'm working through deleting a lot of photo from my google photos account.


Thursday, June 08, 2017

Flickr’s new profile page

I noticed a short post today on the Flickr blog post (yes I read it) that they have updated the profile page. I don’t think it has changed since I joined over a decade ago. So I excited went over to my profile (boy is it embarrassingly out of date) and sadly its the same as it ever was …no About section.

The blog post does say they are rolling it out slowly, but I found Thomas Hawk must have seen it already and had posted a comprehensive personal view. It does look nice and I’ll just have to be patient, until my profile becomes an About page.

Plein-air onto tablet and some pleasing #AIart

Me deeply absorbed in sketching on my tabletYesterday I bit the bullet and tried out drawing my daily sketch directly on my HP spectre in Tablet mode, using the HP pen. There is a massive disincentive to working with the tablet, in fact anything with an LCD screen, in the outdoors, the screen is quite reflective and fine detail (and specifically small icons and text in the likes of Corel Painter are almost impossible to read) so sketching soon becomes a frustrating squinting, dabbing, missing, and confusion resulting in random lines all over the place. Thus I figured I’d start with a simple application, and the free version of Wacom’s Bamboo Paper fits the bill perfectly. There are hardly any on-screen control’s and they are big anyway. Further updates to the Microsoft ink workspace (that seemed to arrive in the Creator update to Windows 10) have improved the response of my pen and added a couple of levels of pressure sensitivity. There are only a pencil and highlighter style marker pen, with three width options in the free version of the bamboo paper app but that seems plenty to start with. Its also very natural to use. There is a colour change/select feature but accurately choosing colours in the glare didn’t appeal so I tended to pick the stronger colours and not worry too much..
My Pein air sketch using Bamboo paper app on tablet
I found a good spot, got out the tablet, shaded the screen with my body and made a start, timidly at first but I got brave and sketched lines and coloured over them with the highlight marker brush then back for more lines. Suddenly about 20minutes had slipped by and what I had done looked ok. I moved under the shade of a nearby tree and it looked better, ok better for my first outdoor attempt. It was after all just a field sketch (see above).
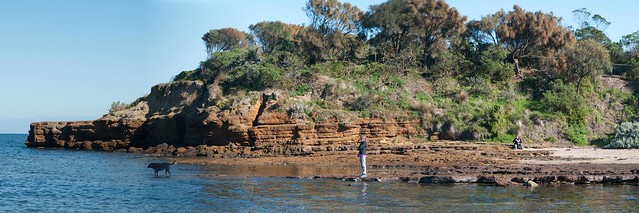
Sunny Day at Table Rock, Beaumaris
Today I stitched together 3 photos I took of table rock from the same vantage point and thought I should try improving the colouring (and tone of my sketch). It didn’t take long to realize this would be a perfect little test for the Neural Style feature of google deep dream generator. What I tried out was to use my bamboo paper sketch as the neural training image to filter my photographic panorama BUT to borrow the colour scheme from my photo rather than the sketch. In other words adopt the line work and flat highlighter style shading.from my sketch but stay close to the photographic colours (and tone). I must say I was impressed. I’m not sure how to take this AIart (Artificially Intelligent art) further but it does produce something with the sense of my touch and the way the place felt, something excitingly worthwhile.
The deep dream results, combining my sketch linework & photo colours

Wednesday, June 07, 2017

Shooting Big (aka Wide) Landscapes but not Wideangle

I am always had a loved of wide panoramic views. This have been even exaggerated as I travel around on my endless summer project. Australia looks better in wide view. However I am not a fan of the distorted view that extra wide angle lenses give. For example you can get the horizon horizontal and straight if you have it in the center of the photo when you take the exposure, but lifting the horizon up or down will result in a curves horizon in the final image. In a forest the tress on the edge of the photo will bend in. Building will get smaller towards the edges and very triangular above you. These are all features that can be used creatively, its just I don’t really like them and therefore don’t own a specific wide angle lens. (my Tamron 18-200mm zoom give me a decent width to play with)

Photo series used

I still like the wider view, so what do I do. I have always (even going back to film days) just taken a series of overlapping photos and cut and pasted them together. Now with digital tools I use software rather than scissors and glue. There are plenty of tools to do this but I like Microsoft’s ICE and Autostitch the best. They actually have a different look, closer to what you see with two eyes and head movement scanning across the scene rather than classic single point perspective. I’m certain that David Hockney noticed this well before me, in his joiners, grand canyon and bigger picture projects (all made with multiple images/panels) and specifically he does mention the limitation of cameras in his collaborative book Secret Knowledge: Rediscovering the Lost Techniques of the Old Masters with Charles Falco, There are now also lots of smartphone apps that will stitch panoramas on the go using the phones camera, they also show this wider perspective rather than the wide angle distortion of a wide angle lens and single image.

As Stitched by Autostitch (with ghosting)

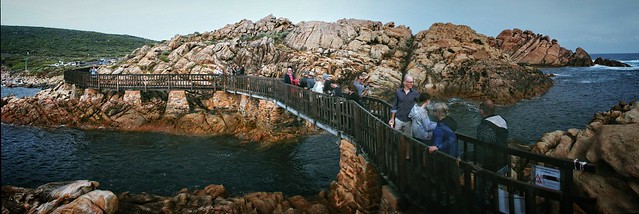
However because the photos are taken in sequence (with inevitable time gaps between) they are prone to a few issues. First and most common issue is someone or something moves (like the man in the 5th. 6th. & 7th. frames), The stitching program will then produced “ghosting” (HDR set also suffer the same issue) in any areas of overlap across the areas of the movement in time. This can be a hassle to fix, and I often don’t or only fix the most obvious ghost. In this case I used OnOne Enhance’s magic (a context sensitive) eraser on the ghost in front of the moving man’s face and the whitish ghost of his hoodie. Some programs give you the option of masking out things not to be stitched (it can be a lot of work with limited success). Another common problem is the difficulty of hand holding and maintaining a level to the sequence as you turn. Wobbles can also lead to ghosting and sometimes bending of the horizon or failing to be able to stitch. This sequence was hand held and I was on a slippery wet rock and it was windy so despite my best efforts the last few frames are a little out of register, and you can see the resulting ghost in the timber slats on the side of the bridge. I decided not to attempt to modify them.

Photographer crush on Fisherman's Bridge at Canal Rocks The important outcome is the modified wider view does the magnificent curved walkway justice  (It is just a bridge to allow rock fisherman to safely fish in the canal but it is a wonderful construction)

Tuesday, June 06, 2017

Roadtrips, the Death of Creativity & the Continuous Sketch

I had the brilliant idea back when I started planning this year long project, to build a series of sketches into a continuous panorama. Each place I visited should form part of the total picture, they thus needed to loosely join each other (eg match horizon and tonal blends. So I recognized that occasionally and intermediate image might be needed for a difficult transition.

riadtrip0001

I soon found out this wasn’t a particularly original idea, but I wasn’t deterred. I even experimented with a few sketches to get the best size (which was quarter watercolour sheets, around 28 by 18cm and in landscape mode. I even though these could be scanned and reduced onto cards. However there was a bit of a time oversight, on the road and travelling (Australia) is a big country and getting between places I wanted to visits take a lot of time) left no time to stop and work on the idea. So very few sketches got completed. If I tried to remember what the road trip saw a few days later I could perhaps describe it but not draw it convincingly. Clearly my visual memory requires a bit of time to work. So I gave my canon to my wife and said take pictures out the window every now and them as we passed through different country. Ok, Now I have a lot of blurred photos.

IMG_2075IMG_2115IMG_2117IMG_2072

The photographer is not to blame, my wife has a good eye for what to photograph. It is the speed of car travel, and trying to anticipate the gaps between tress, landposts and countless other obstacles. Still I should be able to take a trees from here the tone and texture from another and the colour balance perhaps from a thirds. Again sounded simple but I always ended up trying to slavishly copy the little amount of detail I could get in the glimpse of in focus landscape.


Then I realized something important, that has be nagging at me for a long time now. I find it very hard to start a painting from a single photo. I’m much happier is I have a sketch I have made, even if it is a very simple composition or tonal layout study. I’m not convinced I’m alone here. Perhaps the time to sketch slows you down an ramps up your visual seeing rather than the symbolic seeing, as the landscape flashes by.  Further the act of drawing reinforces that visual sight and lets you focus on the important aspects of creating something. You come tp terms with the detail that is not required and are happy to leave it, whereas the snapshot records it as if it is important.


However, I’ve lost enthusiasm for the continuous sketch project. So The moral is…


Lots of driving and no drawing kills creativity

Monday, June 05, 2017

Alvin Crashes My Instagram

A post shared by Norm Hanson (@oz_endless_summer) on
I'IMG_2284m not sure what bought hin out but yesterday Alvin insinuated himself into my Endless Summer Instagram photostream. Well he has a point I'm doing a daily drawing project for a month and he is hand drawn, after all.

Sunday, June 04, 2017

PhotoProject :: Seeing more with your photos

I have become convinced that there are two opposing objectives when you are collecting photographic reference material for creating art works. Firstly the documentary aspects, the objective recording of important visual details, form, shape, lighting etc. An aide-memorie. Such tasks are really performed well with a digital camera or smart phone. However there is a second subjective/expressive side of how you feel about the scene, the atmosphere or your connection to the place. Single photographs will seldom capture these things. Whereas a sketch or small plein-air painting probably will.

I suspect ignoring the second component when painting from a single photo is why they so often look bland and lifeless.

I had already come to recommend to artist wishing to collect photographic reference that they should make at least an tonal/compositional sketch in the fields and take at least 5 photos to support it. Actually it’s better to take 10. By coincidence this ties in nicely with capturing both the objective and subjective aspects. A great metaphor is to use your hands to remember what to photograph.

Documentary

1-IMG_20170602_164305_processedTaking an Objective View (Detailed left Brain Stuff)

  1. Take the obvious snap shot.
  2. What is the main subject, get as much detail as possible.
  3. Take a wider view.
  4. Evaluated the tonal balance.
  5. Textures and surfaces

Its quiet normal to pick a snapshot type view of any new vista, It might actually be what you are going to paint to take the shot, get it out of the way. It could also be the scene you sketch, that’s fine you’ve already got a photo to copy. However now you need to look for a bit more detail of the scene. In particular detail of the main subject could really help future drawing or painting back in the studio. Therefore zoom in on the important subject details, or walk up and take some closer photos. Similarly it is wise to take a wider view, zoom out or walk back, or use a wide angle lens. Even take a few over lapping images to stitch or cut an past together. This will help you understand what part of the scene makes the best framing and composition. The last two items have a lot to do with the quality of the light. The tonal aspect are a very important in realistic art as they help the eyes more that any other visual features understand the three dimensionally of what we see. This is a bigger topic than I can even begin to cover here in a single blog post but you want to avoid just have one photo with a bleached out sky (or other highlights) and solid black shadows. It might be best to take one exposure of the sky and another of the shadows (or use HDR style exposure bracketing) or even take one photo without and with a flash providing fill light of any close subject. Perhaps you might look at using black & white to better understand the tones. The eye is also interested in edges, texture and the small detail of surfaces that help our brain identify an object, However it often ignores other information once its has found itself a satisfactory explanation. so it is a wise option to get some documentation of the dominant textures usually requires very close up detailed photo(s).

Expressive

Finding a Subjective View (big picture right brain stuff)1-expressive hand

  1. Include a photo your plein air work
  2. What interests you most in the scene.
  3. Look for main abstract shapes .
  4. Main colours and mood
  5. Atmosphere

If you have not made a sketch you won’t be able to photograph it. However a photo of your work in position with the scene in the background can be a great help in putting your sketch and colours in context, this cross reference will be a big help back in the studio. It is also a wonderful way to establish provenance, works in progress posted on social media are a better way to promote your work than yet another selfie. The next two items to attempt to photography are similar to items 2 & 3 in the documentary set but know you need to focus on what interested you the most. It may not the the old house but the path disappearing behind it. To the tree but the show it cast across the path beside it. Take you time to understand what attract your view don’t just assume it was the subject you first choose in the snapshot. Next you should look for the larger abstract shapes , They are probably defined tonally and the small composition sketch many art make are perfect here, another well established trick is to squint. However a camera can be a great help here. Deliberately put your camera out of focus. The main shapes of dark and light design will jump out at you. The final items are also related to the quality of the light but you need to consider how they affect you and what mood they invoke. Despite all the colour matching and calibration technology perception of colour can be a very personal thing and strongly connected to emotions. This is a bigger issue is not just white balance and colour temperature, but extends to colour harmony and compliments (classic colour theory). Another important aspect to remember is few experienced master painter fill there creations with endless detail a lot of the images was left with a suggestive colour, tone, texture and our eyes filling in what it thought it saw, where as way to many photographer's are obsessed with tack sharp focus and copying such photos doesn’t excite our eyes and brains so take a few photos of the distant mist, the heat haze or sun glare. 

Saturday, June 03, 2017

A superwide panorama in HDR

Smith's Beach HDR Panorama
There were 18 photos used in this panorama. Six portrait mode image seys taken as 3 exposure bracked photos used to create HDR images which where then stitched together in Autostitch.

Friday, June 02, 2017

Sketching my digital cameras

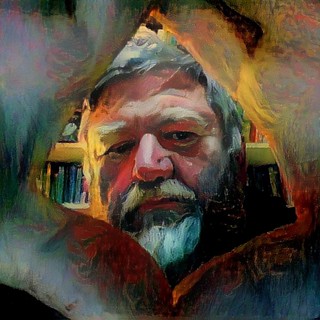
dreamscope deep dream after Van Gogh of me sketchingIn a bit of self reference fun I have been sketching by journey through digital photography, Starting with an old Logitech webcam (last used to make a short stop motion film), then my first real Digital Camera the little Olympus. Compact then my first Pentax, the Canon and now the bigger Pentax K20D. It just happened that when I was looking around for something to sketch they where there.I could see then a-fresh not as complex instruments/tools with lots of knob, buttons and dials by see them objectively as items catching the light. Perhaps there was a bit of objectivity creeping in as I love using these things. These represent almost 2 decades of digital imagery

You can see the latest incarnation of my daily sketches on instagram @oz_endless_summer


Old Logitech webcam dressed up in tripod legs in soft pencilOlympus C-4000 in brush pen and pencilPentax 100D in soft pencil


Canon 1100D in soft pencilPentax K20D in charcoal

Thursday, June 01, 2017

A little late


Autumn in HDR II
I visited Alfred Nicholas Garden late last week, seeking some autmn colour, but I was a little late. One exception was this magnificent gingko tree down beside the lake