I’m leaving the new camera owners to play around with their camera and find what it is capable off. Also the big surprise with my new Olympus OMD E M10iii was how good the jpeg was straight out of the camera (I noticed this because I wanted to just look at the images straight out of the camera and not processed in any way when I post examples in here). Purest might argue that the camera is actually doing some important post processing, and I can only agree with that. This only reinforces the idea that not recommending new camera owners only shoot raw and use manual mode, because it is likely to leave them with discouraging results. Instead if you are a new camera owner, I think you are much better to stay playing in jpeg and have fun with your camera. The results will be good and you will still be able to improve as you understand your cameras strength (and perhaps weakness).
Unfortunately I couldn’t wait, to follow my own advice, I’m jumping ahead and switching over to the traditional modes, starting with Aperture Priority. On my new Olympus this is marked by a single A on the mode dial. On a Canon camera it is Av. I’m probably letting a secret out of the bag but a lot of photographers, the majority of those I know, (there is even a current survey over on Digital Photography School that also supports this) shoot in this A mode. In this mode you must select the Aperture (which controls how much light is let into the camera, and probably the ISO (the sensitivity of the sensor to that light) and the camera will work out the shutter speed to get an average exposure. This is the mode I usually use, and my excuse is I got into this habit back when I bought the original Pentax Spotmatic film camera many decades ago. It was a technical marvel at the time because you could set the aperture and then use the built in light meter (not a common feature at the time) to balance a needle horizontally in the screen by moving the shutter speed dial. It was magic and it got good results. Ok the shutter speed dial is gone on most cameras and the camera does the balancing itself without showing a big needle in the middle of the screen but it works much the same way.
The big advantage of using Aperture priority is its simple to use and pretty logical. In normal light you can pretty well always use a middle f-stop like f8, in darker situation you may want to open up and got to a lower fstop like f5.6 or lower. Let more light in when its darker, its logical. With this basic knowledge and your camera in Aperture priority and you will normally be able to get a decent exposure in a wide variety of lighting conditions. Its not fail safe, there can be a downside if the camera chooses a very slow shutter speed (less that say 1/30 second) you may find a hand held camera is inevitably moved a little and your exposure gets a little blurred. Most modern cameras have some built in logic to avoid this and might blink the shutter speed in the viewfinder to highlight that the exposure is getting too slow and out of a safe range. Alternatively the camera may allow ISO to be adjusted within a nominated range by increasing the sensitivity (a higher ISO) in order to keep the shutter speed as fast (quick) as needed.
There can also be a creative advantage (or hinderance) in being able to choosing the Aperture, and that relates to how closely the camera focuses on your subject. In simple terms a tiny hole (like a pin hole camera or say f22) lets the lens focus on a wide range of distances onto the sensor. The bigger the size of the aperture the lower the range the lens can get in focus either side of whatever you choose to focus on. This phenomena is called Depth of Field. As the fstop gets smaller (the aperture is opened wider) and the depth of field gets narrower. Portrait photographer for example often use the feature to get the subject’s face in focus but blur the background to remove fussy distracting detail. Alternative a Landscape photographer might want everything in focus so they will usually use a narrow aperture, f11 is a good starting point. There are many ways to use this sharpness or blurring creatively. The smaller the fstop of your lens the more power you get too blur but usually the more expensive the lens.


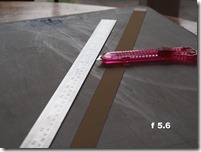
In the three photos above you can see this depth of field control at work. In all cases I focussed on the blade tip of my safety knife (also know as a Box cutter in the USA) which is opposite the 20cm (approx 8”) mark on my metal ruler. At f11 (a smaller aperture hole) you can easily read the markers out to 31cm (12”) mark before the marks and numbers start to become blurred. With the aperture set to f8 the scale starts to blur between 26 & 27 cm (between 10” & 11”) mark. At f5.6 the blurring starts at the 25cm (10”) mark. The important thing also to notice is that my pink plastic safety cutter is pretty much the same exposure in the three images because the camera automatically changed the shutter speed (and in my case also the ISO) to achieve this.
After becoming happy with Auto mode, I believe a new camera owner should next get the courage to try A mode (Aperture Priority). Moving to A will let resulting photos stay nicely exposed and occasionally you could start to pull off really good creative shots by experimenting with and controlling depth of field. However don’t race out and buy an expensive fast lens (with a low f-stop number) just to become a bokeh master right now. Experiment with the lens(es) you have (a lot of kit lens will be f4 or f5.6, but they’ll be just fine to start).


