|
Register now through mga Booking Essential.

I can't make promises about the weather, but if its overcast and drizzly the birds will still be flying, so come and bring a raincoat and/or umbrella.
|
I can't make promises about the weather, but if its overcast and drizzly the birds will still be flying, so come and bring a raincoat and/or umbrella.
Seems there was a lot of angst generated yesterday, because the social media drip was taken away. The really sad part was that the emergency services in Australia (triple zero) has to take to conventional media to stop ringing to report Facebook and Instagram. So sad….
Well there is a good alternative #TURNOFFSOCIALMEDIA and go and do something in the real world, the more creative the better or actually talk to someone, especially a friend. It will be really good for your health.
Yesterday I when for a walk for with my sketchbook, watercolours & pens (the actually fit in my camera bag) Sat in the sun (and strong breeze) and sketched.


Time disappeared into a flow of seeing and sketching. The only rude reminder of reality was fighting against the wind. Such is life and it is good.
The S mode (Shutter Priority, TX on Canon cameras). Its very simple to use you set the shutter speed and ISO and the camera chooses the best aperture for you.
There is a lot of advice out on the net and in how to books about the importance of keeping shutter speeds fast enough to avoid camera shake. So setting the shutter speed sounds like a good option. It is also helpful if you need to you can “freeze” action by using and ultra fast shutter speed (like 1/2000th of a second), faster infact than a blink of an eye. While I did use this mode on older film cameras, I have seldom used this setting on any of my digital cameras (I’ll explain later below in this post). Like most cameras my new Olympus OMD E M10iii does have an S mode and I was trying to think where I might use it and I settled on birds in flight (be warned that is a challenging subject to try yourself especially starting out, kids on a bike would be a better choice)
That was a bit easier said than done, It was a cold dull overcast morning that Melbourne gets a bad reputation for but aren’t really all that common. So there where not many birds out and about. I figured ducks would still be out, supposed this is the weather they like, so it was down to the lake.
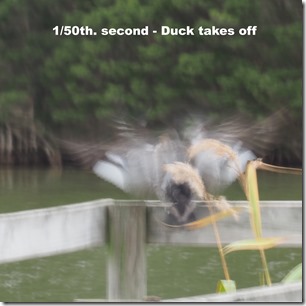
Despite starting to drizzle the duck did perform for me. He was sitting on the wooden rail on a small pier as I approached and a photo with the shutter speed set to a 50th of a second was almost ok (the image has a slight blur but the duck is recognizable despite the low light and slow speed). However as he took off, the next photo, also at 1/50th second is just a blur of feathers. He circled around which gave me time to change the shutter speed and catch him flying in and about to land at 1/2000th. of a second. Now most of the duck is in sharp focus (perhaps expect for him trimming his wing tip feathers). So Shutter Priority mainly helps in deciding weather you want blur or sharpness when you subject is moving. I probably won’t be using this mode to often, but it will help is some situation (if I have enough time to change the mode dial and the shutter speed before my subject has disappeared into the distance. Which it generally has.) Thus you need to plan when using this mode before the action starts.
I just realised I haven’t posted anything about a series of free photowalks I will be hosting in Jells Park (over the next 10 months). The series of walks follow the notion of Photography with an Artist Eyes, so they are a little different. The first photowalk is only two week away and has the theme A Sense of the Place. The number of participants is limited to 20 and this first photowalk is almost full now. If you want to join the fun please register via Eventbrite at the link above.

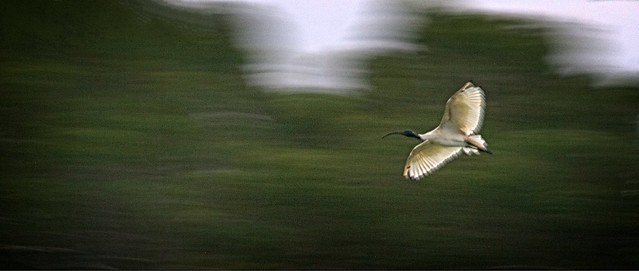
Today I was testing out my new camera wrist strap (I really don’t like or ever use the neck strap) for comfort and suitability when panning. I chose this image because it was the slowest and showed the best motion blur associated with panning on the ibis. I also liked the composition.
There where several other decent candidates, and a fair few blurred rejects. So the wrist strap was comfy but didn't guarantee panning success, which I still but down mainly to luck.
Whilst on my endless summer trips I’ve gone a bit overboard taking very wide panoramas. It very easy with a digital camera to rattle off the 30% overlapping images to make a stitched panorama and I have used Autostitch to do this mostly although Microsoft’s ICE is another great stitching program and there are lots of other programs and apps. Because the wide view suits so many of the vistas I’m visiting I’m also opening out my sketchbooks to paint across two adjacent Landscape pages. This is all wonderful and enjoyable in the field but it has a downside, it takes time, in fact the bigger the panorama I want the longer the stitching and other post processing of the photos takes. On busy travel and field days I simply run out of time and/or I’m likely to fall asleep waiting for the stitching to complete in the evening.
As my LG phone got terminally ill, and misbehaved several times, I lashed out an got a new HTC U Play (why HTC, well it was not the cheapest but because my first HTC was super reliable and easy to use and is still going strong, as GPS in my camera bag, it was able to take over from the ailing LG). The UPlay was equally easy to use, the one downside is the beautiful case and screen as a bit slippery so a slip-on cover (red so I don’t leave it behind) was the first accessory. Then it was out to try out the camera, I just love it! Here is my first attempt at panorama mode.
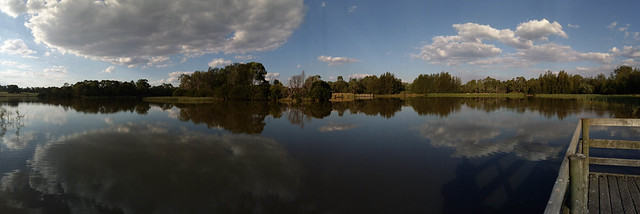
Now that did take a few seconds to stitch in the phone but it is a wonder panorama, I might have been able replicating this with a DSLR and autostitch, which would easily take over 5 minutes or longer!
My passion for the wide view has very much moved into my instagram accounts especially @apimageo, which is still very much stuck in the 3 across grid view (you have to look at my profile to see it). I also recently notice that @packtography (he’s worth a follow) includes the camera, exposure and post processing summary with most posts. I reckon this is a great idea, so I will try to keep up including such info. Sharing your settings to me is important as an insight to let other understand your work, BTW my flickr posts have always included the extra EXIF data automatically if you are interested.
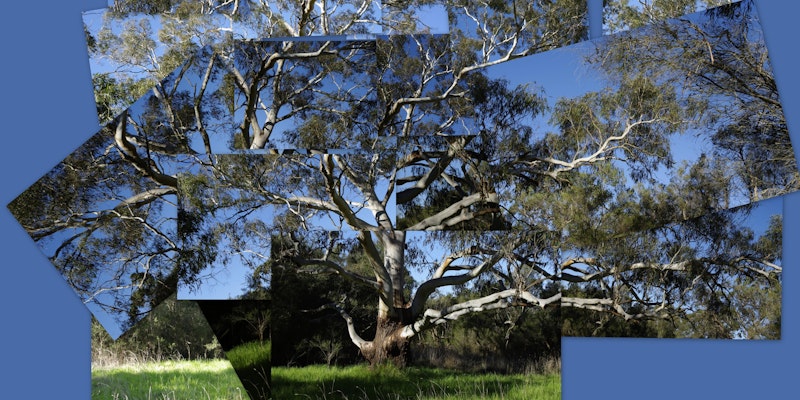
 The lighting was not so perfect this afternoon, so I had decided to try another seeing exercise from Freeman Patterson. This time I’m looking at the idea of thinking sideways, looking at something familiar, but not normally photographed. However thee trick here s to think of a reason you don’t take the photo and instead look for something to become a photo. Freeman’s suggest trying to break a rule, like not photography into the sun or avoiding balanced and cantered compositions. On the way to my favourite spots on the far side of jells park lake to capture the setting or late afternoon I have to walk along bush tracks. I have seldom photographed them so next I look to break a rule of too.
On my way out I turned and looking back towards the sun (and yes damn there is sun flare). I also took a bracketed set of exposures so I could play with the tonal aspects. I then processed HDR versions in two different applications (firstly on the right using Aftershot HDR merge and secondly of the left Nik’s HDR Efex Pro 2)
I treated the Aftershot Pro merge as I normally do (without using a presets) and adjusting the tonal sliders myself to match the scene I remember. The HDR Efex software is still a bit new to me so I choose to use their Soft Landscape preset.
On the way back further back along the track the sun broke through the clouds for a few moments and Looking Straight Back down the track, with the classic composition you are supposed to avoid. I took another bracketed set of photos. However the cross lighting and shadows in the distance do attract the eye and make the composition appear more interesting. Again I created two HDR versions.
Of these images I do like the bottom left one, it has stronger contrast (because I created it that way) and perhaps fits more closely with what I remember of the lighting at the time. I’m glad I spent some time thinking sideways and looked at these tracks a fresh.
This is an alright photo for an overcast drizzly day. Actually I was waiting in hope of catching a rainbow, but the sun never shone for me so I didn’t get a rainbow, just the last of the oak leaves falling. Being adventurous and warm back inside I figured this was perfect for a comparison of how I might post process the RAW version of this image in my software on my HP spectre 2 in 1 laptop.
| Picasa (no adjustments) | After Shot Pro 3 (Perfectly Clear) |
 |  |
| Lightroom (Tonal & Colour Adj) | OnOne 10 (Enhance & Effects) |
 |  |
I have included the unaltered render of the .pef RAW file, just to show that an unedited RAW file usually looks flat and often a bit dark. My goto tool for the first pass look at photos at the moment is After Shot Pro and the perfectly Clear filter (in this case it has the colour a bit loud and the sky blown out, not that wasn’t pretty much blown out in the unedited version). At this stage I think the image has potential and flag it was a keeper and even give it a couple of stars.
I then fired up Lightroom and set to doing a fairly standard tonal tweak, recovering some shadows by mainly looking to pull highlight down and deepen the blue of the sky (moving the blue channel viberance to the left) I also cropped the image to avoid the leading lines of the edge of the road drawing the veiwer to the bottom left corner. I felt this was better than the Perfectly Clear. Next I used OnOne, I’m having trouble with the browser not display my RAW filesin version 10.5 so I took the unprocessed lightroom rendering into OnOne 10 Enhance and tweaked the total range similarly to lightroom and I also used the magic eraser to remove a couple of post a swing and BBQ and performed a similar crop. Next I went into OnOne 10 effects and started with a soft dynamic contrast, added a little sunshine and finished with the big softy vignette. Happy with this and it becomes my photo of the day, albeit a dull day.