Wednesday, January 30, 2008

Enjoying the warmth of the sunset

-0.5 EV 0 EV +0.5 EV
It is really clear to me that the HDR techniques (performed here with Dynamic Photo) are ideal for taking "better" (in that they will look more closely like the lighting at the time) in low light, especially at sunrise and sunset, and the half light of artificially lights. In this example I took just three photos using the bracketing feature on my camera at 0.5 EV intervals (shown above).

image I also used tone adjustment (via Windows Live Photo Gallery) to "stretch" inner section of the exposure captured in the center image above(the no EV adjusted image) as a comparison. The image is still a striking sunset, but harsh, it has as very strong contrast and the colours slightly shifted, not as warm or natural.
Tone adjusted

Tuesday, January 29, 2008

The holidays are over


This flock of gulls, appears unsure what to do now all the tourists are gone,

Sunday, January 27, 2008

PhotoFriday :: The Machine


In modern life we are surrounded by hundreds of machines, yet there is just one that most people would find hard to do without. A photomosaic using some of the many devices of modern life as tiles.

For PhotoFriday's topic the machine.

Saturday, January 26, 2008

Staying cool

I was out late expect a good sunset over the lake, to cut a long story short there wasn't one. Just a big dark cloud threatening a cool change which didn't happen either.

IMGP1362-1

At least this little guy knows how to stay cool

Friday, January 25, 2008

Late summer delights


The last of the day light saving light, a cool breeze, the smell of onions and sausages cooking, high summer is to be savoured. Also the opportunity for nice backlighting

Thursday, January 24, 2008

Cracks appearing in flickr's geotagging community?

It seems that I'm not the only one who has lost interest in the once vibrant and innovative geotagging group on flickr. Threads about (lack of) accuracy, inability to position a map (and get photos), in fact to summarize the new map format is a disaster, now are starting to out number the nifty new things to do. The problems probably relate mainly to a new "feature" in flickr called places. It boldly promises -
The Places project is our way of saying thank you to all our members who’ve taken the time to put their gorgeous photos on a map.
The trouble being they will no longer be your photos, and finding your photos is, well so hard, I gave up.
image My biggest whinge about geotagging via flickr, is however to do with the Yahoo Maps engine behind it, it just is not good enough for most of the parts of Australia (ie outside the main cities) that I like to photograph. The "We're sorry the data you requested..." mosaic means I can not accurately geotagged via flickr end of story. What I use instead is picassa's link to google earth, maybe not as easy to do but it works and with care it can be accurate to a few meters (ie close to many popular portable GPS units

Wednesday, January 23, 2008

More on "extending" exposure range

The discussions on the net about extending exposure range often get involved in tone mapping (al la HDRi), and suspect that many people see more contrast are doing the same on a single image (ie expanding the contrast, using exposure adjustment) and it is unfortunately commonly also called tone mapping, but perhaps it is better called adjusting tonal scale.

image

An histogram adjustment slider is such a tool and window live photo just happens to have one, if you know where to look. Firstly select the photo (yes single image) and click on the Fix tool on the tool bar. A list of common fix techniques pops up on the right hand side. Select the first item Auto Adjust, the image will be adjusted and a small panel of sliders will drop down. A histogram graph of the individual pixels tone (from dark to light) is displayed at the bottom imageof these tools. Under it are two sliders (one with a black dot, representing the darkest shade on the adjusted image, the other a open square which is the lightest tone) . As you move these sliders you will see the image "tone stretched" as you go. For the image below, base on my stitched panorama from a few days ago, I have chosen to slide the dark slider up, which appears to darken the image, but all that has happened is the tones are moved to fill a space between dark and light. The three sliders above can also adjust the histogram but they compact or stretch individual parts of the histogram. I thought the image required stronger highlights and moving that to the right stretch the upper part of the histogram a little but left the rest unchanged.

IMGP0514 Stitch-1

Does this look closer to what I remember photographing? YES, with a slight colour shift. Is it tone mapping? NO, but it is an easy way to liven up a "flat" result.

A lot of the auto fix tools in camera bundled software, popular photo album programs and even photo processing kiosks, use tone scale adjustment as a significant part of their "magic".

Slideshows revisted


The old fashion slide shows can be really "sparkled up" these days with a number of photosharing sites offering fancier slideshows, like this one from photobucket, to decorate social networking sites like My Space and Facebook. Ok maybe its a bit over the top for this blog but you get the general idea.

Tuesday, January 22, 2008

Blue Eye Wallpaper


Blue Eye Wallpaper
Originally uploaded by imageo
If you like the mosaic below this is just a reminder you can download a screen wallpaper based on it and other wallpapers based on my photo from my flickr screen wallpaper set

mucking around with mosaics

I have been doing a lot of "playing" with photo mosaics, specifically the ones that make up another image. My software of choice has been andrea mosaic for a long long time. It is free to download, and gives you a lot of control over, as well as the tools to build the library of tile images you use. To be fair its user interface is old fashioned text forms, but perfectly servicable.

Blue_eye poster (created with andera mosaic)

The past couple of weeks I have been trying out mosaic creator, it has a much snazzier user interface (it may not be any easier to use though) and has two important differences to andrea

  1. it can generate an image using a range of tile shapes (eg triangle and hexagons)
  2. It does not need to firstly compile libraries of tile images (you can give it individual images or directories of images)

This second feature got me thinking, I could use a standard iBlue_eyes logo mage and get a photomosaic made from any given day's photos (providing I had taken enough photos). Here is how a few of the different day tilings worked out on my photo eye icon.


rectangular 20-jan-2008 rectangular 19-jan-2008

honeycomb 22-nov-2007 hexagon 23-dec-2007

rectangles oct-2007 (includes screen captures) open grid mesh 18-dec-2007

Sunday, January 20, 2008

Stitching in an unusual place

image

If you are a regular reader of this blog you will know I love the extra wide perspective you get when you stitch several images together. Normally I have been using autostitch, but I have just discovered a very serviceable stitching tool inside window Live photo gallery (one of the tools that you can get in windows live)

The Downside, depending on you view it could be an upside, is the fact that it works completely automatically, no settings to maketweak, no sliders to slide or knobs to turn. You just select the photos you want to join and then click on the little make item on the menu and pick the first option create panoramic photo... That's it

It generally seems to to a good job. It even does multi panelled grids of overlapping images

IMGP0514 Stitch

I haven't cropped or rotated (Live Photo Gallery does not seem to have a straightening tool!) so you can see exactly the image produced.

Saturday, January 19, 2008

PhotoFriday :: Disaster


The cane toad, Bufo Marinus, is Australia's Most Obvious Biological Control Disasters.

For PhotoFriday topic Disasterous

Friday, January 11, 2008

More on HDR (High Dynamic Range)

I posted last week, about the HDR or more precisely HDRi  (High Dynamic Range Imaging) technique, to attempt to get a higher dynamic range into a single exposure. I was inspired enough try out what can be achieved with a few popular freeware and shareware/trial version of software, and it is time to share my finding so far.example of ghosting on palm tress
Well the first big shock was in the amount of ghosting I saw. This resulted because the images could not be superimposed adHDRequately and was mainly due to the fact that I had taken most of the bracketed exposure sets handheld (without a tripod to ensure that the images where exactly the same view). In fact some of the ghosting was so bad in many cases the final photo looks out of focus.
Most packages offer some way to adjust individual exposures but most where to say the least tedious (ie more up and down one pixel with each press of the mouse or arrow key, in just horizontal and vertical directions independently). Only Dynamic Photo seems to allow rotation as well, and it has a nice "pin warping" method that snap difficult areas undependably. On this count alone this means that only dynamic photo and Fdrtools are the only software from this trial I will keep installed on my computer.
Artizen and Photomatrix are probably the first HDR software you'll discover with a google search. The final tone mapped images are nice but I was too frustrated with the ghosting to give them a second chance. I've deleted both! They are both trial version and have a prominent watermark on the output.
Created with Artizencreated with Photomatrix
FDRtools was refreshingly easy to use and I will run through an example later using it. It gave a lot of opportunity to tweak things without undue complexity. Its default tone mapping is not quiet as rich as the other packages
created using fdrtools
Dynamic photo ended up my favourite, just not 100% sure why, I think is was a combination of being able to align handheld images and the nice tone mapping choices. it has a small watermark on the free version
Dynamic Photo - Tone mapped to the  human eyedynamic Photo with  smooth compressor tone map
For comparison purpose this was the "best of" the original bracketed set. Note all the detail in the foreground is lost.
P3201017 from original photo set

Wednesday, January 09, 2008

Wierd Shapes


Some wonderful contortions in the trunks of Swamp Paperbark (Melalucas ericifolia)

Why I have turned off anonymous comments?

Sorry folks I've turned off anonymous comments on this blog to stop the ad-bots (the annoying software robots and market oriented folk that post irrelevant adds), I'm pretty annoyed at all the Chinese posts lately.

So if you want to add a comment, and it can be about your own company of product, you just need to identify yourself. I welcome feedback

Tuesday, January 08, 2008

PhotoProject:: getting rid of the ghosts (almost)

raw image after autostitching
This autostiched panorama was taken on the point smythe beach walk for the "summer by the sea 2008" program for coast action/coast care. Unfortunately sone of the figures are ghosts because they moved between exposures, Not something I could really do much about at the time, or even less about now. However there are wonderful tools available to do photo manipulations these days. I have not written about them much because I tend not to use them. An exception and a great tool, is the clone tool. Here am using the clone tool in corel paint. Not all free or "packaged with camera" software has this feature but the free to download paint.net does have a great version of this tool, if you want to try one out. Basically the clone tool allows you to copy another small part of the photo over the top of something your want to remove. This preserves the "texture" of the local area on your photo surface and genrally does a great job of concealing things. I also used cloning to get rid of a couple of pesky dust dots in the sky. The one problem I had to compromise were the heavily ghosted two figures in the middle, without them the composition was weakened, so these two ghost got to stay.
after cleaning with cloning tool

Sunday, January 06, 2008

Sky or Foreground (that is the digital camera question)

collageI am guessing every digital camera owner has come across this dilemma, as soon as they take any landscape photographs. If you point the camera slightly down the exposure will give you nice detail in the foreground but the sky will be washed out (almost white), or you could aim up a bit and the sky will be nicely exposed but the foreground  will be in shadow.
The underlying issues are twofold the light meter in the most cameras do not perform well when you have a big contrast in the lighting levels, the meter has to make a compromise about what it exposes correctly, often when the contrast is strong that compromise is not good. Secondly the camera's CCD (or CMOS) sensors do not have the ability to record the detailed gradation of light over a wide range. This is often called the camera (or and media) dynamic range. Computer monitors and TV screen also have limited ranges. Traditional film still has a slightly broader range, but no where as good as the human eye.  That is why you so often here "You had to be there, to fully appreciate this view"

So can photographer actually get close to what you really see? Yes the good ones can. Look at Ansel Adams and Ken Ducan's  work.
Automatically selected exposure
One, not so secret, secret is to take your photos during the golden hour (when the sun is not full strength and the low angle lighting is softer). However remember if you are pointing your camera at the sunrise or sunset, then you will be giving your camera a very contrasty scene with a massive dynamic range. The result might disappoint you.
collage2
Another technique, I like, and have written about already is to use 
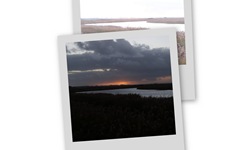
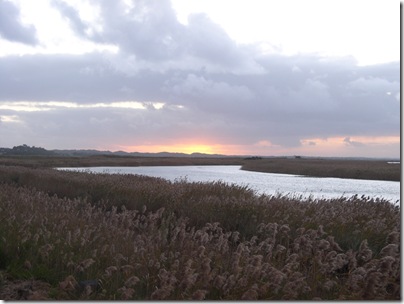
exposure bracketing. Which will normally be represented as a number of overlapping differently shaded rectangles and/or BKT on the cameras menu. In this mode the camera will take a series of under and over exposed images, normally by changing the EV (exposed value). In the sequence above both the underexposed images (bottom images) record the intensity of colour in the sky (and are therefore better to convey the moment than the automatically selected exposure above). The downside is the detail in the shadows of the grasses in the foreground is lost.
lower tarwin bend using enhanced dynamic range, tone mapped to What the human eye might seeAnother way to "fake" the dymanic range of your eye is to use the HDR technique, which is not exactly new, but can be easily exploit with a little bit of special computer processing on the bracketed sequence (as the above set)

High Dynamic Range Imaging demands a lot more discussion than is available in a single blog post, so watch this blogspace for a few more posts about the ways to exploit higher dynamic ranges in your photos.