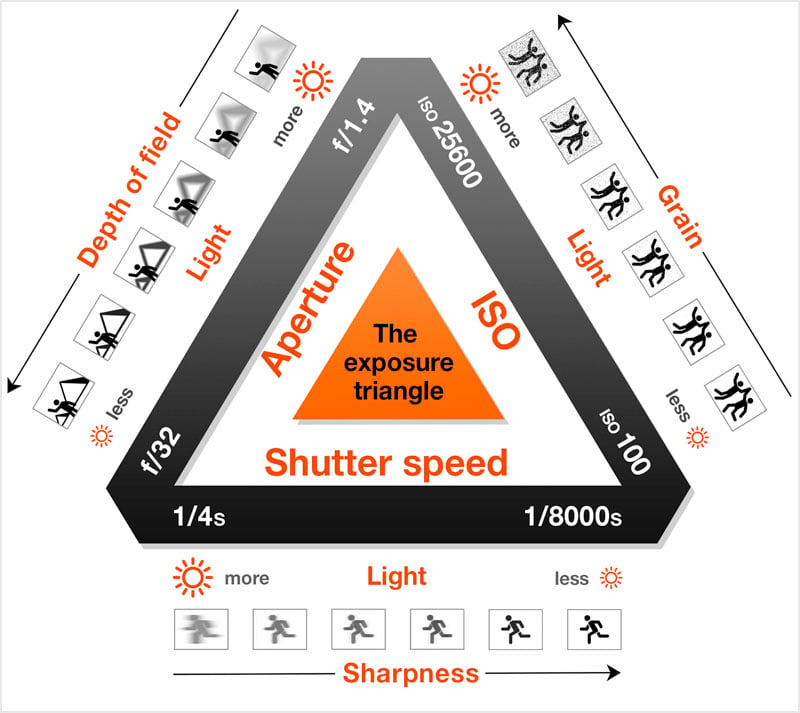
 If you are a new camera owner, you and have been following this series of blog posts by now you have realise that I’ve moved into the advance area of setting modes, without asking your to remember the exposure triangle or complex formula. You won’t totally escape, but it is just a brief overview here, and no test afterwards. This stuff is actually quiet straight forward, and it is much easier to understand when you apply it. I like this little infograph from Peta pixel because it includes a basic graphic representation of what happens with each setting.
Somewhere inside that triangle should be the perfect exposure for your scene but where? Setting the mode to A or S lets the camera change one or both the other sides of the triangle and aims for that best exposure. Tomorrow we will explore M mode which simply means you will have to make all these exposure settings yourself.
The other thing you probably noticed is there is no I (for ISO) on the mode dial. I’m pretty certain this a throw back to the film days when the ISO was dependant on the film in your camera and you got to set that when the film was loaded but that was that and the ISO setting stayed until you changed film. Each type of film and its development process produce different sensitivities to light for that combination. The ISO was written on the outside of the film packet. If you wanted a different sensitivity you had to buy a different film. These days on digital cameras the ISO can be changed electronically to let the sensor be more or less sensitive to light. In some cameras you get to change it to a single value, more recently most cameras let you set it to Auto within a given range and this lets the camera also flex the sensitivity.
There is a downside to higher ISO, in darker scenes which seem to demand higher ISO (and thus sensitivity) the darker shadows become subject to more noise (seen as a grain or an unpleasant spottiness). So staying with lower ISOs (setting your auto range 100 to 400) will probably be a good move when you are starting out, and you are not trying to take photos in dark rooms or alley ways. You can see am example of this noise in the shadow, of the flying duck photo in the earlier post, and look in the shadows behind the duck. You might have to click on the image to enlarge it. The noise is there because I had hit the maximum aperture of the kit lens I was using f4,6 and the low light meant the camera had to select ISO 5000 to get sufficient light at 1/2000th second. Normally I would have used a noise filter which would probably smooth this out nicely, but I am showing images straight from the camera (ok the duck photo where cropped) but otherwise not post processed
No comments:
Post a Comment