Despite the fact that I couldn't yet see any compelling reason to go over to uploading RAW images into google+, I still wanted to have a play and see what it can offer. So I went an took a couple of pictures of the gingko in my cretaceous garden. I had been a bit worried because it has not spouted any leaves and it its well into spring. Luckily they appeared two days ago and are developing well. The first set where taken with my pentax, which lets me save files in either the pentax propriety raw format .pef or adobe's .dng format, I've also uploaded the .jpg version captured at the same time. I was actually a bit disappointed because whilst I thought the background was out of focus it was a bit strong (more on that later)
I then took another two photos with my canon this time with the aperture wide open to dramatize the depth of field blur.
Normally I upload to google+ via picasa but trying to upload raw files from it triggers a jpeg version to be generated in the process, not what I wanted so I decided to do this via my google drive. You can also upload via your browser, but that is a bit more work. Whereas yesterday auto enhance seemed to be toggled off, today it was toggled on, so this turned out to be a fairly low effort way to get half decent renditions of my photos. The downside is the background sync from my google drive took several minutes, so its a case of copy to the google drive locally and go and get a cup of coffee.
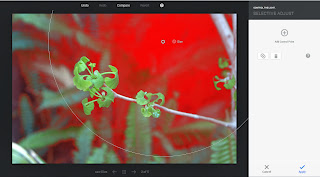
Whilst once I was very interested in the "auto fix" features of photo processing software I've come to prefer to tweak the sliders myself. This of course take time. The google+ plus path is classic google (I'm feeling lucky) where its all done for you behind the scenes. I must admit it isn't bad but I still prefer to do my own adjustments so I had a look how I might be able to fix the background dominance. I used the .pef file and I chose the selective adjust option which allows you to select a part of the image and this will find similar pasrt of the image to be selectively processed, You can adjust the size of a circular area to work with and the effect feathers off outside that (its shown in red above). You can also have more than one selective area. It does not offer blurring as an adjustment but I was able to decrease contrast and reduce saturation to take the background dominance away. Achieving something closer to what I remember in the view finder as I was photographing.
I'm impressed there is a lot of power here, if you are already have good software for processing RAW files I'm sure you'll be able to do better. However if you are new to RAW, have it on you camera but have been afraid to try it, give google+ photo and google drive a go, they are free after all, you just need a google account and be using a chrome browser. Oh that's right, also make sure you have a good data plan first because uploading the large RAW files will be a bandwidth hog.


No comments:
Post a Comment