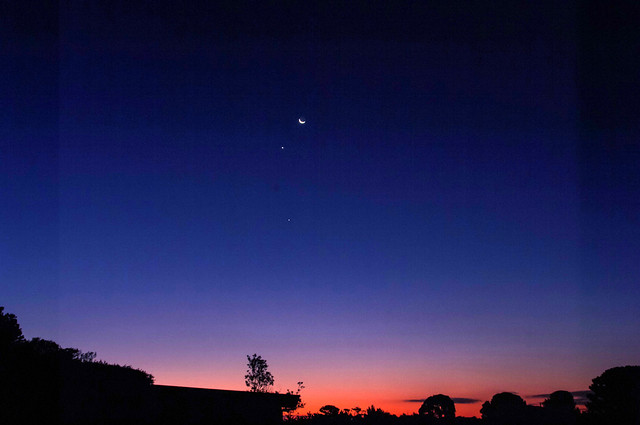
Towards Sunset

After Sunset


Whilst small flat works (watercolour sketches etc, photographic prints, many of them old family photos) could be scanned on one of my two multi-function printers I have. I also have an old and “cheap” slide & negative scanner that is so old It not longer has a driver and can only work with an old XP laptop (I have keep for compatibility with some old devices like this). Larger art works (and I have some BIG ones) had to be photographed. Which is easy enough. However I also do a lot of more sculptural small things as well. I figured an old fashion copy stand was what I needed. 
Clearing out some of my father’s untouched storage I came across our first enlarger (in a poor state). It was missing the globe housing and lens. I soon realized it could be easily converted to a perfect copy stand. I just had to unbolt the enlarger bellows unit, to give me a perfect mounting position, roughly over the centre of the base). I also found an old bracket for an old and broken off-camera flash bracket and figured it would be perfect to connect the camera. A little experimentation and I found I needed ")
Using the stand is simple. Place the piece on the base, rack the camera up or down till the piece largely fill the viewfinder and focus. A macro lens if you have one is great also. I haven’t built any special lights for the stand (yet) and have used it both outdoors in the shade and indoors in my studio away from direct sunlight without needing extra lighting. 
With an extended table and the the camera cranked as high as I safely can get it, and un-zoomed to 28 (the widest I dare to avoid undue distortion) I can easily photograph to 40 by 25cm (approx. 18”” by 10””), not quite A3. With the stand turned around so the camera overhangs the back of the base and the stand protruding off the edge of a table (securely weighed down on the based) I can photograph items on the floor up to 90 by 59cm which is roughly A1. With this configuration it is hard to focus through the viewfinder but that’s when I find connecting the camera to my computer comes into its own (my Canon T3i tethered to lightroom is perfect).You have a very remote control and can zoom in to get the focus perfect.
I’m proud of my repurposing, Further I can now strongly recommend a copy stand over a scanner for any artist as a way to record their art.
The new Google+ has arrived, its faster (much faster) and bolder (a red header line with a more responsive style design) but really more of the same. EXCEPT there is no direct menu link into google photos and hangouts,These are are presumably becoming very separate applications, so that ok. Also missing from the menu are circles and pages, which I don’t understand. The Truth is I removed Google+ off my phone a while ago and I have been visiting google+ less and less much from the computer. I don’t see anything to encourage me back. However if you want to give the new google+ a go check out the “How to Use [the New] google+: Tutorial” blog post by Traffic Generation Cafe
Thanks to +Ananda Sim for the heads up on the How too…

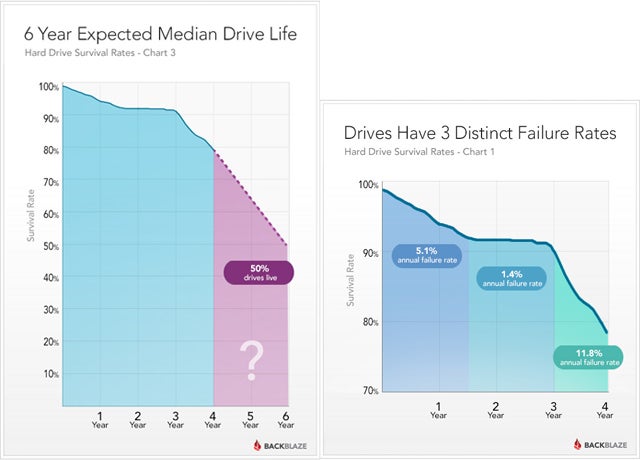 The conventional hard drives (whether built into your computer or as an external USB style) also have some telling untold secrets (see backblaze study, which suggests seagate drives are more likely to fail than western digital, but I have had the opposite experience I have 4 dead western digital my book USB drives but 3 healthy expansion seagate drives, one of which considerably older). The caveat here is they will probably last a day or two longer than the guarantee. So what about cloud storage that’s forever isn’t it? Well if you look in the terms of Service (TOS) or most cloud service providers there is generally no mention of loss or damage of stored data (I guess they assume you must already have a copy as well, ie from their point of view the data is backed up by you). Only Amazon seems to have addressed this, and I hope companies like google could be relied upon. However they are companies that are unlikely to last forever. So cloud backup is where we are at now, not cloud archiving yet. So where does that leave us. We will need to plan to regularly move any digital archive onto new media as technology change and popular taste determines. Clearly an Archive of Digital Photos must not be hardware/media specific.
I trust all this scares you into making a backup of your digital photos right now. Stop reading and go and do it!
 They are not full of finished art works, mainly there are squiggles that are really little more than doodles. There are also notes on the lighting, time and conditions. Maybe I have sketched the horizon and marked where the sun/moon rise or set. Perhaps I have scouted around for an interesting foreground silhouette. Occasionally there will be records of some key colour aspects of what was happening. Most are just me trying out some composition decisions, often this is just getting a feel for shapes and tones (not exactly notan but similar).
  What is the first thing you see? Do you return to looking at it or something else?
 I enjoy painting and sketching outside. Very little of this work gets directly into exhibition pieces but that’s not really my purpose. I find I do remember more and connect with a place more strongly when I have spent a little time sketching.
 Sometime I just have a basic sketch book, other times I might want good quality watercolour paper (ie > 300gsm) I pretty well always have one packed and ready to go. At the moment I have only the one folio to carry better quality media (ie individual watercolour or pastel papers) it also holds a drawing board that can be attached to a camera tripod, (see my tripod easel post), This normally travels with the larger kit which is logical as it has more watercolour paints.
  It’s really nothing fancy, “”fold out” studio is just my name for a portable workspace (and specifically the equipment and media for it). I have had a fair bit of practise in creating such a “portable” studio. One of my favourite places to create is in a place down the coast, a couple of hours drive. To use it I must include all I want in the back of the car (space is generally limited) and I need to be able to hand carry the bits, thus weight has also been a consideration.
  bag or a couple of smaller carry bags. Fitting it all in a duffle bag also means when necessary it can easily become standard luggage for flying (ok not much room left for clothes). It also needs to fit in the bottom shelf of my studio cupboard.
 Whilst I have the luxury of a Home Office and a separate Studio. They are significantly different places with different meaning. The office is the place to work and I can leave the work behind when I leave the room. Creativity doesn’t work that way, it just happens and is difficult to turn on and off. The environment has a lot more sway in the creative process than most folk appreciate. Unfortunately my studio has succumbed (or more precisely keeps succumbing) to clutter. A stained glass filter from Dreamscope might make it look inspiring but all the junk it hides makes it hard to just sit down and create. So how to fix it?
 What about colour, watercolour, pastel or camera again? Do I need computer tools?
My objective for the next few years is to seek out artistic residences that I can both learn from and perhaps return a little extra new knowledge back into their community. Having myself prepared to create in other spaces is an important first step.


I must admit I had been ignoring Apple TV, streaming, chrome casting and such. Unlike the supposed typical Australian net user I don’t use such technology to download pirate videos of the lastest TV show from the USA. So I am late coming to the wonderful little chromecast dongle. Rather than playing with streaming video, I came across the wonders of the chrome cast as a way to avoid cables and incompatibilities when giving a presentation (or training session) directly from my computer. What it can do is allow you to throw your screen onto any modern TV and most data projectors without a cable. Thus avoiding resetting screen resolution, cables not long enough or other such hassles. The TV, Big screen or projector just needs a HDMI input and most recent equipment will come with this. You just plug in the chromecast dongle into the HDMI socket (it generally needs to be connected to separate power supply, a charger is supplied with the dongle but any powered USB port is fine).
There is a downside, you need to have WiFi, both to set up the the chrome cast at a new location and carry the stream from your screen during the presentation. Most venues these days do have internet & WiFi but if they don’t and If you have a smartphone that can create a local hotspot that will be fine for running a powerpoint or a live demo of software. Perfect for a travelling trainer. However it could be a very expensive way to stream cast a full movie from somewhere else on the internet, depending on your phones data package.
You can broadcast from your phone or tablet via special apps, and you probably already have some of these. For example the You Tube app on android will direct the YouTube clip to your chromecast, no need to download it first. Google Slides, can make a slide show presentation located on google drive directly controlled from your from your phone (and yes it can read powerpoint files). The real power lies in the ability to send the contents of any chrome browser tab, to the chromecast, and thus big screen it is connected to. The current version also has the ability to send an application output or your entire screen (these later options are in beta release and can be a little laggy at times). So as long as you have a chrome browser you can send anything you can get on your PC screen onto a larger presentation stage. All without any fuss.
I also like the backdrop (aka screen wallpaper) settings on the unit which lets you use your own pictures from Google Photos, Flickr (or facebook if you must) or just stick with the google selected photo as a slideshow screen saver.
https://t.co/DvpzlgiSdI still having fun with dreamscope
— AP@imageo (@APimageo) October 22, 2015

Not yet a great photo but a pleasing improvement none the less, much closer to what I feel I would have seen and attracted me to take the photo. These days I normally only take three photos but 1.5 EV apart and in RAW on my Pentax and 3 photos 2 EV apart on my Canon. There is lots of well meaning advice of the right settings for HDR, most of it apparently given with authority but totally prescriptive and usually without explanation. If you have decent software I suggest you experiment for yourself and find those settings that best suit you and your camera, and be gentle with the sliders during tone mapping (aka avoid the lurid colours).

 For PhotoFriday‘s topic My Favourite Location