Saturday, April 30, 2016

Look after those SD cards

SD cards have become ubiquitous with digital cameras and microSD cards with smart phones. They are relatively cheap and generally robust. However they can be damaged and can very occasionally fail. My experience up till last week was that failure does happen but was very unlikely. I had one bad experience several years ago where a card came apart in my camera and jammed the card socket. With patients, a magnifying glass, a torch and the tweezers from a swiss army knife I did get all the pieces of plastic and gold foil contacts out of the card slot and no damaged was done. Luckily!

Example corrupt RAW fileAnother card last year just gave errors on two test photos when I loaded them. Picasa loaded in the photos ok but Lightroom reported corrupt RAW files. Surprising the paired jpegs were fine. At first I suspected the camera but I took some more photos using an older SD card and no problems. This was a cheaper brand card and I could see no obvious damage. I just  reformatted the card in my camera, and it worked fine. But I did buy a replacement card the next day. It is serving out its retirement in a relative’s photo frame and apparently enjoying life and behaving.

Problem with Write Protection Lock sliderTwo days in a row this week I had two cards develop problems with the little plastic slider on the side that provides write protection. I don’t normally touch this slider. The first problem was I managed to push the slider up inside the card and on top the contacts. I felt the card being blocked when I inserted into into the card reader. I could read the photos the card stuck again as I tried to removed it from the reader. I carefully applied more pressure and the card came out. Close inspection showed the slider had moved and was jammed (see picture above). The SD was immediately thrown out. Unfortunately the next day, same camera another same brand SD card, read the photos ok but when I put it back in the camera it reported the write protection lock was on and when I checked the card the write protect tab was missing. I carefully checked both the camera slot and card reader but that little bit of plastic was totally missing. Another card for the bin. Three new cards from a different manufacturer purchased.

By this stage I was worried either the camera or the card reader was damaging the cards. So an intensive investigation of cards and cameras and card readers followed, including testing the write protection sliders. No problems found and I breathed a long sigh of relief.

So What might have causes the failures?

Then I realised I had changed how I was using the cards on my recent trips. I was using a new card each day and not clearing it off. After being loaded I would put it back in an elasticized pocket in the camera bag. There were only three such pockets and six cards so there was doubling up and I remember a few cards slipped out and floated around in a mesh compartment which also house a few other accessories. I now suspect that is where the little plastic slide switches got damaged.

So I have gone back to my old practice of re-using the same card in the same camera and clearing off the photos after they are loaded. Only a singe SD card is stored in each pocket, as spares in the field. Old Style SD Card PackAny other spare cards are kept in those older little slide boxes, that SD cards used to come in before that where just bubble packed. They are robust but kept back at base with my backup USB drive, not floating around in my camera bag.

Before I try the rotating card process again I’m need to find a suitable protective wallet for the cards and take better care of them.

Friday, April 29, 2016

Introducing another Mistressess

angle nikMy photo software harem keeps expanding, despite all the advice to choose just one package, This monogamy is actually good advice because the major packages do have their own little foibles, and cross incompatibility, or just straight out refusing to play nicely with each other. What seems even worse is it is yet another bit of well loved software that google are abandoning. My latest addition, and she is an angel, is Nik’s software add-ins for such programs as lightroom and Adobe photoshots elements. With the re-instatement of lightroom on my HP spectre. mainly because she is behaving and is now fast, I am finding these wonderful little tools easy to evoke and bringing a little more welcome power when I am post processing RAW files.

The black and white conversion of Nik’s Silver Effect Pro is really well loved and many keen black and white devotes have long sung its praises. However it is the colour tools I am learning to love, The reproduction of old film formats can be easily set up with Analog Efex Pro, The slide film effects work in the gorgeous colours that well exposed slides could reproduce much better than any lightroom presets I have seen. The real jewel for me is Viveza, which brings advanced color control. One of the magical tools shared across the modules is control points. which is almost like a mixture of layers and luminosity masks, only it is a method of local selection of those parts of the photo with similar tone, texture and colour, once selected all the sliders from the module can be individually changed. My preference is to use this feature sparingly and it is at its most beautiful when adjusting just one colour as the center of interest or to highlight a subject. The other bit of magic is the slider called structure. It will take an entire image or just a control point selection from highly detailed to very smoothed. Its a little like the clarity slider in lightroom on steroids and across all tones not just the mid-tones. I actually prefer the dynamic contrast filter in OnOne effects because that can be separated in short, mid and long ranges textures. Like colour in Viveza this also works best when only bring in extra detail to a few carefully selected control points,

Google are now offering the entire NIK suite for free download. If you don’t already have them and  have lightroom (or photoshop elements) and process RAW files then definitely go and get the free downloads. If nothing else just learn to use control points and fall in love with the structure slider, I’m sure you will find this collection of angels brings some beauty and inspiration back into your post processing.

PS She is well behaved.

Wednesday, April 27, 2016

Yet another Google favourite stumbles

It seems to have been at least two week since the last dissapointment with google. perhaps a recent record (actaully it was only 7 days I had to turn off the thumbnails in popular post on thr righthamd column of this blog) Ok it just seemed longer. Today I am woking in my studio which does use an old computer which is still running vista (and running a little slow but doesn’t give me the heartaches of the theoretically upgaded windows 10 machines). Its slow and stately, never misbehaves and fine for what I need.

bad googleHowever today I got the message that google will not be supporting chrome on Vista. This is a pity because using chrome across a range of computers and opeating systems was nice. What do I expect for free, obviously the confidence I once had in google is now almost none.

My only solution is to keep using the software tools google once brilliantly championed but now has lost interest in and hope there as no legacy, compatibilty or upgrade consequences to come.

Tuesday, April 26, 2016

My First 3D Picture

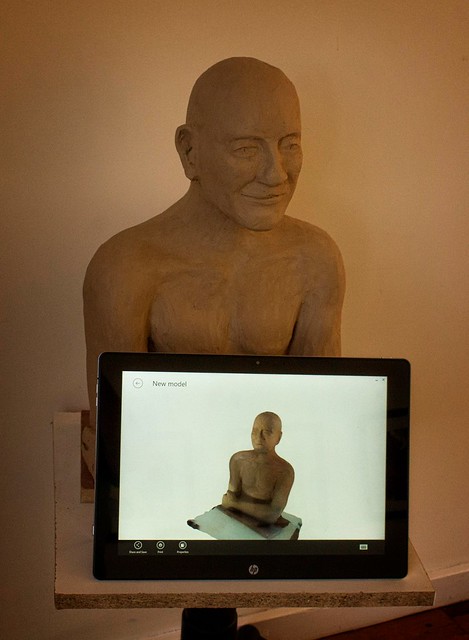
I do like trying out new things, and since my new computer comes with an Intel “Real Sense” 3D camera I though I should try it out. Trouble is the Camera app that comes with Windows 10 is not 3D aware. A little looking around and I found itSeez3D, which can make 3D scans of people (it must start by recognize a face). Most importantly there was a Windows 10 app that recognises the Intel real sense, that I could download. There is also an IOS app (for iPads with R200 cameras)

_#117_MG_6930-My_First_3D_Photo

The standard windows app is free, but there is also a business version (for commercial use). However the only interesting extra feature I saw was being able to print your 3D models. Unfortunately I see being able to make small 3D plastic “selfies” as a toy application rather than something I would need at the moment. You can do the 3D render locally on the tablet, this took me less than a minute but was pretty crude or once you have an account with itSeez3D (Simple enough but it took a while and a verification email step), you can upload to the cloud (that took a few minutes) and have a much more detail (final) model produced on the cloud (I had to wait about 10 minutes). The result was really impressive you can interactively rotate and scale your 3D photo/model on the screen. For me the next step is figuring out how I can use the 3D models to create unique art. That’s going to take some time, which I have, but I do like the potential of  technology and will be looking for a way to scan non humanoid objects soon and perhaps then make some virtually amazing sculptures.

I then went looking for a way to embed a 3D viewer in this blog posts.Try out Sketchfab below, click on the 3D arrow to manipulate the image. Unfortunately the 3D view highlights a couple of places I didn’t get adequate coverage. However for a first attempt I’m pleased.

My Clay Sculpture by imageo on Sketchfab

Monday, April 25, 2016

PhotoFriday :: Bold

IMGP8858

Beach towels drying in the sun on a windy day through a glass wall.


For PhotoFriday‘s topic Bold

Sunday, April 24, 2016

Are we really Shadowless?

Today I visited a new exhibition at mga on Australian Exotica, which presents the views some contemporary Australian photographers that is a different and erotic place. On the way back to the car park I walked the path on the right below and loved the shadows. However compare that with the photo of typical open forest (below left) I had taken earlier a short distance away. Different style of shadows but not really exotica.

Typical Australia Open Forest European Style Garden

“The trees  [in NSW] nearly all belong to one family, and mostly have their leaves placed in a vertical, instead of as in Europe, in a nearly horizontal position: the foliage is scanty, and of a peculiar pale green tint, without any gloss. Hence the woods appear light and shadowless: this, although a loss of comfort to the traveller under the scorching rays of summer…”

…Charles Darwin (notes on trip from Sydney to Bathurst 1836, From Chapter 19, The Voyage of the Beagle)

Friday, April 22, 2016

Free WiFi is great ….but slow …& other self inflicted woes

Waiting for my flight & uploading to flickrI’m sitting at Brisbane airport waiting for a delayed flight, and I thought it would be a great time to upload my best three photos from today. Ok there is free WiFi and it was simple enough to get connected BUT as I  was trying to upload to flickr via the web interface, I came to realise that after 10 minutes I had uploaded less than 10% of the files (an estimate looking at the progress bar). There is a good chance that the whole thing will abort because the three files won’t upload before my flight is ready to load. Do I abort and try individually? … or some other anxiety inducing worry. No the first rule of travel is go with the flow. The free WiFi is slow, so I’ll just wait and see what happens. Nothing is really being lost if I wait till I get home.
Upload time outSo the answer to that wait, is the flickr upload ground to a halt. Time to stop worrying and perhaps have a coffee.  Damn the flight is delayed further. Perhaps I’ll restart. …slowly slowly two of the three images get loaded over the next half hour wait. Now the incoming flight has arrived and passengers disembarking. The public service announcement indicates there is a problem and some passengers have to embark via the rear door and that means going out on the tarmac. It’s sure to be me, no big deal so I go to check my boarding pass on my phone (I’m just trying this for the first time).
2016-04-22-23-48-57Bugger the flight has closed off (and theoretically departed) so my boarding pass is no longer valid, and all I can see on my screen is I no longer have a boarding pass. So I join the queue of people with the same problem infront of a very stressed ground staff at the gate. After talking on her radio for a while, she says we’ll have to go to service desk. So the queue moves over there and eventually I get a printed boarding pass. The plane still is waiting to load and a massive queue is waiting to board but still to board via the air bridge and when the boarding actually starts only myself and two other guys walk over to the stairs to the tarmac, our boarding pass is checked and we stroll to the back of the plane. climb the portable stairs and get seated, everyone else is slowly getting through the air bridge crush and the the narrow corridor between the seats and other passengers arranging the luggage, it take a further 20 minutes to load everyone. Why weren’t they listening to all the announcements? Ah that’s right they where listen to their iPods, or watching video of their iPads or just talking on their phones, and probably their frequent flyer apps didn’t notify them because notify is turned off!
The morale of this story is perhaps we expect the always connected and on-line world to be there, work and look after our interests. However we shouldn’t stress when they don’t, just be prepared to go back to the old methods that work (ie Perhaps just wait to get home to upload, use a printed boarding pass, listen to the announcement)
PS: I was writing this as the events unfolded and I was able to update a draft of the text to blogger via my Open Live writer app, but it got hung up trying to upload the images I had capture on my phone & PC to Google Photos (low bandwidth issues same as flickr uploads mentioned above). So I had to be patient uploading this blog post as well.

Wednesday, April 20, 2016

Almost Black & White…

The differences between the approach of most photographers and artists can almost be summarised as a difference between black and white.

your cup is always being filledToday I listened to a great podcast,  TWIP Family ep 49.5: Trey Ratcliff On Becoming an Artist. If you haven’t already listened the discussion between Jenny Stein & Trey is really natural, full of inspiration and worth listening too. One of the topics is about analogy that your cup is always being filled (with creativity and inspiration) we just need to be able to get to appreciate the good stuff inside the cup. That analogy of a glass half full or half empty is perfect for this post.

I need to begin at looking how tonality is represented in each medium. An easy way to understand tonality is just to desaturate an image to remove all colour. I’m using the basic tonal range names from lightroom. Black, Shadow, Mid Tone, Highlights, White.

 Desaturated Photo

When taking the photo I have to make sure that the highlights don’t get blown out. I begin at the whites. It is easier to find at least some detail in the blacks and shadows, but post processing the image, whereas once the whites are blown out that’s it, nothing can be recovered (even from a RAW file). If I can make sure that the other tonal zones are well represented I will probably have a well exposed image.

My tonal sketch

When starting to sketch the same subject I’m using a well known artist trick of drawing a series of 5 boxes (some artist use 4 boxes, other prefer 7 grey tones) and use the pencil to stipple a set of graded grey tones. and I have matched them to the lightroom names. I’m sketching directly from the simple still life by observation not copying a photo by the way. The key difference is I begin with the darker tones. I personally start by blocking in the mid tones and  then move to the darkest tones (lightroom’s shadows & blacks) and then finally back towards the highlights, leaving parts of the paper to be the whites. My darker tone marks thus define what is consider highlights and whites. They hold the composition of my image together.

#111_MG_3850-sketching II

While photographers generally exposure for the highlights, artist will generally study the shadows and sketch these shadows to define the composition.

Sorry Folks I’m Turning off Picture in Popular Post Side Bar

image Google’s taunting of me continues. Today I notice that the popular post summaries over on the right hand side bar have at last started to displaying flickr images but now they overflow the screen. The effect of truncated images is really distracting. I hope this is not a ploy to bring me back to google photos. So I’m going to turn off displaying image thumbnails in the popular post in my side bar for now, Which sort of defeats the purpose on a photography oriented blog.

I have actually had some good feed back about the idea of a popular post summary, probably because my blog rambles all over the place. You can still follow topics by clicking on the green labels (blogger’s version of tags) at the bottom of the blog post. Alternatively there is a label cloud still on the righthand side bar.

At the moment, although I can easily find my most popular posts, I can not find an alternative way for a reader to find popular recent posts (other than the blogger popular posts tool). So Sorry folks no pictures in Popular post (for the moment)

Tuesday, April 19, 2016

Don’t Panic :: But…

I definitely don’t want to create a panic, so I need to careful in what I am warning here. The past few months have seen several disappointing announcements from those offering “free” photo storage on social media services. The ”One place for all your photos” was a claim that worried me from the start. Social media services are definitely not the only place to store your photos. You can use them to share selected photos but trusting them with the only copy is very dangerous. They have already shown that they change their minds, sell the business and/or possibly will even shut up shop.
So before the crying and gnashing of teeth stage. If you don’t have copies elsewhere it is time to make sure you do. Backup those on-line photos now
image

Bulk Downloading from Flickr

No so long ago you would have had to do it one photo at a time or better still one album at a time (look for the download arrow icon). Now with this the new camera roll feature it is even easier. You can just select all (which does select all your photos, so definitely don’t press delete, the red rubbish bin on the left hand side) on each grouping the the camera roll. You can then move onto the next grouping and press select all again, which add the new set to the selection bar at the bottom of the screen. Normally the camera roll is order by date (either taken of uploaded) and this is a good way to structure your downloads, say my month or by year. However remember if you have uploaded a lot of images it can take a fair while to download a really large collection and it might be wise to break the downloads into logical groups. If you are more interested in organizing your collection by theme you can consider using the magic view to help you select batches of images to download in thematic groupings (there may be a few miss-classifications).
image

Bulk Downloading from Google Photos

Despite the promises about recognizing how much work people have put into saving and organizing their photos in picasa. Google have been quiet about how to save any on-line uploads from Picasa into picasa web albums. The picas web photos  are still on-line but now they are in Google Photos. However finding where to download them is no longer as simple as finding the download to Picasa button. Both the the individual and album views have three vertically arranged dots in the upper right corner, which signify more options. Clicking on these dots brings up an action sub-menu which contains the download feature. It the case of albums  it is a download all. I haven’t found a way to selectively bulk download. If you are using auto-backup the photos will be grouped by date (each date will be its own album)
image    image
Remember :: It is the right time to  Backup those on-line photos now

PS (May 2016) I have discovered you can bulk download everything using google's takeout service

Monday, April 18, 2016

Computer-aided distractions

imageYou just have to walk around any city to see how many people are totally distracted by their personal electronic devices (phones. iPads or watches). Well here is another distraction, CaptionBot, from Microsoft’s cognitive services, its and AI driven softwareBOT that attempts to describe the contents of your photos. Because you can rate its performance, it is probably using you to help train it to recognize objects with a higher precision.

My tests didn’t go so well … no 5 stars for captionBOT

Sunday, April 17, 2016

Not exactly what I wanted to see

If you pass by often you will probably have noticed that I have gone back to posting most of my photos to share on Flickr. There are several reasons for this but mainly it has retained the better sharing features and hasn’t lost focus chasing mobile photo oriented service.

Now it looks like everything Yahoo is up for sale (apparently 40 companies have been asked to submit offers for parts of the yahoo by 11th April, ie last week) Flickr must be one of the few services that will attract competitive bids. However as the Peta Pixel article concludes -

“In the hands of a good owner, Flickr could thrive and live on as a dominant photo sharing option. In the hands of a bad one, it could go the way of MySpace and other once-powerful Internet services that have withered away from neglect and lack of innovation.”

Back Home & What did I learn?

Yesterday, getting home, took over 6 hours driving. It made me realise that there were many potential photo opportunities that I just flashed past. I’m sure if I’d stopped (and had time) I might have found many more. I realised photography is a pedestrian activity.

Angel Hair Dreamcape of The Three Sisters

The second realization (not a new one) was that whilst there are lookouts at scenic spots, the lookout rail is likely to be crowded and the view more a snapshot than a landscape, probably already reproduced in the post cards at the nearby shops. Even more distressing is the number of people with selfie sticks taking photos of themselves blocking the view.Dreamscape Crowd @ Echo PointMany of the more scenic places have narrow winding roads and it is not possible to safely pullover. Yet many of these locations also have wonderful bike or walking trails. So you need to turn off the vehicle direction, get out of you car and use the walking or bike directions on your gps. Better still get a detailed local map, We are lucky, in Australia, to have staffed tourist information centres in most towns. Their local knowledge can help you find those magic places.Luckily Australia Rock is beside the car Park (if you look)

The moral, get out and walk (and allow time to do it)

Friday, April 15, 2016

PhotoFriday :: Blurred .vs. Sharp


Fountain in Norman Lindsay's Springwood Garden


For PhotoFriday‘s topic Blurred

Thursday, April 14, 2016

Size matters

My HP spectre has a 256 GB SSD drive, which seemed ample for me when I bough it. Roughly 50 GB for operating system and software and around 200 GB for photos. Well that was the theory!
In practise after a week on the road I only have only 64 GB free, but my picture folders (and subdirectories) is only a little 104 GB so what has happened to the space. The culprit is mainly windows 10 update between Windows.old, $windows.~bt & SYSTEM.SAV account for 25 GB. I don’t want to deleted these just now in case I have to recover the install version.
There is still another 50 GB that’s hard to fully account for, Windows itself is Approx 16 GB and my software, mainly photo packages, is just under 10 GB, which only explain around half of this.Narooma at duskMy original theory was I would use the system for a week or so in earnest before I set up all the system recovery files so I knew I had a viable system to rely on. I just don’t have much confidence in Windows 10 & Microsoft.

Tuesday, April 12, 2016

Panorama Overload

Three Siters from Echo Point at 18mmThe wide vista here in the Blue mountains are much wider than my widest lens (18mm on crop sensor). Which has never been a serious problem as I just take an overlapping photos and then stitch them later.
This is all well and good until you spend most of the day taking overlapping Images. Then you automatically have a lot of homework and after a decent day working tracks and climbing stairs, its not surprising I fell asleep a few times waiting for the big stitches to be finished, The one below is made from 22 images (hand held) and generated a massive 16,040 By 7,381 pixelsEcho Point PanoramaThis is not the only issue if you have a long stream of similar photos on your film strip or _IGP4307thumbnail grid. It might be difficult to find the start and finish of any series. A neat way to figure out where sequences begin and end is to use photographic punctuation, take a picture of your hand (with fingers out – “take five”) or some close up such as rock texture or flower. These are easy to pick up and it is easier to isolate a set of photos to be stitched. pano15-Edit copyAnother organizational assistance can be gained by using the colour patches to help identity those photos that are part of a sequence versus single images. I use Green to flag potential overlapping images (to be stitched in a panorama) and Yellow to flag bracketed sets which I may late choose to process via HDR. I used to always put images to be stitched in a separate lightroom collection, but with lightroom used less and problems transferring collections I have switched over to using the metadata tag ~AS (for Autostitch).Hargreave's Lookout PanoramaA final tool to help keep your photostream (film strip or thumbnail grid) neat is to use stacking. This is a feature that lets group together similar images and just show one typical image (the analogy is you have collapsed the photos into a stack of images one top of the another. Stacking has wider application to avoid clutter in your photos but is an ideal way to group images to be stitched and just display one photo. You can click on the top of the stack to expand it into the included photos. At the moment I only know of Lightroom and AfterShot Pro offering stacking. Lightroom can even be set up to automatically to stack photos that are taken less than a certain time apart
Leaura Cascades Panorama

Monday, April 11, 2016

Finding a Vista

_IGP4228Being in the Blue Mountains with good weather, school holidays and perhaps just the normal day tourist flow means there are seldom any car parks at key lookouts and probably no standing room at the rail anyway. The spectacular views however don’t just occur at the tourist traps, They are everywhere.To get “private viewing place” is however a challenge because trees and perhaps other hills usually obscure the vista, yet there are many tracks around the cliffs and the occasional a rock ledge opens up with a breath taking view. _IGP4161_IGP4110
_IGP4138However no matter which track you take there will be steps, lots of steps.

Getting into a routine

2016-04-10_16-55-10_ 2.0EvPhotography and Travelling with the new Silver Spectre (HP Spectre x2) has been wonderfully liberating.

Firstly it has speed up the loading of photos off two cameras (via SD cards) and occasionally from my phone. The Spectre only comes with a mirco SD card reader (and the draw for it is jammed anyway) and as I didn’t want to fork out for new Micro SDs and adaptors I instead just bought a single.USB C to USB A connector. Today I loaded 400 image's onto the spetrce from two cards in less than 2 minutes (I still use picasa rather than lightroom). Then I import them from the SSD disk into lightroom (less than 3 minutes for todays 390 photos and 10 videos) which is now lightening fast. Only a few snips into my coffee and already everything is loaded.

Second I have a toshiba USN external backpack style drive. It has a USB 3 connector but an older style USB A plug. So off with the card reader and in with the external drive. A bit of file explorer navigation and I can backup all todays images and videos (only another minute) and plenty of coffee left.

Next is when I scan through the images and cull the bad, ugly and unfortunate ones (only a dozen today). This is an area I have refined yet. Because waiting for lightroom on the laptop was so tediously slow I had got used to just using Aftershot Pro, which is also lightening fast. I can also use picasa and OnOne in browser mode, which is perhaps becoming my favourite. Mainly because I can flick across to lightroom and back painlessly.

The biggest advantage here is I can do all this where ever I like, such as out on a deck watching the sunset (providing ambient light on the screen isn’t too stong). The battery life on the spectre seems to be a couple of days even with a fair bit of post processing at night.

Saturday, April 09, 2016

My thoughts on collecting Photo Reference for Painting

Whilst there is a school of artists that still insist the only landscapes are those painted plein-air. The vast majority will finish their big painting in the comfort of their studio, a few from just sketches but the majority will use photo reference. I love to sketch and paint outdoors but time and the light seldom let you finish a big work outside. However I know that when you try to slavishly copy all the detail in a photo it can make a painting look very flat. Whereas a sketch hurriedly dashed off is more likely to be dynamic and truly capture the sense of the place. So my take on this is to spend time to do a sketch or small composition painting to capture your impressions of the view, and record the important aspect you see. Start with a sketchDo this on site. I like to use a watercolour wash, then add the the detail with a soft pencil afterwards (I’m not filling in a detailed sketch with colour, I’m putting down the area of colour and main composition elements then adding a bit of detail.) Or alternatively I just sketch monochrome in pencil of graphite stick.

So My First Rule of taking reference photos is

Start with a sketch

  • Put your camera down
  • Do some compositional sketch to capture you what you first see and feel. Just the main elements

Waiting for the Sketch to Dry

Whilst I wait for the watercolour wash to dry enough to sketch without damaging the paper. I find this is a good time to pick up the camera and take those reference picture because you now know what is important in the image. The first photo being the obvious, the same view you are painting. This is where a camera with a zoom lens comes in handy because it is likely that your composition will not match a snapshot from your camera. You will probably have to zoom in or out. In my example I have taken two images side by side and then stitched them together, using Austostitch, because my sketch is a little wider than by camera can handle (alternatively I could walk back behind me before I took the scene, assuming their is room and the full scene if not obscured)Lake Pano

However don’t stop there, take at least an additional 4 views, zoomed in (or walking close) to key aspects of detail that will help you finish or zoom out to get the broad feel of the place (you might like to add some slightly out of view detail or subject into your composition). If there are large areas of colour or texture photograph them, they could be the key to visual appeal in your photo.

 Detail of Comorant on postDetail of walkwayDetail of Tree TexturePatern of Ripples & Duck

So My Second Rule of taking reference photos is

Take Five

  • The composition you intention to paint.
  • Plus 4 details zoomed in or out, or concentrating of a key texture or colour

The biggest limitation of trying to copy a photo religiously happens with tonal issues. Whilst modern digital cameras are great they still have limitations with Dynamic Range and photos typically look flat compared with what you saw as you where sketching. There are two approached here that can help here by they may require a upgraded camera.

_IGP3787_IGP3788_IGP3789

The first approach if to take a bracket set of images (many but not all point and shoot cameras can take a set of three EV settings, older camera usually don’t have this built in but there are several camera apps that add this capability. The bracketed set gives you an underexposed version (to focus on the highlight) a normal exposure and an over exposed version (which will give you a lot more details in the shadows). These three images should give you the ability to play with the tonality to suit your composition. If you want to take the tonal representation further you could investigate processing this bracketed set as a HDR image and refine the tonal mapping to bring out the tones as you remember. HDR is an advance post processing technique that requires specialist software but it will give you a lot of freedom adjusting the tonal range._IGP3787_8_9_HDR with simple tone mapping

The second approach is to take RAW format images (probably as well as jpeg). This require software that can handle RAW images (like Lightroom, Aftershop Pro, OnOne or RAW therapy). The advantage here is the raw format records everything recorded by the camera sensor and it is possible to “pull” extra detail out of the shadows and often bring back the highlights. This requires learning how to use this software and extra time to refine the RAW images. However the ability to refine tonality and colour can be wonderfully inspiring. I started to like having the overhanging tree as part of the composition._IGP3780 Post processed in Lightroom

So My Third Rule of photo reference, if you have the technology to do it, is

Why not Take Ten?

  • Use Bracketing
  • Take and Process RAW images